
Still have questions? Let's talk.
For further queries or more information, please get in touch. Let’s continue growing our Nomi community together!
Want to dive in?
We'd love to hear from you.
FAQs
For this, you will have to navigate to Agent Hub>>Settings>>Advisor Info>>Agent Info. As a financial advisor or accountant, updating your details is crucial as the data updated under Agent Info is utilised under different modules for Advisor Information.
The process is simple. Begin by entering your first and last name, followed by the professional body from which you are certified. This ensures that clients know you are a qualified expert in your field. Next, choose the form of business or practice entity that best describes your firm.
If you are registered for Value Added Tax (VAT), indicate it, and enter your VAT number.
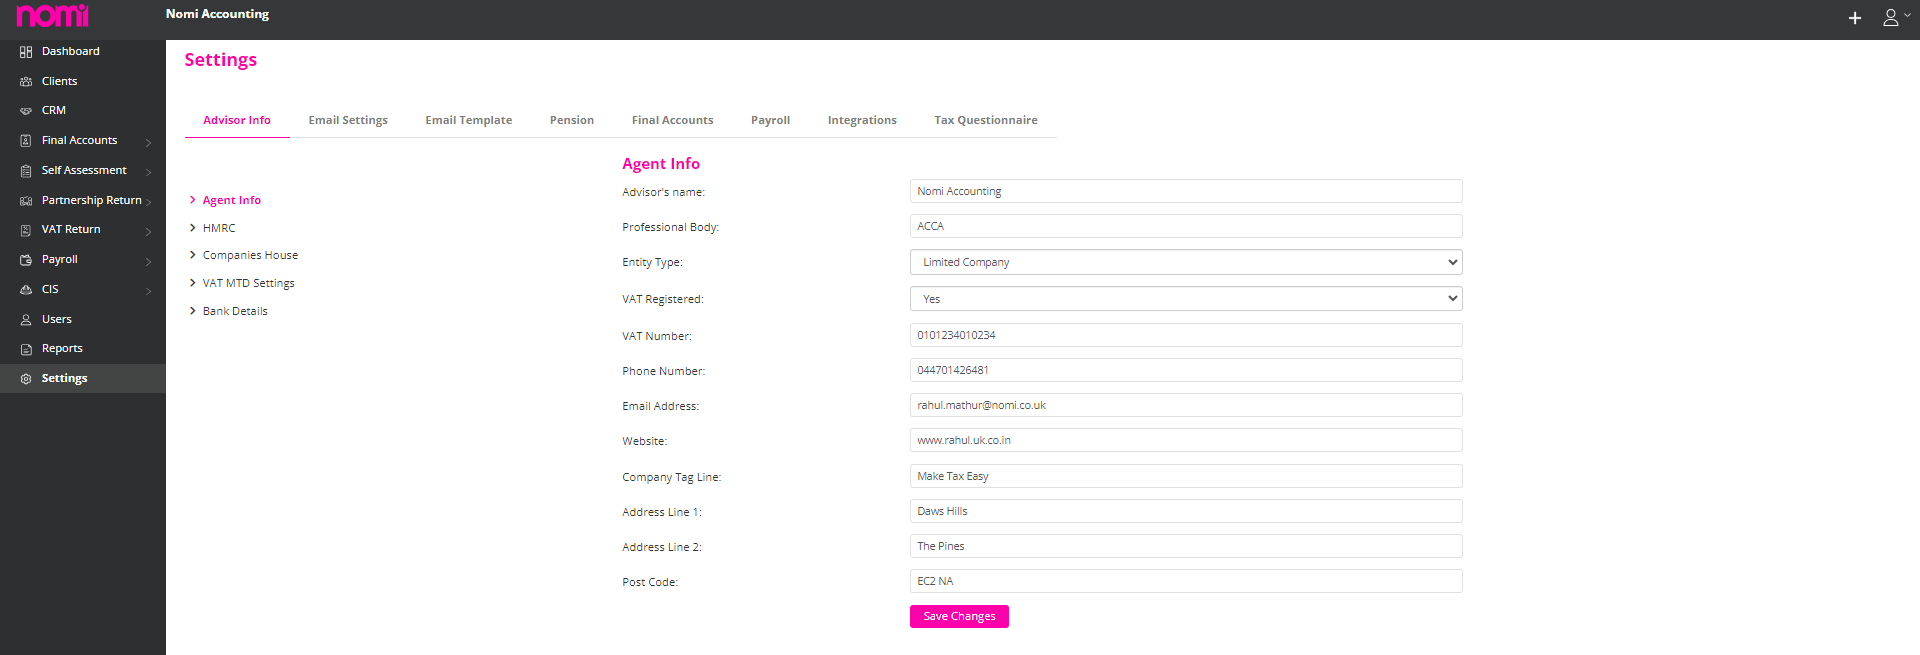
This ensures that clients are aware of your tax status. If you are not registered for VAT, select “no” from the dropdown menu. In addition, make sure to update your contact details, including your phone number, email address, and website.
You can also add a tagline to your practice, which can help you stand out and make a lasting impression. Finally, make sure to update your firm’s address details. Updating your Agent Info is a crucial step in the setup process.
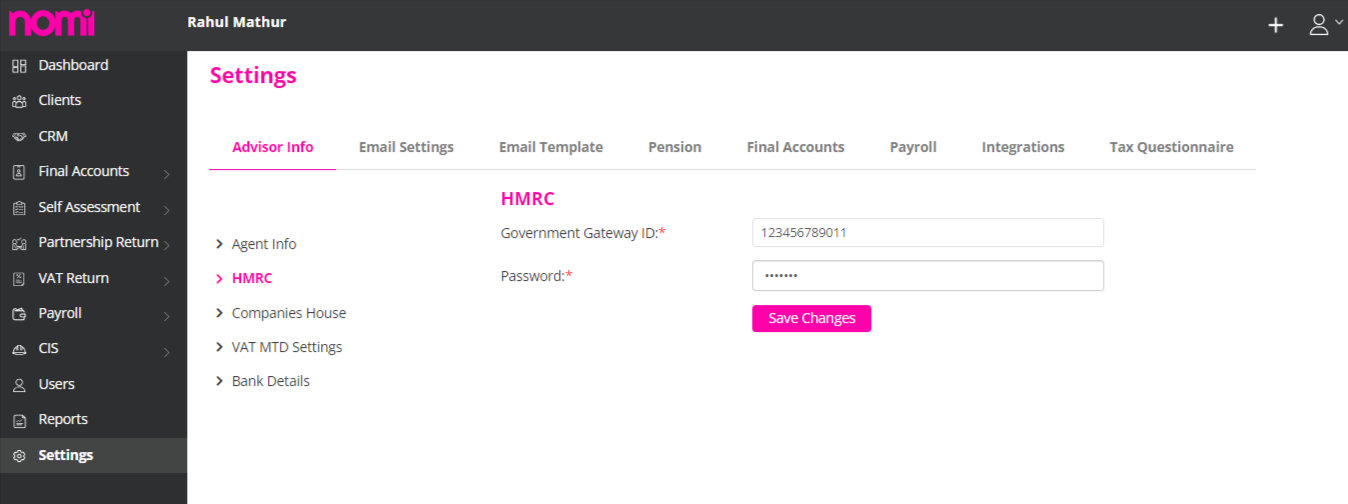
You will have to navigate to Agent Hub>>Settings>>Advisor Info>>HMRC. On this screen, you will have to enter your HMRC Government gateway ID/Username and Password as an Agent. Once it is saved, whenever you are making submissions such as Corporation Tax, RTI, Personal Tax or Partnership Tax Returns on your client’s behalf then these credentials are used for submitting.
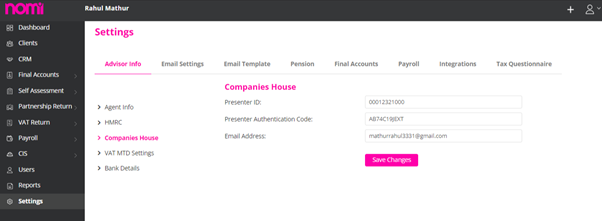
You will have to navigate to Agent Hub>>Settings>>Advisor Info>>Companies House. Please save your Presenter ID and Presenter Authentication code along with the registered email address as you will require this whenever you are filing Accounts to the Companies House.

Please note that you will require these whenever you submit Accounts to Companies House from any third-party software.
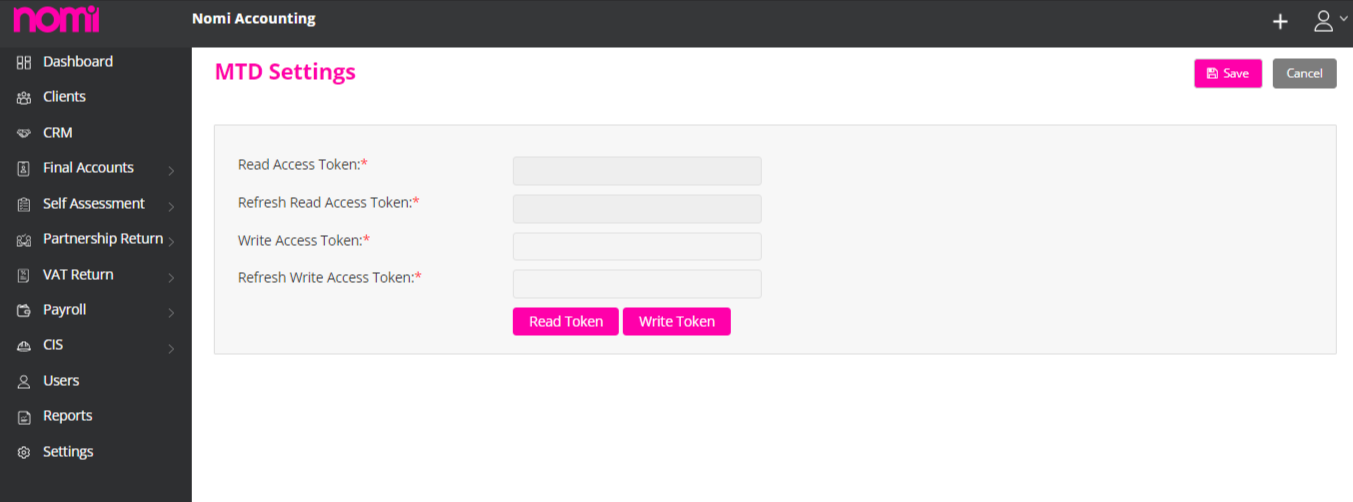
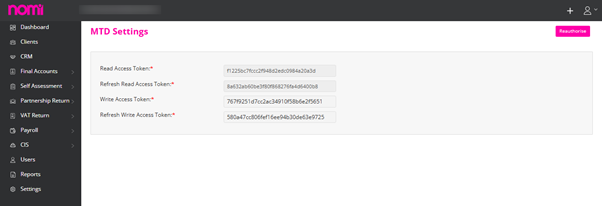
You can update the MTD VAT tokens by navigating to Agent Hub>>Settings>>Advisor Info>>VAT MTD Settings. To submit MTD VAT for your clients you need to generate the tokens on this screen. For this, you will have to click on Read Token, and this will redirect you to the HMRC website where you have to use your Agent Service Account credentials and then log in online after this it will redirect you to this screen and you will have to click on Write Token and follow the process. After completing this process, you will be on this screen and then you have to click on ‘Save’ in the top right corner.
Once the tokens are generated then you are ready with the MTD VAT filing for your clients.
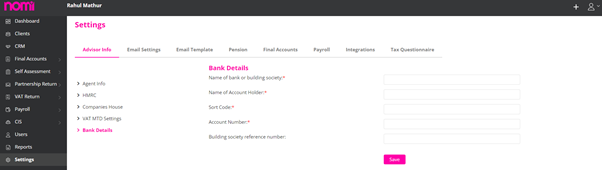
You can save your Bank Details on this screen, and it is applicable in all the relevant sections of different modules. If you are trying to claim any refund on the client’s behalf while filing their Tax Return and you tick the relevant checkbox under refund, then these Bank details will be populated.
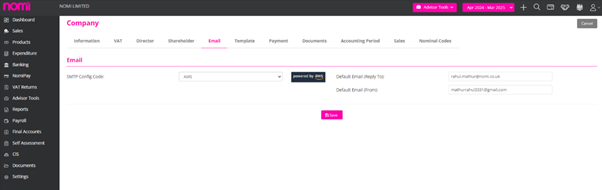
With AWS in place, the email settings are now more streamlined. To update the settings, you can navigate to Agent Hub>>Settings>>Email Settings>>Set the SMTP Config Code to AWS.
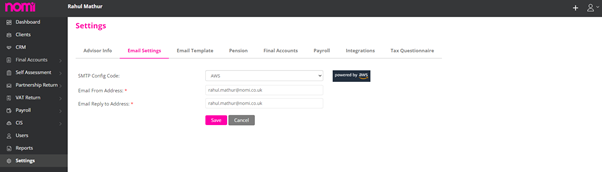
You have to enter the email address under the From and Reply to column and then you will receive an activation link from AWS in your inbox. As you click on the link the email will be activated and you can then send emails in your name through Nomi.
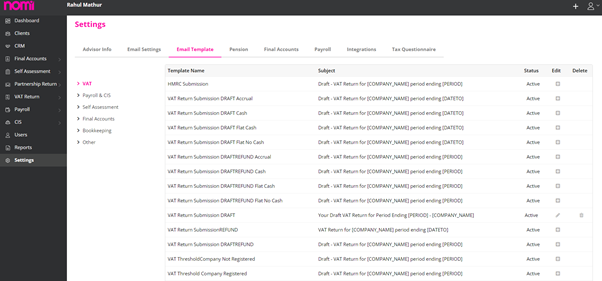
The default Email Templates are offered to you related to different modules. To access them you have to navigate to Agent Hub>>Settings>>Email Template. On this screen, you will find different Email templates related to different Modules. However, these can be customised as per your requirement, and you can use other tags under these templates. Any templates created in Final Accounts/Personal Tax or Partnership get listed under other sections in Email Templates.
Whenever you are setting up the payroll and if your clients have a Pension scheme then you will have to navigate to the Pension option and click on ‘Create Account’. This will create an intermediary ID and after this step, you will be able to set up the pension scheme for your clients. You will have to navigate to Agent Hub>>Settings>>Pension.
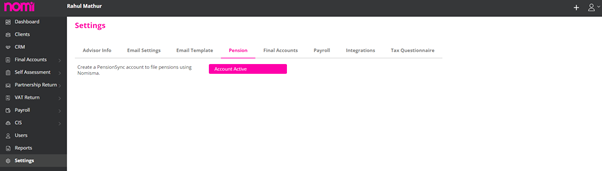
Please note that this has to be done once and not every time you are setting up the pension scheme for your clients.
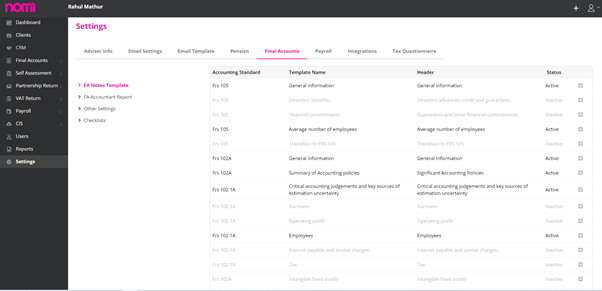
To make any changes you will have to navigate to Agent Hub>>Settings>>Final Accounts>>FA Notes Template. If you make any changes here it will impact all the Companies and you don’t have to make any changes individually.
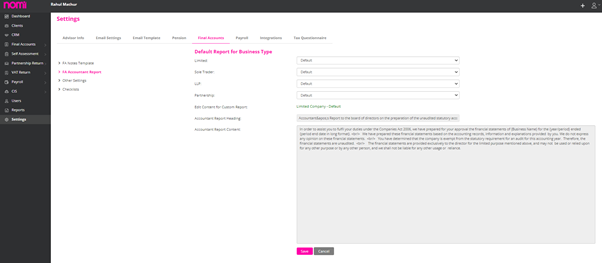
Yes, it is possible and you can do it by navigating to Agent Hub>>Settings>>Final Accounts>>FA Accountant Report. Once you make the changes then it will show under all the Clients in Final Accounts.
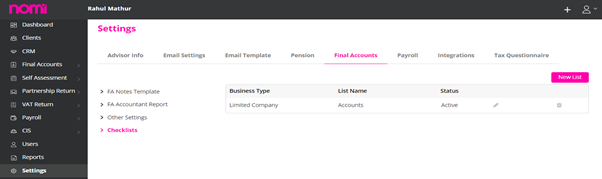
You can create checklists by navigating to Agent Hub>>Settings>>Final Accounts>>Checklists. The checklists you create here will be displayed under Workflows of individual Final Accounts Dashboards of the companies.
These steps can be as follows:
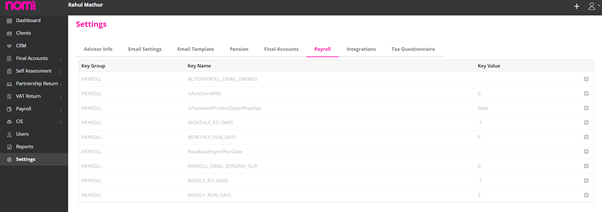
Yes, you can make changes in the Auto Payroll settings by navigating to Agent Hub>>Settings>>Payroll.
This section allows you to make changes in some of the key areas in Payroll and Auto Payroll i.e. Auto Payroll Run date, Password Protected payslips, Auto Payroll email timings etc. So, if you are looking to make any changes then we always recommend that please take the help of the support team.
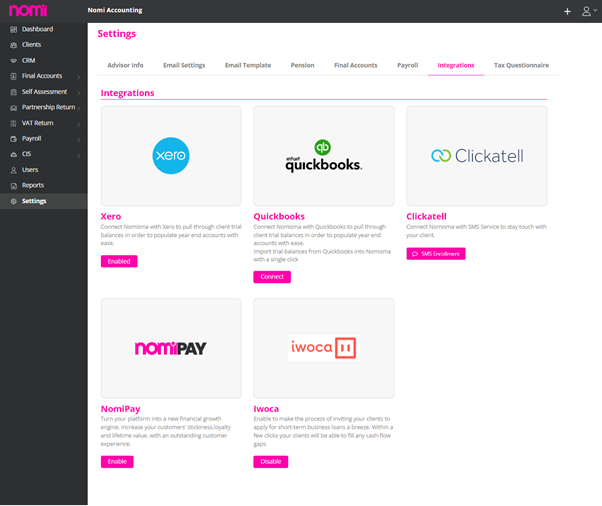
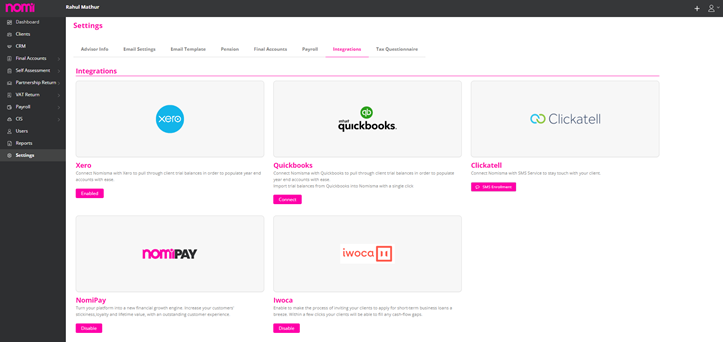
Yes, Nomi is integrated with different platforms viz XERO, QuickBooks, Clickatell, Nomipay and iwoca. To enable these integrations, you will have to navigate to Agent Hub>> Settings>> Integrations.
You can enable the XERO and QB integration in case you are looking to import any trial balances for your clients from these two platforms into Nomi. Clickatell is an SMS service provider and once set correctly you can send SMS from Nomi.
NomiPay is our Payment wallet which helps collect the money from your customers through a ‘Pay Now ‘label on the Invoices customers can then make the payments through Debit/Credit Card, Google Pay, Apple Pay and Internet Banking. It also supports the Direct Debit which then collects the money from the Bank Account of the customers and makes the debt collection a hassle-free process.
We have also offered integration with iwoca which helps your customers to apply for short-term loans directly through Nomi and if the application is selected then the loan is disbursed within 24 hours.
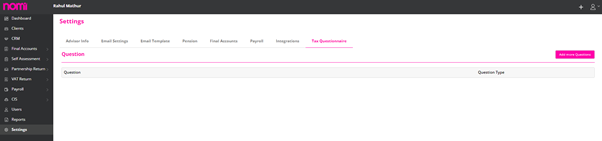
You can add the questions for all of the individuals from the master Tax Questionnaire. 26 questions are offered by default under the tax questionnaire in personal tax returns however if you want to add more questions for all of the individuals then you can do so through the tax questionnaire section. This can be done by navigating to Agent Hub>>Settings>>Tax Questionnaire.
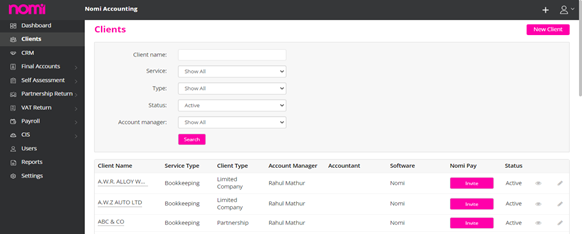
To add a New Client we have to click on the clients’ screen where we have the option to add a ‘New Client’. As you click on this, the new client window will appear. Alternatively, you have a + icon at the top right corner of the screen. It will give you the option of New Client and as you click it will take you to the below screen:

On this screen, you can see six types of clients viz.
Limited Company: Where you can add the company directly from the COHO database and all the details related to the company along with the Director record are imported into Nomi. You can also add manually and if there are many companies then you may import them with the help of a CSV file. The sample file is provided to you, and you can update all the information in that file.
Sole Trader: You can add manually and import them as well. Please note that for Personal tax return purposes, you will have to set up the Sole Trader as an Individual separately.
Partnership: You can first add the Partnership Business details and then add the Partners and allocate the partnership sharing ratio. The import function is also available for partnerships.
Limited Liability Partnership: Add an LLP directly from COHO and it will import the partner information as well.
Public Limited Company: You can add a PLC as well in Nomi.
Self-Assessment: If you are looking to file any Personal Tax returns then you may add the Individual records under self-assessment. However, if there are many individuals then you may import them as well in Nomi with the help of a CSV file.
Note: Any Directors, Sole Traders, Partners, or Individuals have to be set up as a Self-Assessment client as they are not created automatically by Nomi.
You can import all the various client types with the help of sample CSV files provided within the client section.
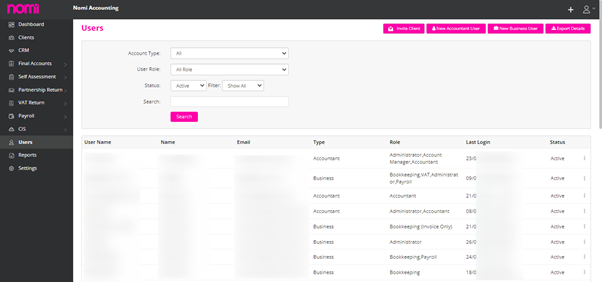
To add the users you need to navigate to the Users section by clicking on Users on the left-hand side.
On this screen, you will see any existing users on the list, and you can add more by clicking on the labels provided in the top right corner. You can add two types of users i.e. Accountant and Business.
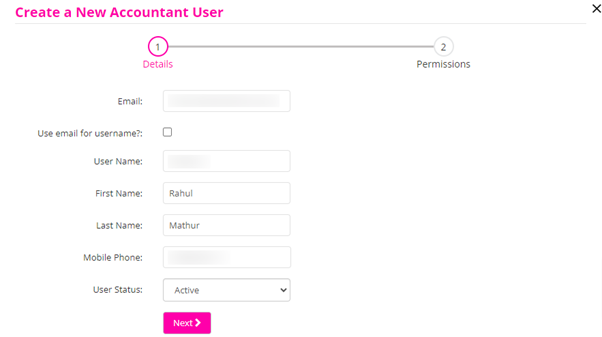
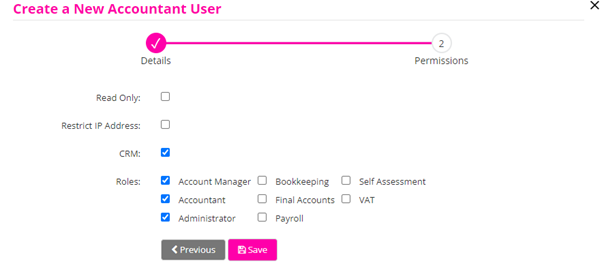
New Accountant User
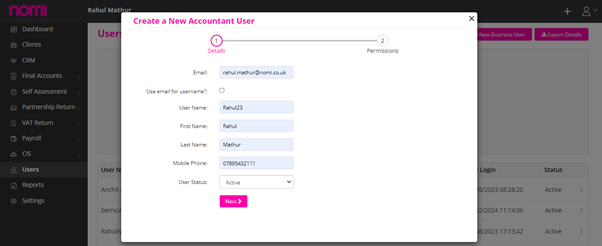
You can add more users i.e. giving access to team members. For this, you can set them up as Accountant users and then give them access to relevant modules. You can restrict their access to a particular IP. Whenever you create a user, the software will send them a login email with a temporary password. They can then login online and then change the password.
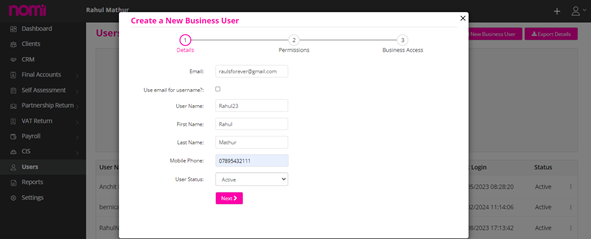
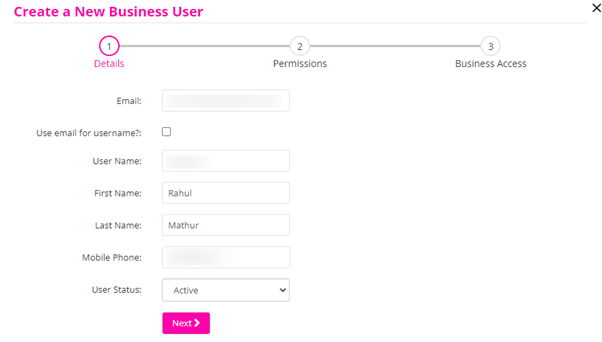
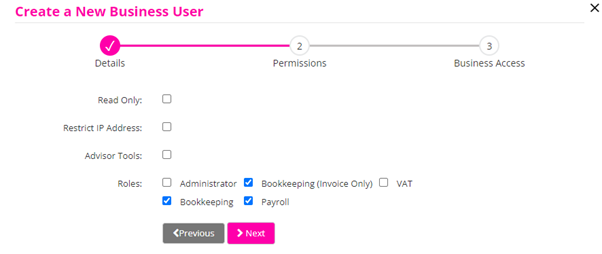
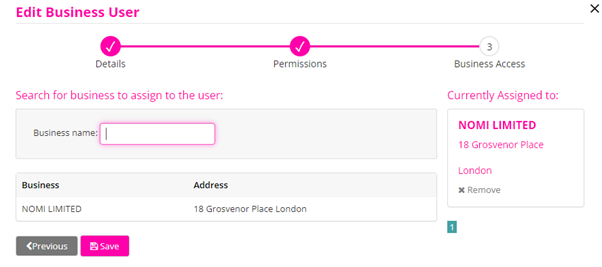
Add New Business User
Invite Client
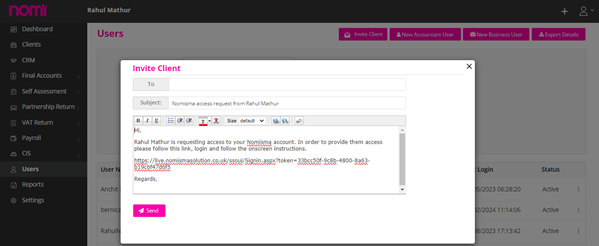
You can invite the client and get access to their Nomi Account. This will help you get access to the bookkeeping and payroll modules of the business user.
To enable Invoice Discount in Nomi:
To enable Invoice Retention in Nomi:
To enable Multi-Currency support in Nomi:
To enable and set the CIS rate for Sales Invoices in Nomi, follow these steps:
This will apply the selected CIS deduction rate to your sales invoices as required.
To activate Subcontractor CIS in Nomi, follow these steps:
Once activated, you can begin managing CIS deductions for subcontractors on sales invoices.
To enable Due Date Reminders for invoices in Nomi, follow these steps:
Once enabled, Nomi will automatically send reminders to clients when an invoice due date is approaching.
To enable Payment Reminders in Nomi, follow these steps:
This setting will automatically send reminders to clients at the specified intervals after an invoice’s due date.
To enable Auto Email for all invoices in Nomi, follow these steps:
Once enabled, Nomi will automatically send invoices to clients via email as soon as they are created.
When enabled, whenever an invoice is created in relation to a customer that has an email address, the invoice will be emailed to them automatically upon creation.
You can’t email invoices unless SMTP settings are set up for the client.
SMTP setup is required to send emails from the bookkeeping module.
To configure or update SMTP settings, follow these steps:
Note: If you are using your own (self) SMTP configuration, the SMTP password should be the app-specific password generated from your email provider, not your regular email login password.
To set up Gmail SMTP with an App Password in Nomi, follow the steps below:
Step 1 – Get the App Password from Gmail:
Step 2 – Add to Nomi:
Once configured, you should be able to send emails (e.g., invoices) successfully.
To generate and use an App Password for Office 365, follow the steps below:
Step 1 – Get the App Password from Office 365:
Note: App Passwords are required when using applications (like SMTP) that do not support multi-factor authentication (MFA).
Step 2 – Add to Nomi:
To configure AWS as your email provider in Nomi, follow these steps:
Step-by-Step Guide to Use AWS Settings
Once the setup and verification are complete, you will be able to send emails.
To get the emails to work, you must update the SMTP settings at the client level in Nomi.
To configure the email settings in Nomi, follow these steps:
Nomi Bookkeeping is linked with Final Accounts/Payroll/CIS/Personal Tax Return. The linking is automatic however you may follow the below steps under various modules:
Bookkeeping Integration with Final Accounts
Now I will show you how you can save your admin time with the help of integration.
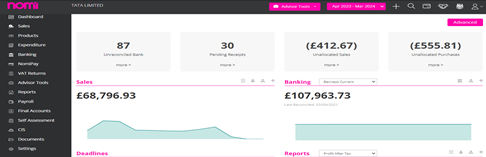
As I mentioned earlier, all the modules are well integrated and data flows from one module to another. As you can see the Turnover i.e. Sales figure is 68,796.93 for Bookkeeping for the Accounting Period 2023-2024 the same data is updated on the Final accounts as well. Even if you post an Invoice Journal or any other transaction in bookkeeping, on a Real-time basis this data will be updated into the Final Accounts Module.
Final Accounts Dashboard
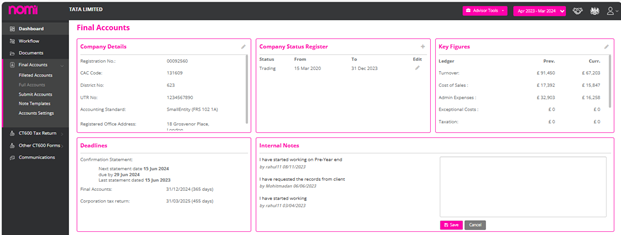
To check this, we click on Final Accounts on the left-hand side, and this redirects us to the Final Accounts Dashboard. Here we must click again on the left panel on Full Accounts. On this screen, we can see the Turnover figure is the same as what is showing under the Bookkeeping Module.
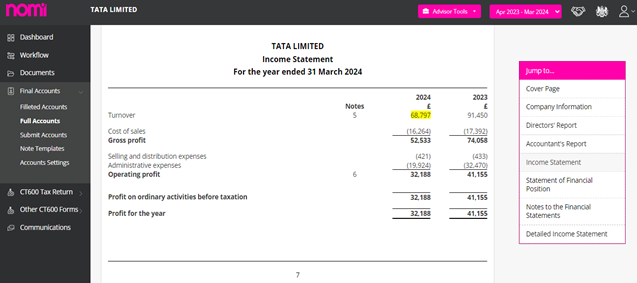
As we can observe, the Turnover Figure is the same as in the Bookkeeping. Another good feature is that it automatically rounds off the figures if required.
If you raise an Invoice which then has an impact on the Turnover will also be reflected in Final Accounts. This frees you from the hassle of checking the Reports such as Trial Balance, Profit and Loss, and Balance Sheet and matching the data again and again in Final Accounts. This improves productivity and reduces errors, time, and effort in preparing the Final Accounts.
Bookkeeping Integration with Payroll
The payroll Module is integrated with the Bookkeeping Module. This allows you to get all the information on Employee Salary Expenses directly into the Bookkeeping Module, no manual Journal posting is required. In case you are doing bookkeeping in some other software then also you can extract the Payroll Journal and import the same.
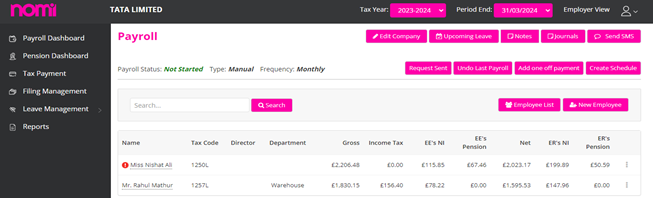
As and when you Run Payroll in the payroll module the Journal is posted. You can check this by clicking on the Journals tab available on the Payroll Dashboard.
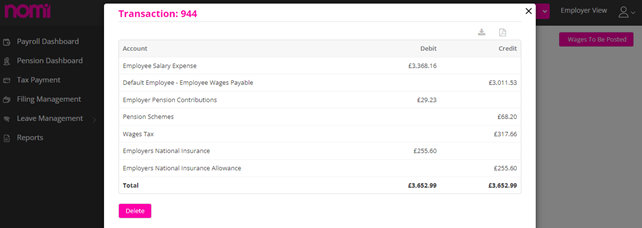
The Nominal Ledger report under the Bookkeeping shows the posting of all the payroll entries. Right now, we are looking at Employee Salary Expense:

Here we can see transaction number 944 for Employee Salary Expense which has the same amount in the Payroll and Bookkeeping modules.
How to integrate Directors from Payroll to Bookkeeping
To post the journal entries in the correct nominal account, we suggest linking the directors and shareholders in Payroll with Directors and Shareholders in the Bookkeeping module.
For this, Click “Edit Company” from the Payroll Dashboard screen, click Payroll Details, and Click the “Bookkeeping Links” option.
From this option, you will be able to link directors correctly and Nomi will post the Journals in BK from Payroll in the correct nominal accounts.
Bookkeeping to CIS Integration
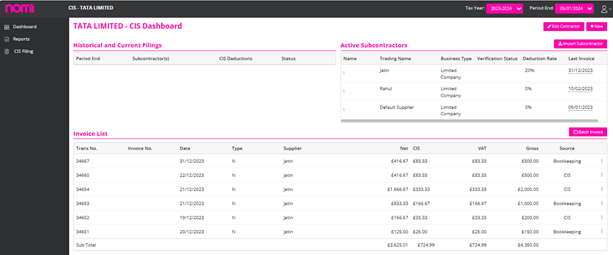
The next integration is between Bookkeeping and CIS. If you raise any Subcontractor Invoices in Bookkeeping, it will show on CIS and the Invoices will be ready to be filed for the CIS300 Monthly submission.
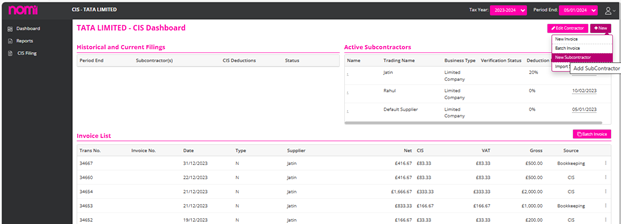
Raise a New Subcontractor Bill
Now we will create a Subcontractor Bill and the same will be listed under the CIS record of this company.
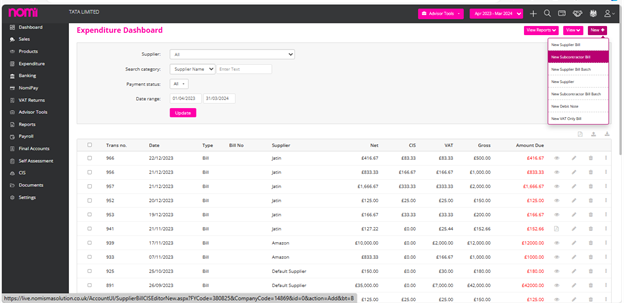
Point your mouse on New+ and then click on Subcontractor Bill. This will redirect you to the below screen. Before this, you need to make sure that the Suppliers are being marked as registered for CIS. This you can update under View>>Supplier list>>Edit>>Registered for CIS.
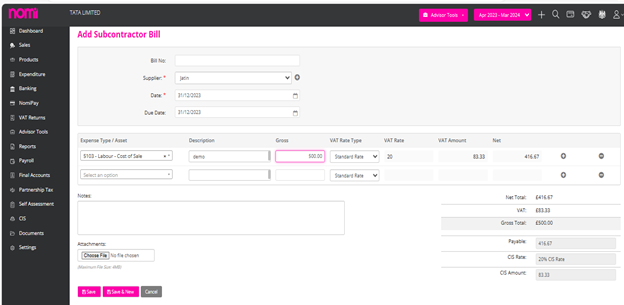
Here you have to select the Supplier who is registered for CIS and select the nominal 5103- Labour Cost of Sale. After this, you can update the rest of the data and see that there is a CIS deduction based on the verified CIS Deduction rate. This Invoice is reflected in CIS and then you may proceed further with the filing of the CIS 300 Monthly return.
If you are looking to add a subcontractor and verify them with HMRC then you may do so from the CIS Module as well.
Bookkeeping to Self-Assessment
Under Bookkeeping, you can raise the Dividend Vouchers for the Directors of that company and then whenever you are filing the SA100, you can link the dividend distributed to the directors from BK to SA.
You will have to first Issue the Dividends and after this navigate to the Director’s SA100 record.
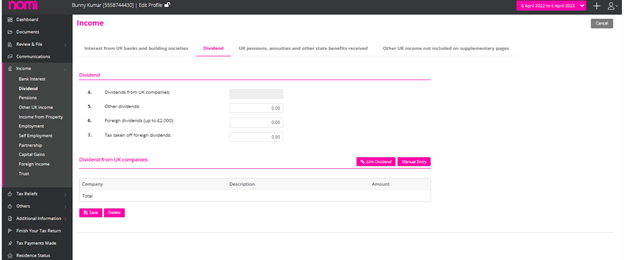
On the SA100 you can click on Dividends available on the left panel under the Income section.

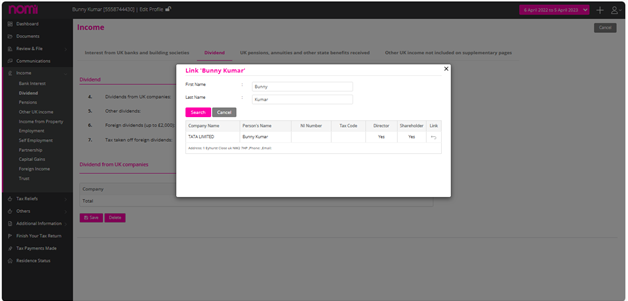
This takes you to the dividend screen where you can click on Link Dividends and a pop-up will appear.
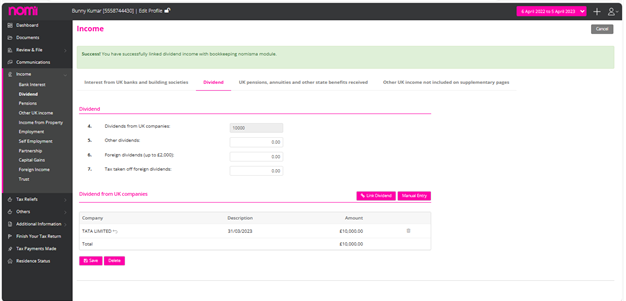
On the pop-up below, it will show the name of the director to whom the dividend has been issued. You have to just click on the link and all the information related to dividends is fetched into Nomi SA100 from the Bookkeeping Module.
As soon as you link the dividend then it gives you a message and the records are also linked with the Bookkeeping Module.
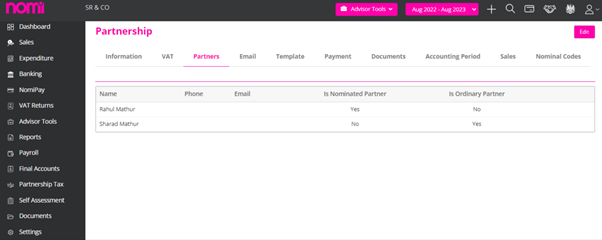
Whenever you add a Partnership record, you will have to allocate the profit-sharing ratio through the Bookkeeping/Final Accounts>>Settings>>Partners. In the top right corner, click on the edit label to access two options: Profit/Loss Ratio(s) and Add Partners.
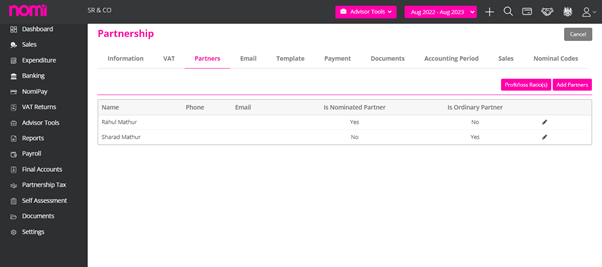
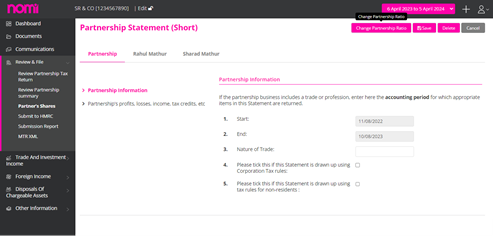
Click on Profit/Loss to redirect to the Partners – Profit/(loss) Ratios screen, where you then click on New Ratios(s). A Profit/(loss) Ratio Adjustment pop-up will appear, prompting you to enter the New Effective start date, which is the partnership start date, and then enter the Profit/Loss Ratios. Click on save to complete the process. Alternatively, you can also click on ‘Change Partnership Ratio’ by navigating to Partnership Tax return>>Review & File>>Partner’s Shares>>Edit (top right corner)>>Change Partnership Ratio. This will redirect you to the Partnership Screen where the profits can be allocated.
This functionality is under enhancement, however there is a workaround for this. You can post a Journal on the start date of the next accounting period by reversing all the balance sheet items.
You can easily update your HMRC/Companies House credentials by visiting Agent HUB and clicking on Settings, then selecting Advisor Info. From there, you can manage your HMRC Government Gateway Credentials and update your Username and Password as an Agent.

Additionally, under the HMRC tab, you will find the Companies House section where you can conveniently update the Presenter ID, Presenter Authentication Code, and your email address for correspondence with Companies House. It’s crucial to have the Presenter ID and Presenter Authentication handy when filing Accounts through Nomi or any third-party software.
You will have to first update the MTD VAT Tokens at the agent level which will allow you to submit MTD VAT for your customers. To generate the tokens, you need to navigate to Agent Hub>>Settings>>VAT MTD Settings and then click on Read Token.
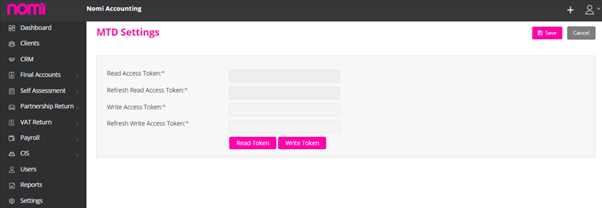
This redirects you to the government website where you must use Agent Service Account credentials and not the usual Agent Login of HMRC. You will have to update a few things and then you will be redirected to Nomi again on the same screen.
After this, you will have to click on Write token and follow the process and again you will be redirected to the MTD Settings page where you have to then click on ‘Save’ in the top right corner. The MTD tokens are generated, and you can make the submissions using your MTD settings.

The next step is to update the client’s VAT Details. For this, you will have to navigate to Bookkeeping>> VAT Returns>> VAT Settings. Then tick the checkbox ‘VAT Registered’, enter the VAT Registration Number, Submission frequency of the VAT return and the registration date.
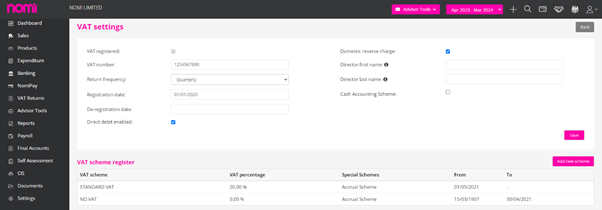
You can also update the VAT Type under the VAT Scheme Register.
Here you have to click on the ‘Add New Scheme” label in the top right corner and then add the scheme i.e. Standard Rate VAT. Once you add the scheme you will find the VAT dropdown while adding the Invoices.
In case you want to set up at the client level then you can navigate to Bookkeeping>>VAT Returns>>Setup MTD. This will redirect you to a screen where you can set up the MTD at the Company Level as well as the Agent level.
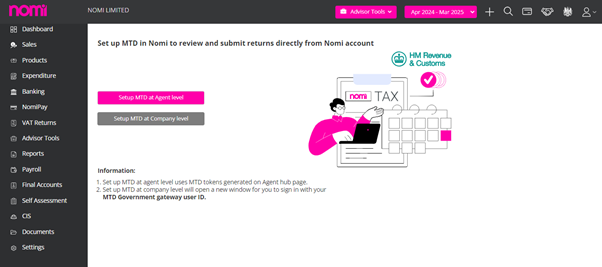
If you have already generated the MTD Tokens at Agent level, then you need to click on Setup MTD at Agent Level and it will redirect you to a screen where you need to tick the checkbox ‘Confirm to Create Setting’ and then click on Setup MTD.
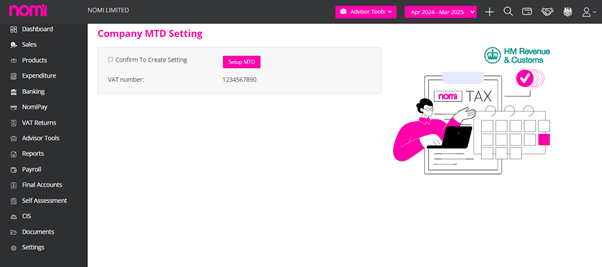
The VAT number details are fetched from the VAT details tab as mentioned earlier.
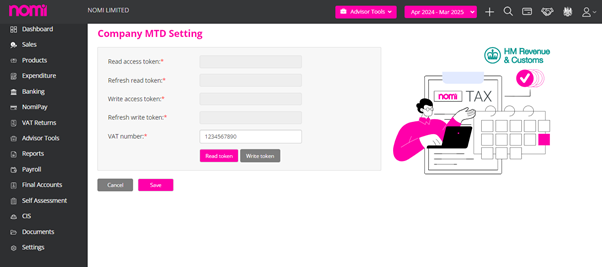
If you are trying to make submissions at the Company Level, then it will take you to a screen where you have to set up MTD tokens using the client’s credentials. This process will be the same as explained above.
To create a Business and Accountant User, you must click on the Users option on the left vertical pane in Agent HUB. Clicking on this will give you the labels in the top right corner as ‘New Accountant User and New Business User.
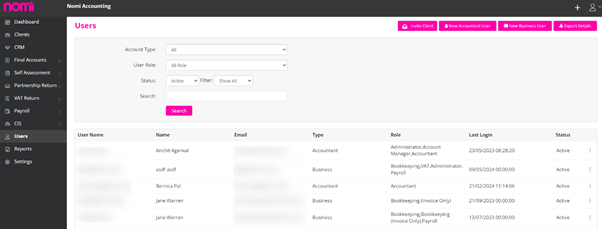
If you want to give access to your team members, then you will have to set them up as Accountant Users. If you want to give access to your clients, then you may set them up as Business Users and give access to bookkeeping where they can record Invoices and Payroll so that they can approve the payroll, leaves, and expenses and also feed in the No. of hours worked by the employees although they can never Run the Payroll.
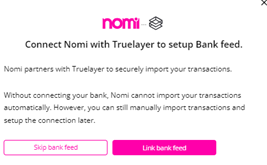
You can set up a Bank Feed under the Bookkeeping Module. You can click on Banking>>New>>Bank Account. It will show a pop-up on the screen, and you can click on Link Bank Feeds.


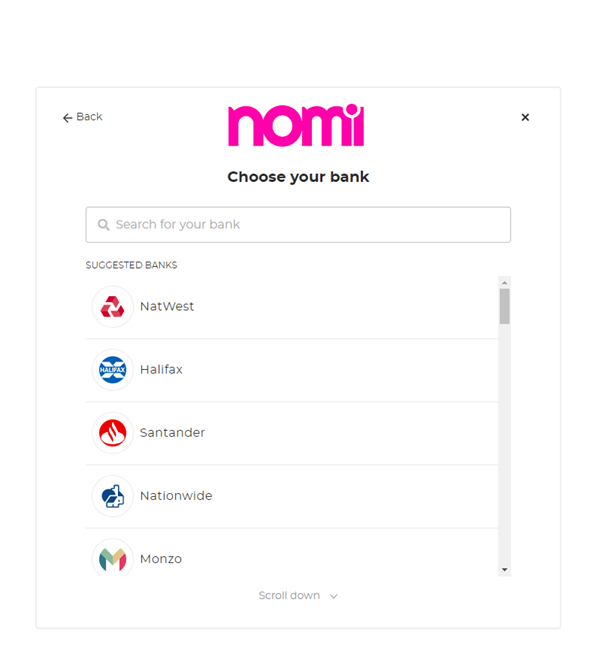
It will redirect you to the ‘True layer’ website where you can search the bank and then click on the bank name after this you will be redirected to connect to your account screen, and you have to click on ‘Allow’.
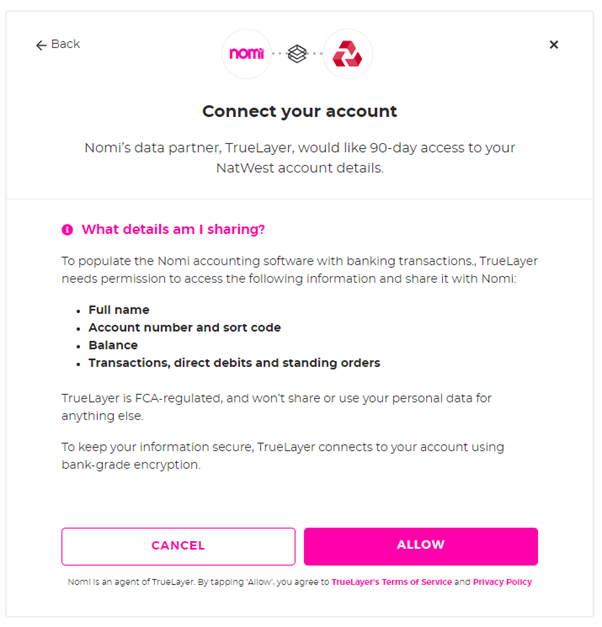
As you click on allow, it takes you to the Bank Website where you can log in online and set up the Bank feed.
Once the Bank feed is set all the transactions will show under Unreconciled Transactions in the Banking Section.
To set up Nomipay you will have to enable the Nomipay integration by navigating to Agent Hub>>Settings>>Integrations>>Nomipay>>Click on Enable. As you click on Enable a message ‘Success! Data saved successfully will be displayed.
After this, you can click on the Clients menu on the left side, and you will see that the NomiPay option is there, and you can Invite your clients for the NomiPay setup.
However, you should navigate to the Bookkeeping record and a pop-up will appear that prompts you to start the Nomipay setup.
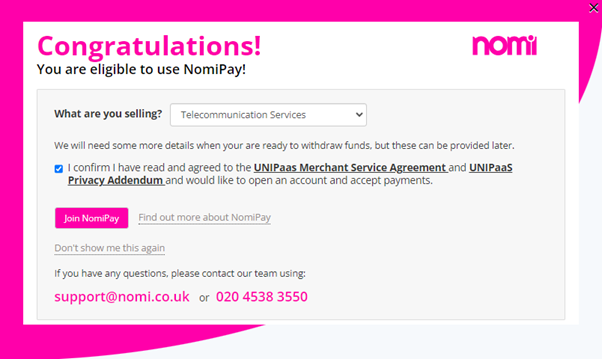
Here the user has to select the nature of Business from the dropdown and then tick the Terms and Conditions checkbox. Then they have to click on ‘Join NomiPay’ after this a Nomipay setup invite is sent to the user’s email which is updated under the General information. In the email, they get a link ‘Register for NomiPay Now’
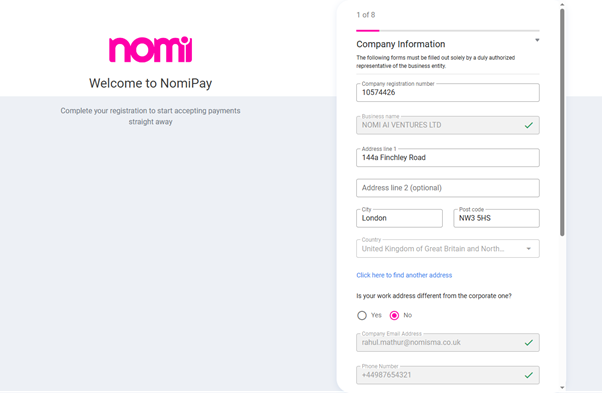
As you click on Register for NomiPay, it takes you to the below screen where you have to follow the 8-step process to set up Nomipay.
While following the process there are quite a few mandatory fields, and you will have to fill in the information.
After the successful setup, a Pay Now label will appear on the invoices. You can also set up a Direct Debit through Nomipay which will collect the money automatically from the customer’s account.
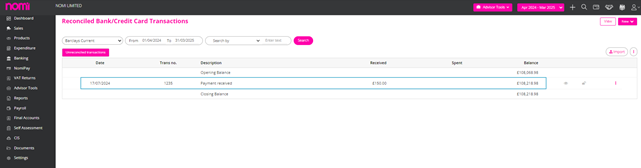
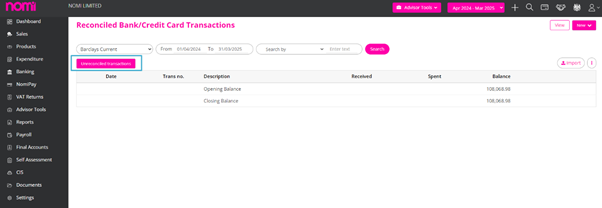
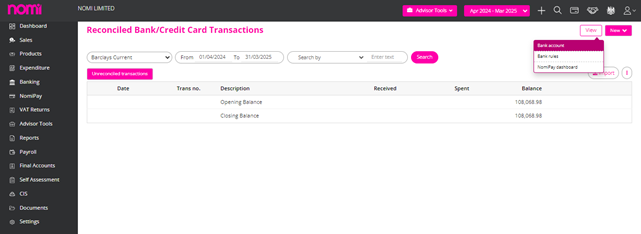
To view the reconciled transactions you can navigate to Bookkeeping >> Advisor Tools>> Reconciliation>> View Reconciled (Top Right Corner).
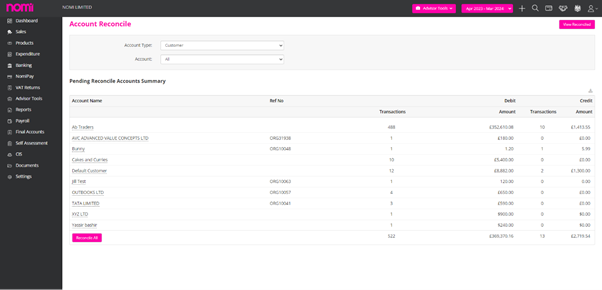
As you click on View Reconciled it redirects you to Reconciled Transactions page. Here you have to first select the Account Type from the dropdown and let’s say you have selected the customer account then it will show you all the reconciled transactions for all the customers. However, you can also view the reconciled transactions for a particular customer from the Account dropdown. You can also use different filter options.

To undo the reconciliation, you must select the transaction and then click ‘Undo Reconcile’. Alternatively, you can navigate to Reports>>General/Nominal Ledger Report>>Select the
You can integrate Nomi with Xero and QuickBooks and fetch the trial balance into Nomi. For this, you will have to navigate to Agent Hub>>Settings>>Integrations>>Enable Xero and Connect QuickBooks integration. Post this you will have to navigate to Client List>>Bookkeeping/Final Accounts>>Advisor Tools>>Import Trial Balance/Trial Balance Entry>>Upload Trial Balance>>Xero/Quick Books instead of CSV. As you will set this to Xero, it will give you an option of Import.
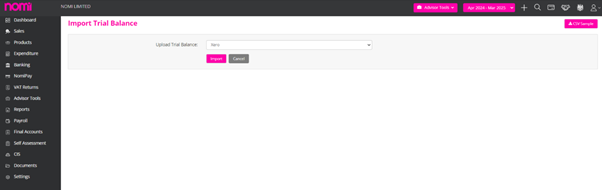
As you click on Import it will take you to the Xero website where you will have to log in and then you can choose an organisation. Once this process is completed the Trial Balance is imported into Nomi.
Few of the Nominals are mapped however you can do the Nominal mapping manually as well.
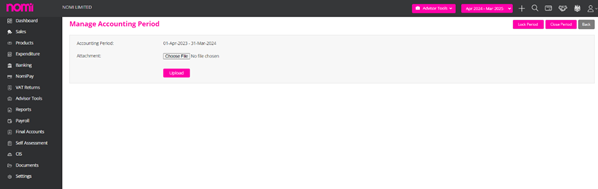
You can navigate to Bookkeeping>>Settings>>Accounting Period or if the Final Accounts service is active then you get restricted access to Bookkeeping and then you have to navigate the same way i.e. Settings>>Accounting Period>>Edit. On the below screen, you need to click on the Pencil icon to Lock or Close the Accounting period. If they are locked and closed, then you can unlock them from the same screen.

To access the Reauthorize option, simply navigate to Agent Hub, then proceed to Settings, followed by Advisor Info, and finally VAT MTD Settings. If you have already generated the MTD VAT Tokens, you will find the Reauthorize label in the top right corner of the screen. In case you haven’t, the screen will appear blank.
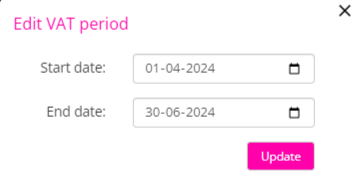
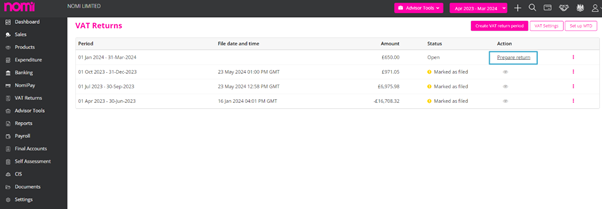
To edit a VAT Period, you will need to go to Bookkeeping, then VAT Returns, and click on the three dots on the right side of the screen as indicated in the screenshot.
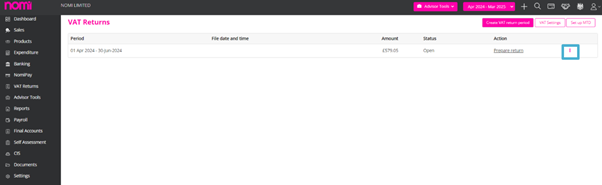
You will see an option for ‘Edit VAT Period’. Upon clicking this, a pop-up will appear, allowing you to change the Start Date and End Date.
To change the VAT you will have to access the VAT Returns section in Bookkeeping. On this screen, the VAT settings label is provided on the top right corner.
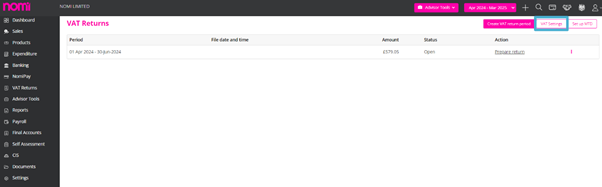
As you click on this it will redirect you to the VAT Settings Screen. Here you can click on the ‘Add Scheme’ label and a pop-up will appear where you can add the Standard VAT scheme.

It also gives you the options for Flat Rate VAT and NO VAT however when you add the Standard VAT then it gives you all the different types of VAT as listed below
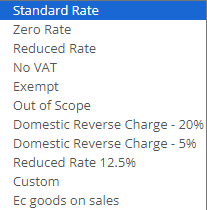
The VAT Rate type will usually not show by default because the software does not know whether the Client is registered for VAT or not. For this, you will have to update the VAT settings under VAT return in Bookkeeping and then add the Standard scheme. This will in turn show the VAT types under different sections.
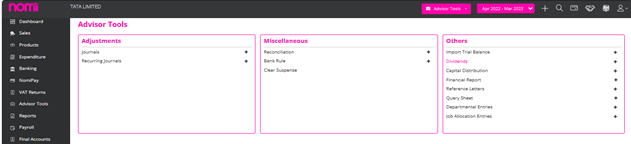
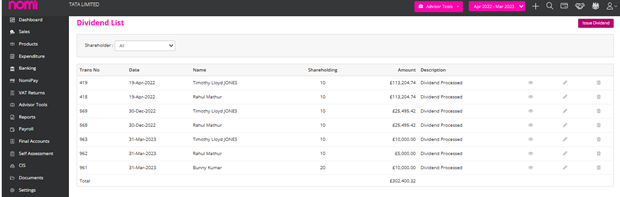
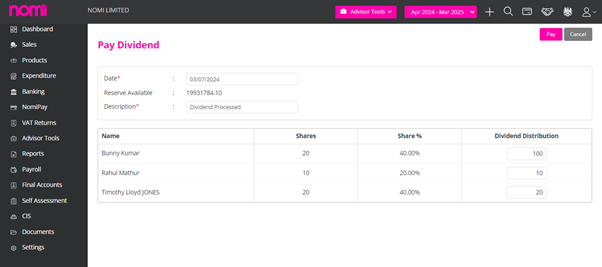
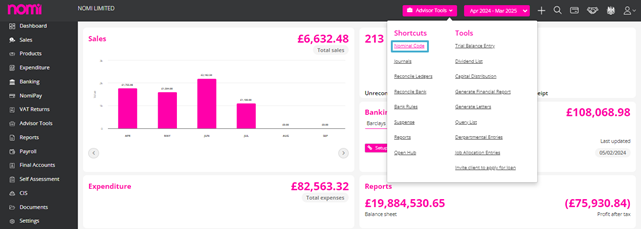
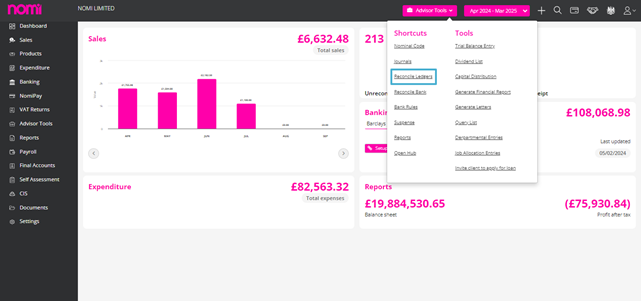
To process the dividends you have to make sure that sufficient reserves are available within the Bookkeeping record. You can check the same under Bookkeeping>>Reports>>Balance Sheet. After this, you can navigate to Advisor Tools>>Dividends>>Dividend List>>Click on Issue Dividend.
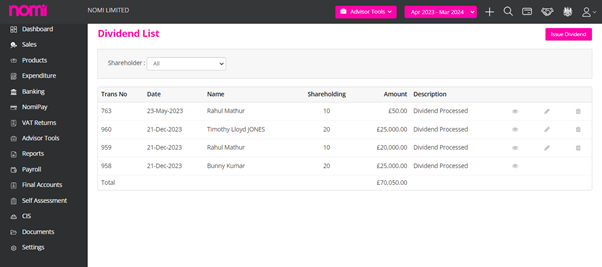
This will redirect you to the Pay Dividend screen where it will show you the available reserves and the Dividend distribution based on shareholding. You may allocate the dividend amount under ‘Dividend Distribution’ manually as well. And then click on Pay.
It will redirect you to the Dividend List and show the number of dividends processed. To view the Dividend Voucher, you have to click on the preview option and it will open the dividend voucher.

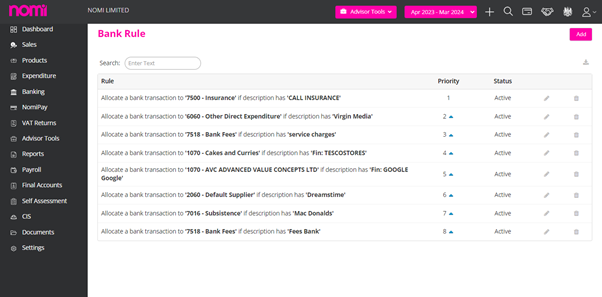
To Run Bank Rules you will have to first set them up. For this proceed to Advisor Tools>>Bank Rules. On this screen, you will have to click on ‘Add’ and an Add Bank rule pop-up will appear.
Here you can set the bank rules by selecting a condition from the dropdown and then if you are applying the bank rule based on the Bank Statement having certain text, you can enter a description, Nominal Code, and VAT Rate and Apply to i.e. Received, Spent or both.
Apart from this, you can also set the Bank rules based on the below options

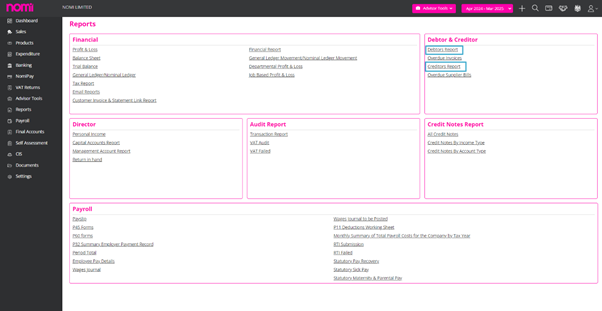
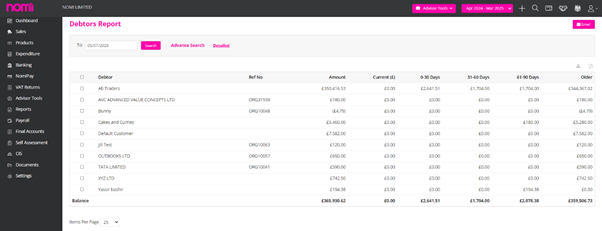
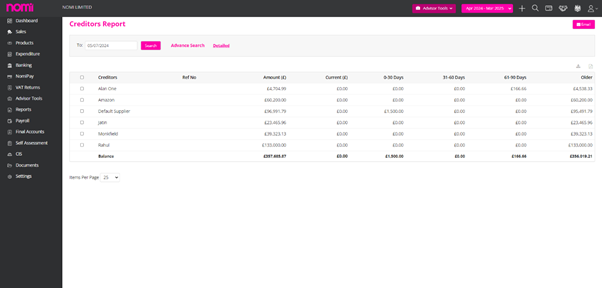
To check the Outstanding Debtors and Creditors, you will have to navigate to Bookkeeping>>Reports>>Debtor& Creditor.
To enable the Pay Now button you will have to first enable the Nomipay integration Under Agent Settings>>Integration. After this, you have to set up Nomipay at the client level in the Bookkeeping post and a Pay Now Label will appear on the Invoices.
To email Invoices we have to navigate to Bookkeeping>>Sales>>Click on the email icon available at the right side of the screen and email the Invoice to the customer.
As you click on the email icon a pop-up will appear:

Select the relevant email template and select the email address to whom you want to send the Invoice.
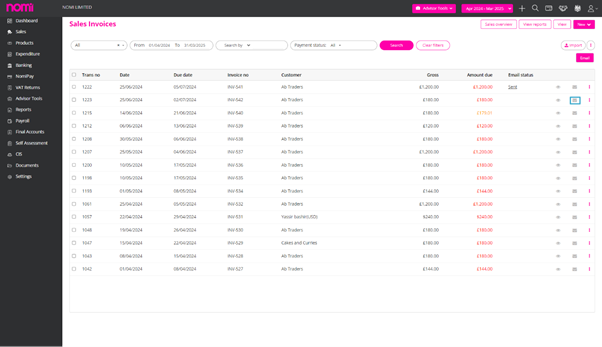
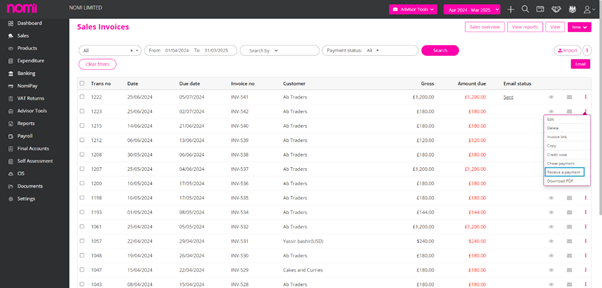
To mark the Invoices as paid you can navigate to Bookkeeping>>Sales>>Click on three dots>>Receive a payment.
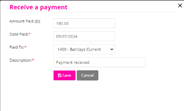
As you click on this a Receive a payment pop-up will appear where you can select the Bank and enter the amount received. This will in turn create an entry with the paid amount on the Bank Dashboard.
This will be a Manual Task and we recommend setting up Bank Feeds. This will pull through all the transactions into Nomi, you can then do the Bank Reconciliation and mark the Invoice as paid.
For this, you have to set up the Bank Feeds and then navigate to Banking>>Unreconciled Transactions.
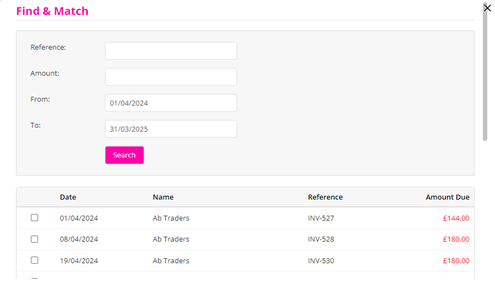
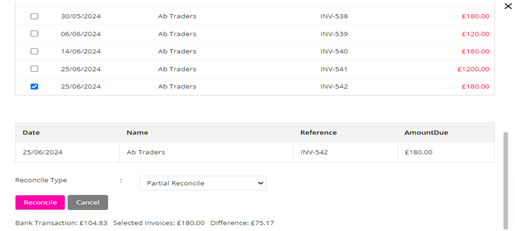
Here you can allocate the transaction to a customer account and click on Find & Match. It will then list all the Invoices in a pop-up.
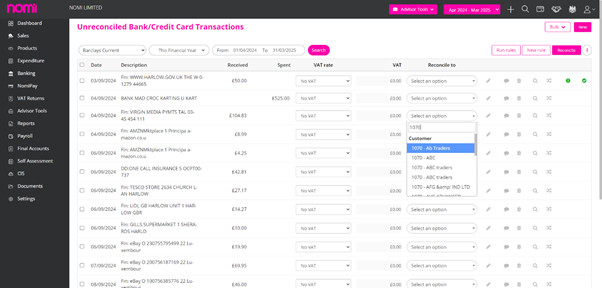
You can then select the Invoice and complete the reconciliation.
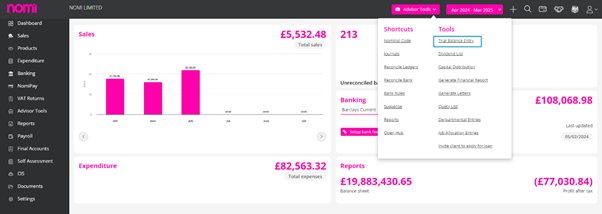
To import a Trail Balance on Nomi go to the Advisor Tools drop-down menu at the top of the client’s Bookkeeping dashboard and then select Trial Balance Entry.
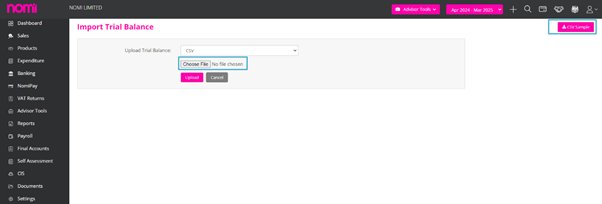
Click the CSV Sample button in the top right-hand corner to download the CSV template that will need to be populated and then be uploaded by first clicking the Choose File button, select the correct CSV file and then click Upload.

There will be three columns within the CSV file: Ledger Code, Account Name and Balance. All Debits will appear as positive figures and all Credits will appear as negative figures within the Balance column. The ledger code can be any code that a previous system may have used but these will be mapped after being uploaded to Nomi.
You can also upload your own CSV file with a Ledger Code, Description, Debit and Credit columns and the system will be able to map these to the Trial Balance.
Once the Trial Balance CSV file has been uploaded, map the CSV columns by selecting the correct options from the drop-down options under the Mapped With section to match with those on the CSV file.
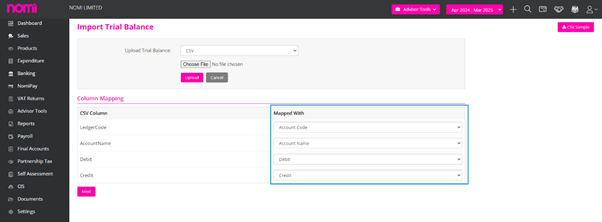
Then map the Account Codes by selecting the correct option from the drop-down menu under Account Code. Check that the correct Posting Date has been entered and then once all the mapping has been completed, click the Import button. Nomi’s Trial Balance Memory feature will automatically recognise and apply the correct account codes for any similar future Trial Balance imports for a particular client.
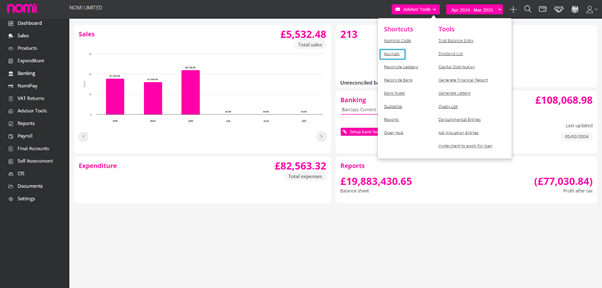
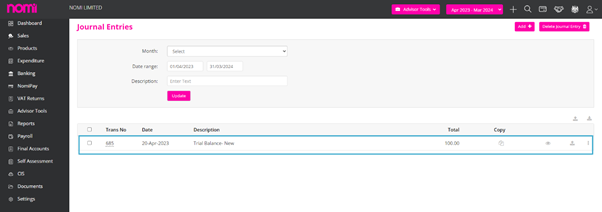
To locate the newly imported Trial Balance, go to Advisor Tools at the top of the page and select Journals. You are then able to make a copy, add any additional documents, edit or delete the Trial Balance within this page.

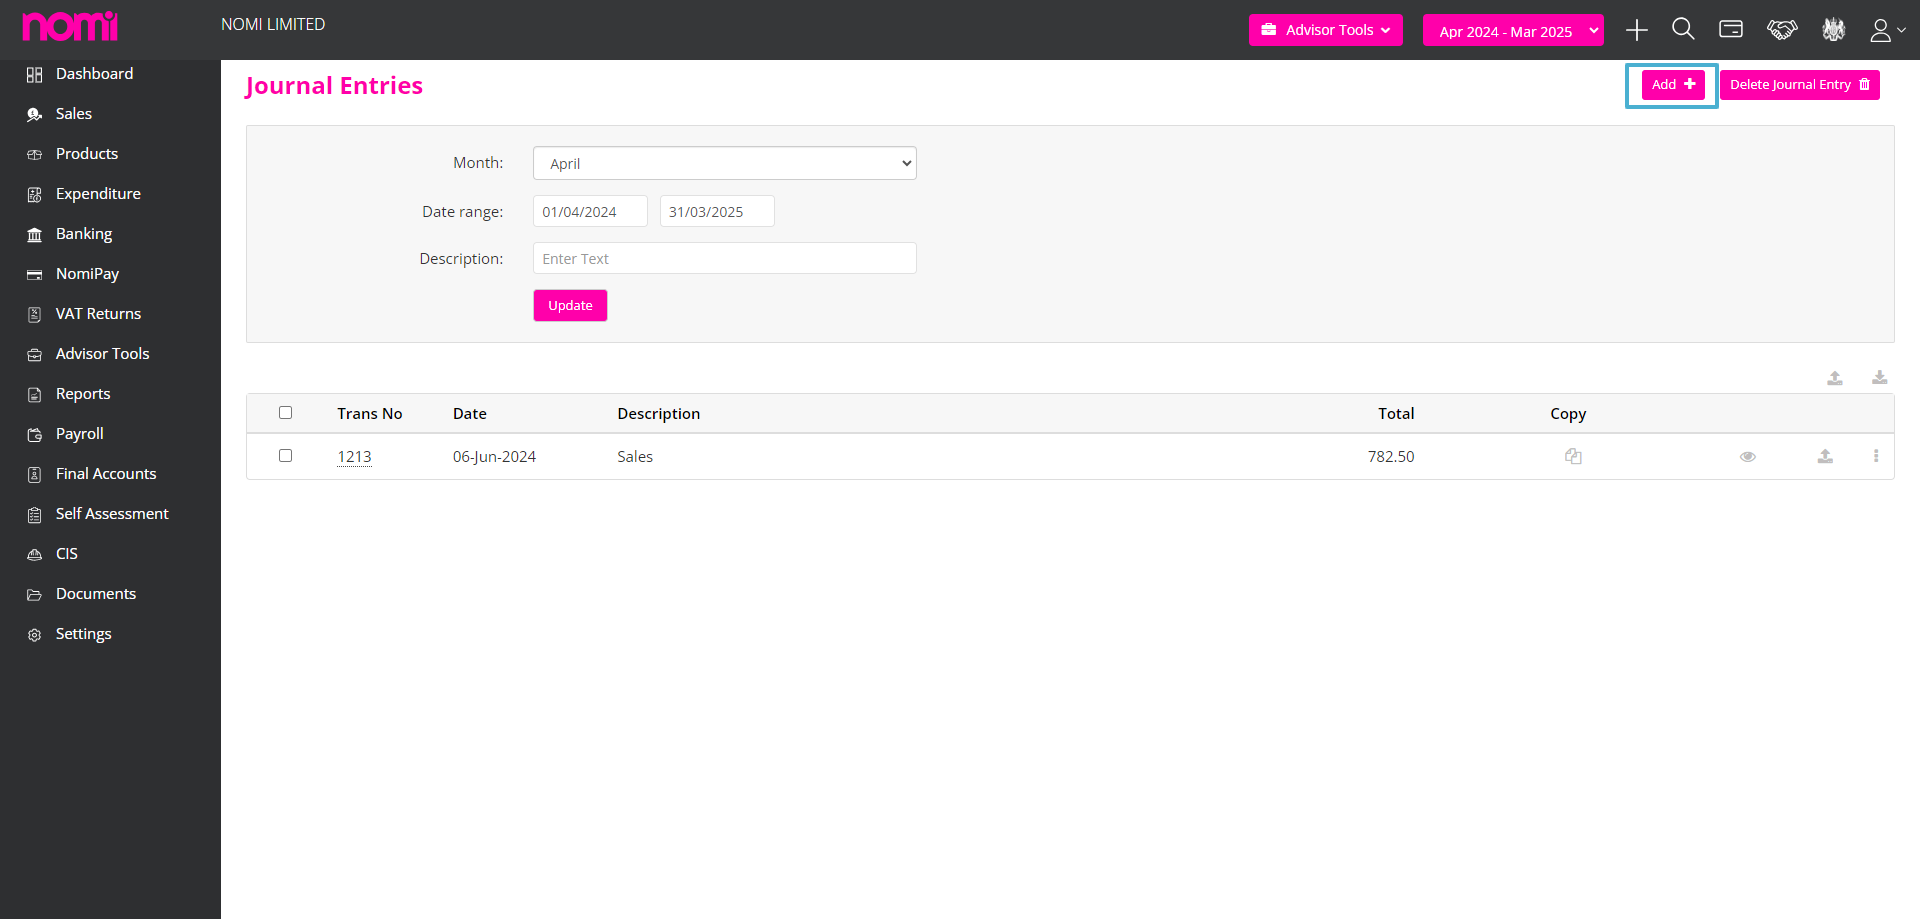
To add a journal entry, first go to the Advisor Tools drop down at the top of the client’s main dashboard, select Journals and then click on the + icon in the top right-hand corner of the Journal Entry page.

Enter the relevant information such as Date, Currency, Description, Account type and also the Debit/Credit amount. You can enter a ‘Reversal Date’ if you need to reverse this journal at a future date. To add more line items to the journal entry, click on the More Line Items tick box and then once all is complete click on Save.
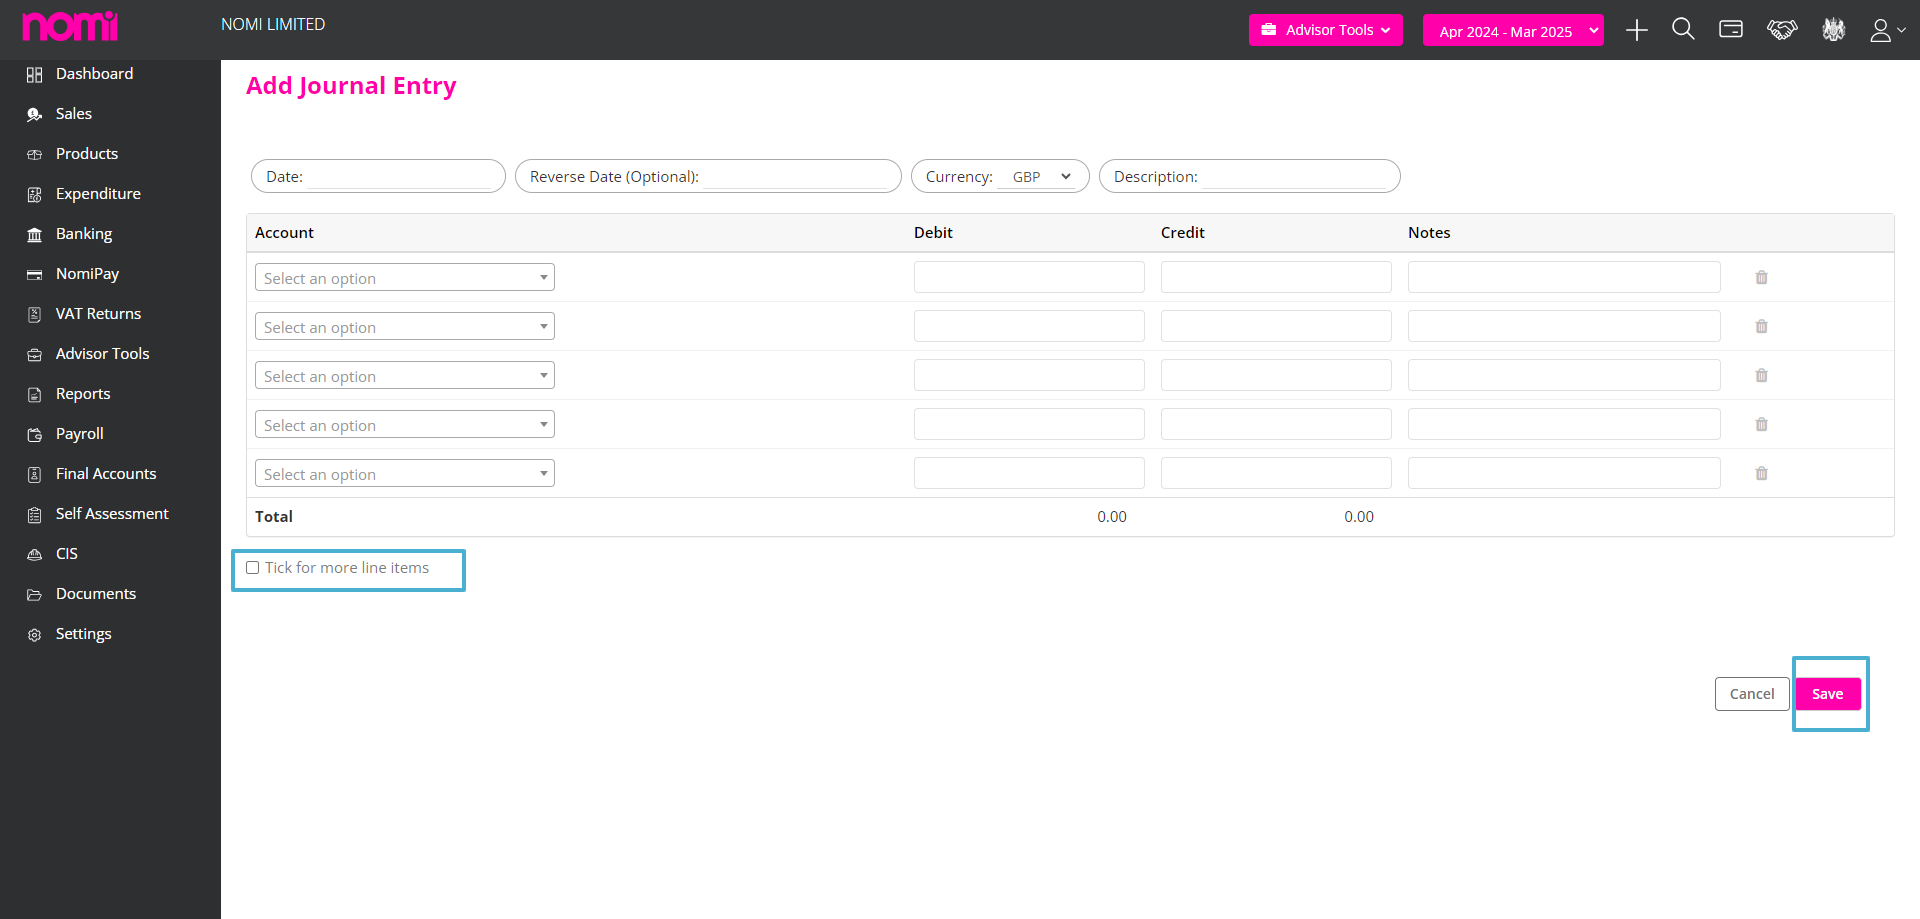
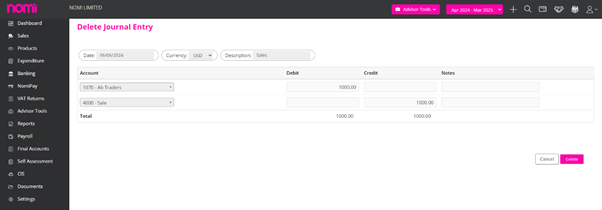
Once the journal entry has been saved, there is the option to add any additional documents as well the ability to edit or delete the journal entry within the Journal Entry page.

To process recurring journals you will have to navigate to Advisor Tools on the left vertical pane and click on Recurring Journals under Adjustments.
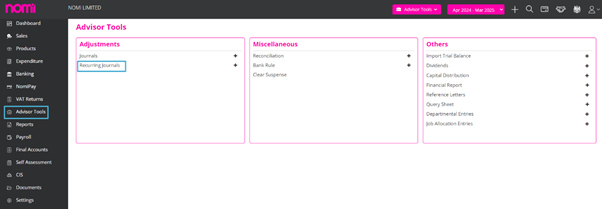
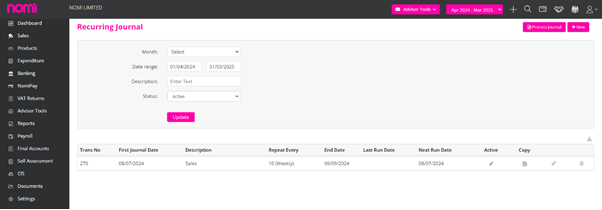
This will redirect you to the Recurring Journals screen where existing journals are listed.
To set the New Recurring Journal you will have to click on ‘+New’ and this will take you to the New Recurring Journal screen. Here you have to key in the important things such as the First Journal date, End Date, Frequency, and description. You will have to mark it as active and auto-process so that Nomi can process it for you on the date of occurrence. You will also have to update the nominals and match the amounts in debit and credit.
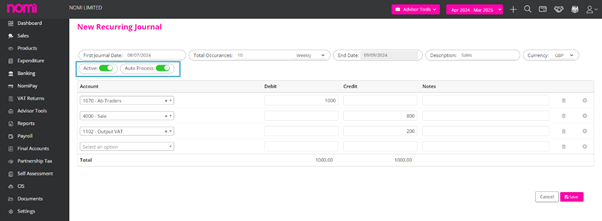
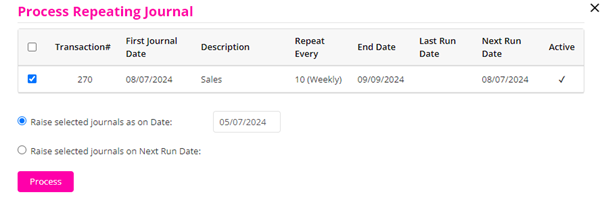
In case you don’t want the software to process it for you automatically then you can turn off the auto process and there is a process journal label on the invoice on which you can click and process the Journal.
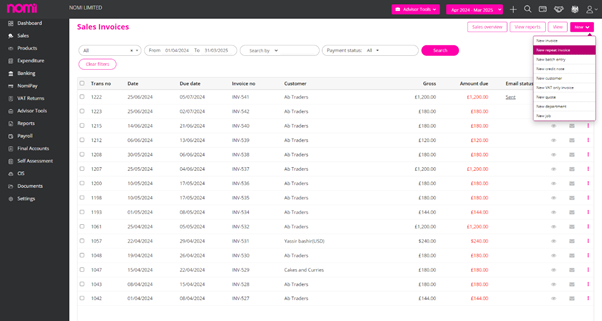
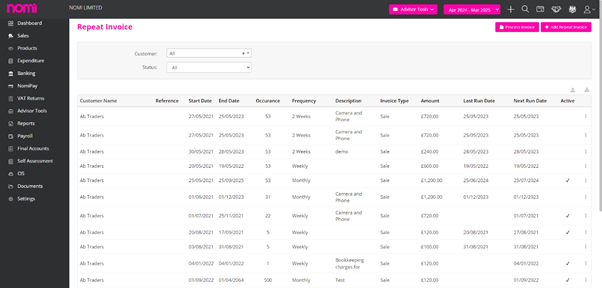
To create a repeat invoice, go to Sales on the left-hand menu of the client’s dashboard, click on the New + button in the top right-hand corner and select New Repeat Invoice.
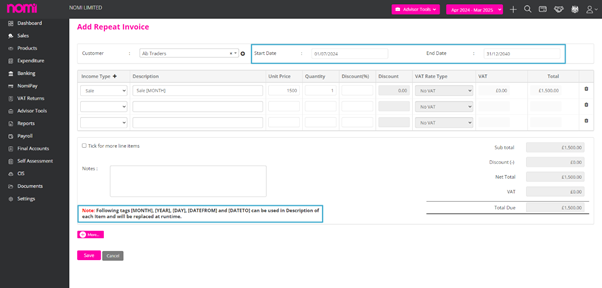
Enter relevant information such as the Start and End Dates and income Type and also include tags in the description to match the dates inputted for the repeat invoice.
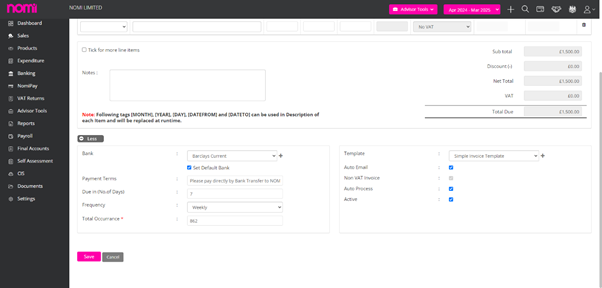
Click the More button to enter other information such as Bank, Payment Terms, and frequency and also select which invoice template to use for the repeat invoice. There will also be options to automatically create (Auto Process) and automatically email out the repeat invoice (Auto Email) to the chosen customer, as well as an option to exclude any VAT that is included on the invoice.
You will then be able to view all repeat invoices created by going to the New + button within the Sales dashboard, selecting Repeat Invoice and either Edit, Delete or add a new repeat invoice.
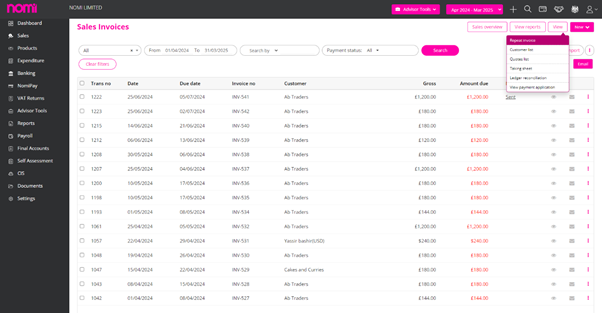
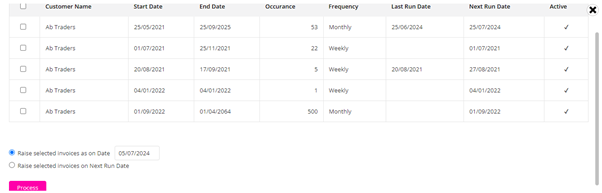
To manually process a repeat invoice first go to the Sales dashboard, click on the View drop-down button and then select Repeat Invoice.
Then click on the Process Invoice button at the top of the Repeat Invoice page where a pop-up page will appear with the options of which repeat invoices to process. Tick the relevant repeat invoice, which is to be processed, either enter a specific date on which to raise the invoices or choose to raise them on the Next Run Date and then click the Process button. The repeat invoices will then be reflected within the Sales dashboard.
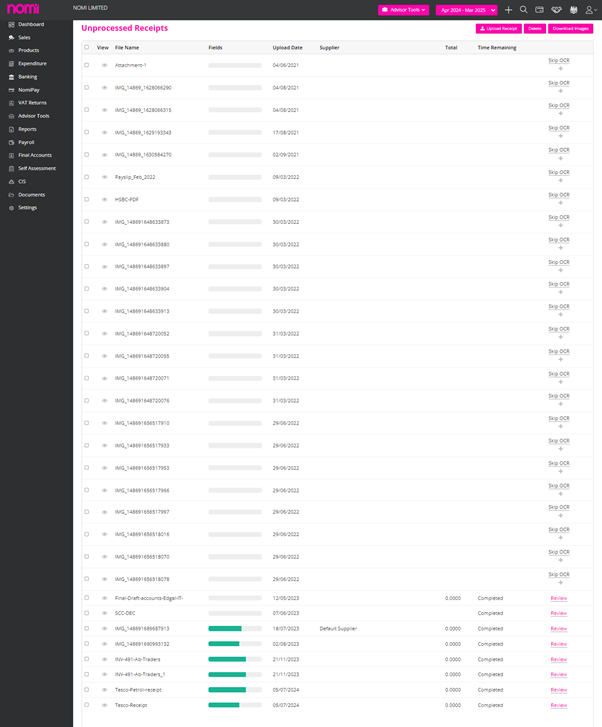
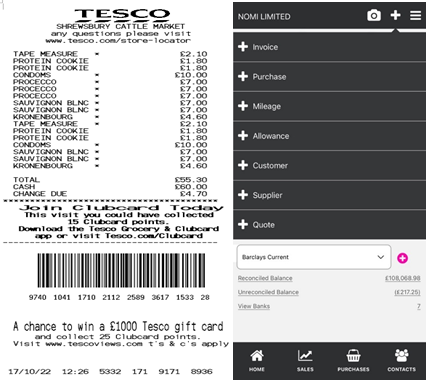
To process a receipt that has been uploaded to Nomi, first click on the View>>Unprocessed Receipts button located on the expenditure dashboard.
This will show you all the receipts that are scanned and uploaded into the software by the clients using the Mobile app.
Note: You have to be careful while taking a picture of any receipt. if the image is not clear or not character readable then the OCR will not work.
You will have to click on ‘Review’ and this will take you to a screen where you can add the Supplier Bill based on the receipts scanned.
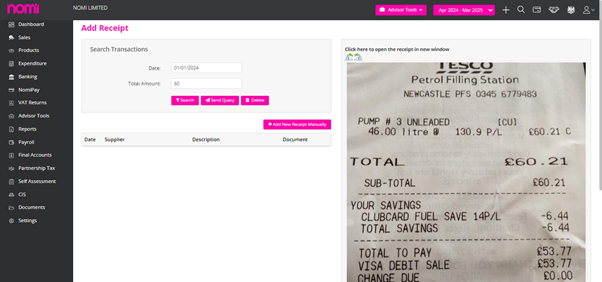
As you click on ‘Review’ it will show you a date captured from the receipt. You have to enter the amount and then click on search. If you have already created a supplier bill relating to a specific receipt, then it will show up on the screen and you can attach this receipt to the existing bill.
If a supplier bill has not already been created relating to this specific receipt, then click on the Add New Receipt Manually button within the Add Receipt page.

Enter all of the relevant information relating to the receipt and then click Save which will add this under Expenditure as the Receipt Type that was selected during this process (i.e. Supplier Bill). OCR technology will automatically populate the Description field if the picture taken of the receipt is clear and contains the relevant information for this particular field.
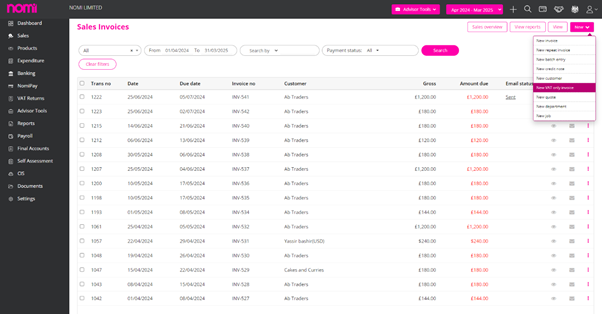
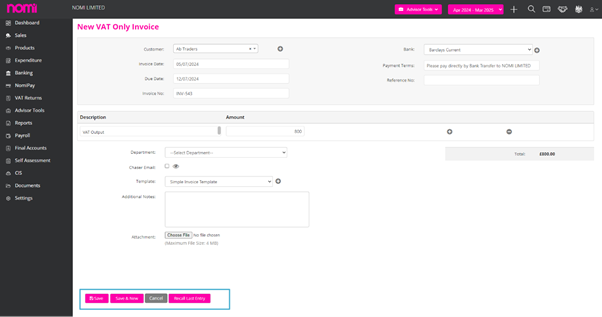
To add a VAT-only Invoice you will have to navigate to Bookkeeping>>Sales>>New>>New VAT Only Invoice. This will redirect you to a New VAT-only Invoice.
On this screen, you have to select a customer which can be a default customer, Invoice date, or due date and then you can enter the description and invoice.
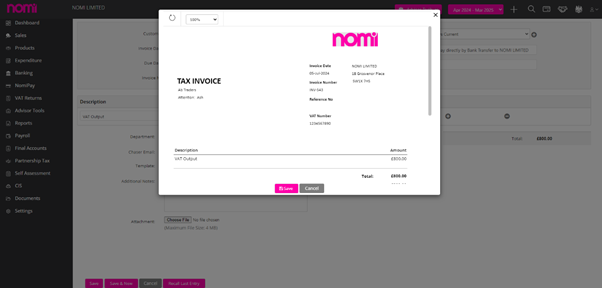
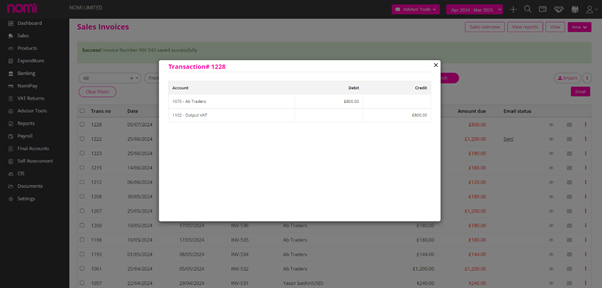
As you click on Save it will show you the invoice generated and then you will get a save label on the invoice as well. You will have to click on that, and the Invoice will be saved, and the double entry will be posted. This will just record the VAT and not an actual invoice.
Post Value Adjustment (PVA) in VAT Submissions
Post Value Adjustment (PVA) in the context of VAT (Value Added Tax) submission in the UK refers to adjustments made to the value of imported goods after the initial declaration to HMRC. This adjustment can affect the amount of VAT due on the import.
Key Points about Post Value Adjustment (PVA)
Example of PVA
Let’s consider an example to illustrate PVA:
In this case, the importer must make a PVA to account for the additional £500 in value, resulting in an extra £100 of VAT due.
Importance of PVA
Post Value Adjustment (PVA) is an essential process for ensuring that the correct amount of VAT is paid on imported goods. By adjusting the value of goods after the initial declaration, businesses can accurately report their VAT liabilities and maintain compliance with HMRC regulations. Businesses must monitor their import values closely and make timely adjustments to avoid any potential issues with VAT submissions. Consulting with a tax professional can provide additional guidance and ensure accurate reporting.
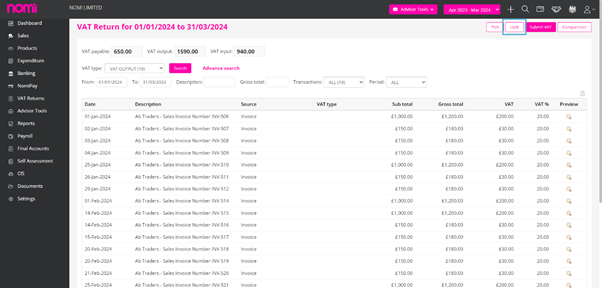
In Nomi, if your client is on a Standard Rate VAT then you may apply PVA adjustments to the VAT return straight away. For this, you have to just click on PVA and adjust the values in Box 1 and Box 4 of the VAT return.
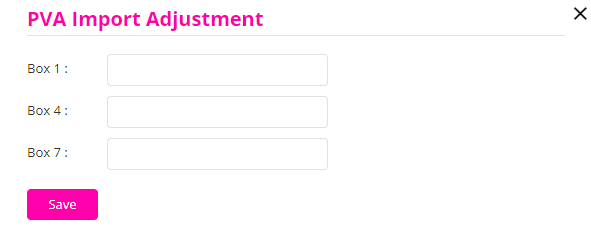
If the client has a Flat Rate VAT scheme in place, then you can adjust in the Box number 1 and 7 of the Return and record the PVA transaction.
To Send the draft for VAT Approval you will have to lock the return and then click on 3 dots on the main screen from there you can click on the email option to send the draft approval email to the customer.
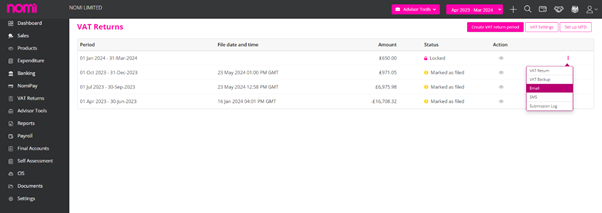
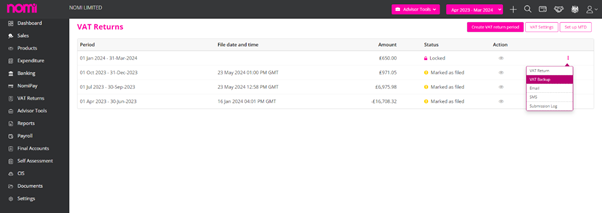
After locking the VAT period you can click on 3 dots and there you get two options VAT Return and VAT Back Up report. As you click on these options it will show you the reports in pop-ups and you can export them respectively.


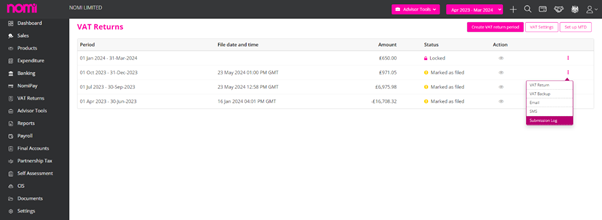
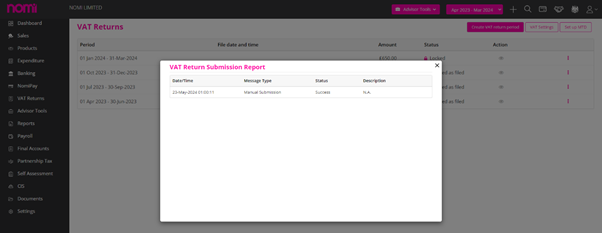
To check the VAT submission status, you can navigate to Bookkeeping>>VAT Returns>>Click on three dots>>Submission log. A pop-up will appear and it will show the current VAT submission status along with previous ones in case you have made multiple submission attempts.
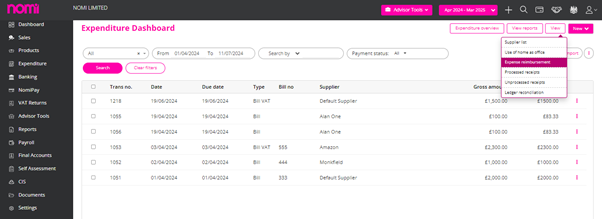
You can bulk upload Expenses, Personal A/C Payment, Allowance and Mileage reimbursements using a CSV file on Nomi. To do this, click ‘Expenditure’, then hover over the ‘View’ button from the top right and select ‘Expense Reimbursement’.
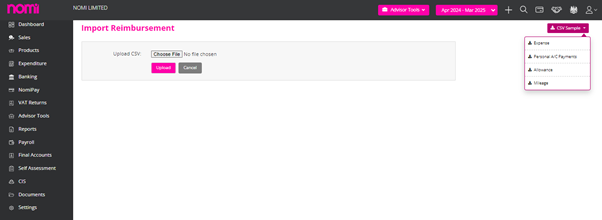
Then, click the ‘Upload Reimbursement’ button at the top right of the page.
You can download sample CSV templates by clicking the ‘Import’ button from the top right and preparing the data using different template files for Expense, Personal A/C Payments, Allowance and Mileage. You can also add the data manually by clicking on +New label available under every section.

Once the file is populated with correct data, click ‘Choose file’, select the file and then finally click ‘Upload’. Following this, review the data and then click ‘Save’.
To record expense reimbursement in Nomi you will have to navigate to bookkeeping>>Expenditure>>From the left-hand menu click on ‘Expenditure’, then hover over the ‘View’ button from the top right and select ‘Expense Reimbursement’.

There are four categories, and they are:
Expense:
Expenses eligible for reimbursement that don’t require supplier bills to be created and are paid by directors, shareholders or employees can be added here.
For Example: Food Expense, Travelling Expense etc.
Click the ‘+’ button within the ‘Expense’ table.
You can either add an expense using the form or click the ‘Add Multiple Expenses’ button to add more than one expense.
Personal A/c Payments:
Supplier bills paid for by directors can be added here to record for reimbursement.
Click the ‘+’ button. You can either add a payment using the form or click the ‘Add Multiple Payment’ button to add more than one payment.
Allowance:
Allowances provided to an employee, director or shareholder can be added here.
Click the ‘+’ button. You can either add an allowance using the form or click the ‘Add Multiple Allowance’ button to add more than one allowance.
Mileage:
The mileage rate as per HMRC for the 2021/2022 year is: 45p per mile for cars and vans for the first 10,000 business miles travelled (25 pence over 10,000 miles), 24 pence per mile for motorcycles and 20 pence per mile for cycles.
Nomi will calculate the mileage allowance based on HMRC’s rates. To enter this, click the ‘+’ button. You can either add a mileage claim using the form or click the ‘Add Multiple Mileage’ button to add more than one mileage allowance claim.
Select the ‘Vehicle Type’ and enter the total ‘Mileage’ for the period for the allowance to be calculated by Nomi.
Tip: If an expense reimbursement has been posted in error and you need to post that as a supplier bill, you can convert that easily into a bill. To do this, click the convert button.
Following that select the ‘Supplier’ from the drop-down menu and click ‘Bill Convert to Supplier Bill’.
From the left-hand menu Click on ‘Banking’, then click on ‘New dropdown’, and select ‘New Transactions’.

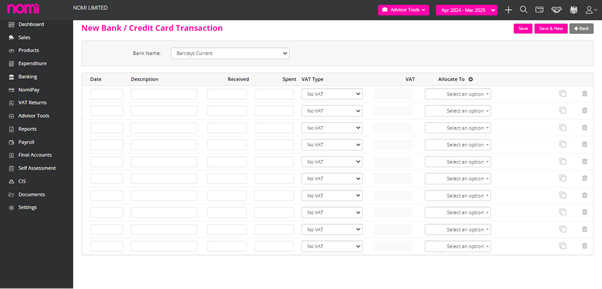
Following this select the bank you wish to upload the transactions to. Complete all the relevant details Date, Description, Received, Spent, VAT type, allocate to (you can choose from the drop-down menu or add a new account by clicking ‘+’ next to ‘Allocate To’) after this click ‘Save’.
Notes: You also have the option to copy the current transaction line or delete the current line.
From the left menu select ‘Banking’, followed by the Import Icon.
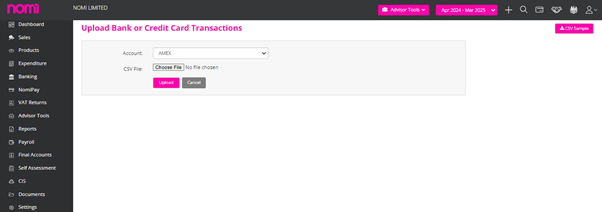
A CSV Sample is available on this screen to download and update the information. Usually, there are three fields i.e. Date, Amount and Balance where you have to enter a positive figure for amount In and a negative figure for amount out. You will have to populate the data on the CSV file, then click ‘Choose File’ and select the relevant. CSV file, press the ‘open’ button and finally, click ‘Upload’.
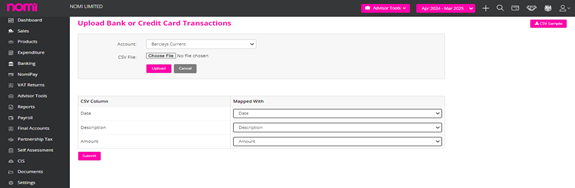
Please note that you can download and use the sample CSV file by clicking on ‘CSV Sample’ on the top right. This file will have 3 columns – a Date, a Description and an Amount column. You can also use your file which can have 4 columns – Date, Description, Money In and Money Out column.
You would then need to select the relevant columns in the CSV file with that in Nomi using the ‘Mapped With’ drop-down menu and click ‘Submit’.
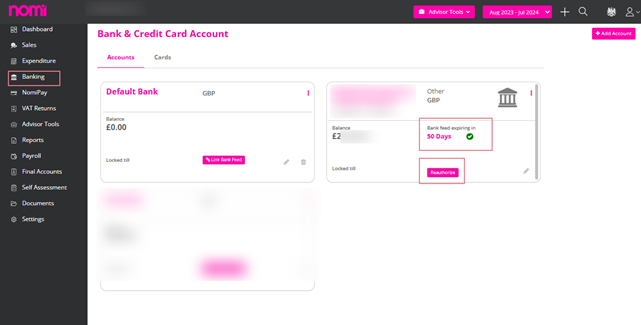
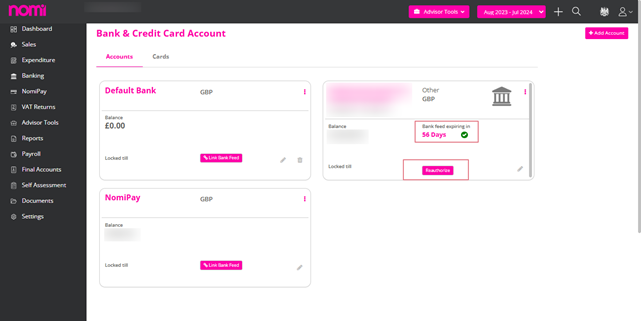
Bank feeds will need to be re-authorised every 90 days. This option is now provided to the Accountants as well and they can ‘Reauthorise’ the Bank Feeds as they expire after 90 days.
For this, they have to navigate to the Bookkeeping>> Banking Dashboard>> View>>Bank Account>>Reauthorise and then follow the onscreen instructions to re-authorise and activate bank feeds.
Once the transactions are updated after reauthorisation, they will then appear on the ‘Unreconciled Transactions’ page. This can be found by clicking on ‘Banking’ from the left menu, then ‘Unreconciled Transactions’(these transactions won’t appear on company reports until they have been reconciled).
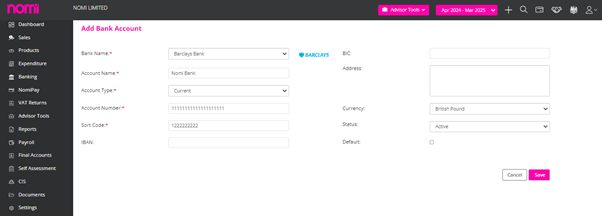
To add a new Bank account firstly click on the left-hand button ‘Banking’, then click on the ‘New’ dropdown. From here click on ‘New Bank Account’, and a pop-up will appear where you can straight away link the bank feed or add the Bank Account.
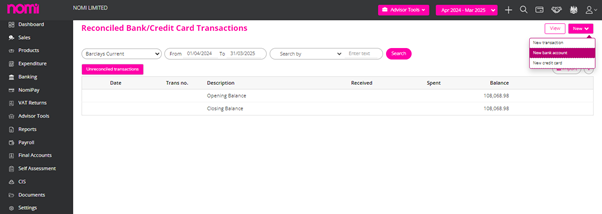
Complete the relevant information Bank Name (can select ‘other’ if bank name isn’t available, then enter the new name in ‘Account Name’), Account Type, Account Number, Sort Code, Currency, select whether this is the ‘Main Bank’ (selecting this, the bank account will appear at the top of the drop-down list for bank accounts) and click ‘Save’.
To upload pictures of receipts to Nomi you will first have to have the Bookkeeping app downloaded (available on both the Apple and Android devices) and will only be available for Business Users. Then select which client you wish to upload a receipt for, click on the camera icon at the top of the screen and select Camera.
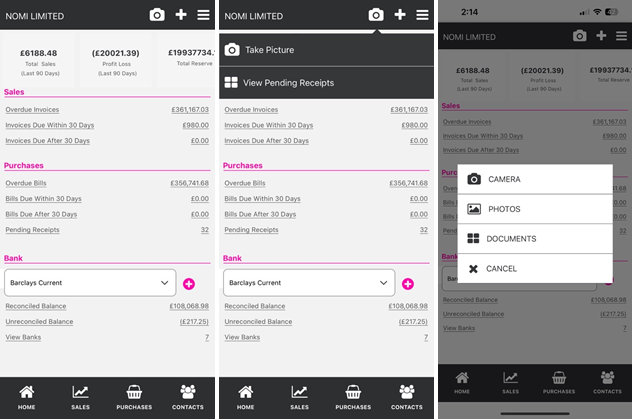
Take a clear image of the receipt containing all of the relevant information such as amount and date. To locate the newly uploaded image of the receipt, log in to Nomi on the desktop, go to the client in question and then click on Pending Receipts where all pending receipts related to this client will be found.
App Store:
https://apps.apple.com/us/app/Nomi-app/id1106412088
Google Play Store:
https://play.google.com/store/apps/details?id=com.Nomisolution.bookkeeping&hl=en_GB&gl=US
To add a new nominal code first go to a client’s Bookkeeping dashboard (this can also be done on the Final Accounts dashboard if active), click on the Advisor Tools drop-down at the top of the page and select Nominal Code.
Click on the Add Account button in the top right-hand corner of the Account page and then select the desired Account Type from the pop-up page that will appear (i.e. Income, Expense, Payment).
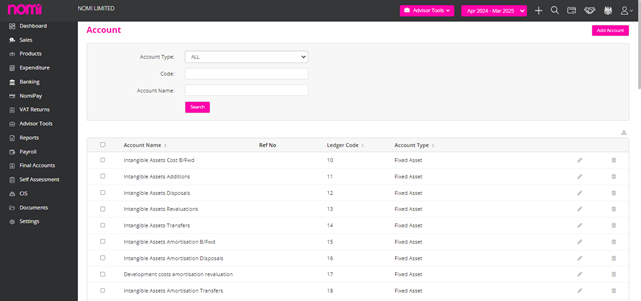

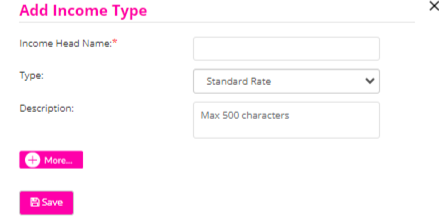
Then enter the relevant details such as Head Name, VAT Type, Description and any other details that can be added if necessary. You will need to map the new code to an iXBRL account (ledger) by selecting a relevant option from the Ledger drop-down menu. Once this has been completed, click Save and the newly created nominal code can be searched for using the search tools on the Account page.
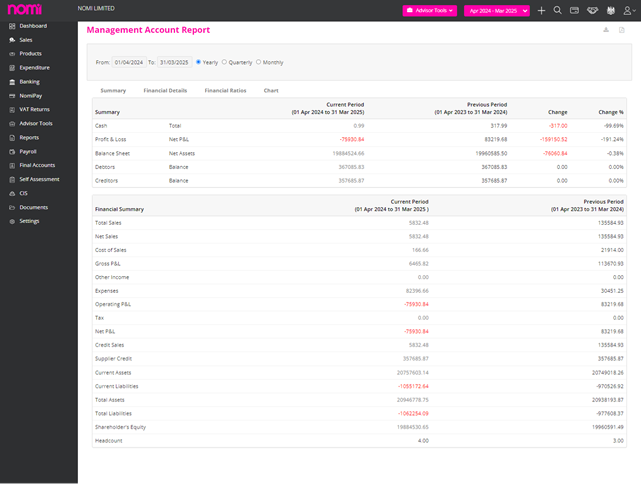
To produce management reports first go to Reports on the left-hand menu of the client’s main dashboard and then select which type of report is to be produced.
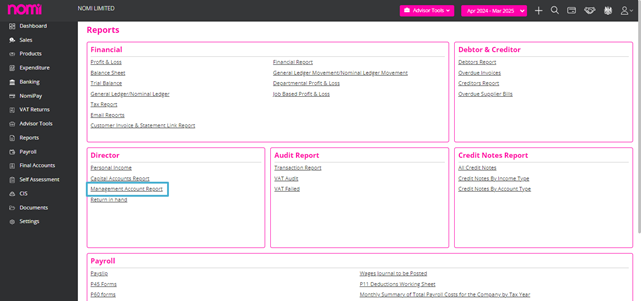
To compare current figures with any past figures that have already been produced for this client, first select a Date range (i.e. yearly, quarterly, monthly) and then select how many of these previous periods you wish to compare to within the Compare with field. These reports can then be exported as a CSV file or a PDF file which can then be shared with clients if necessary.
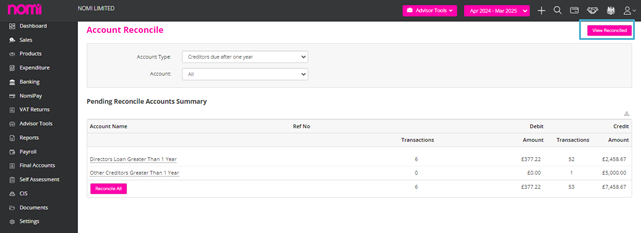
To undo a ledger reconciliation first, go to Advisor Tools at the top of the page and select Reconcile Ledgers.
Click on the View Reconciled button in the top left-hand corner and then select reconciled ledgers individually or in bulk. Also, use both the Account Type and Account drop-down search tools to specifically pick out any reconciled ledgers.
To pull through historical bank transactions via the bank feed feature you will first have to have a bank feed set up on Nomi. Once a bank feed has been set up, go to Banking on the left-hand menu of the client’s main dashboard, click on the View button in the top right-hand corner and select Bank Account from the drop-down options.
If a bank feed has been successfully set up on Nomi, it will have a green tick symbol that can be clicked on which will reveal a Manage True Layer pop-up page.

Within the pop-up page, enter dates within the From and To fields and then click on the Get New Transactions button. This will pull through transactions within the From and To dates that were entered and can be saved into the Unreconciled Transactions section by ticking the tick box to the left-hand side of the transaction and clicking the Save Transaction button.
How far back you can pull through transactions from will vary with different banks so please use the link below to help explain this for all banks connected with True Layer.
What banks are supported by True Layer:
https://truelayer.zendesk.com/hc/en-us/articles/360025108713-What-banks-and-PSPs-are-supported-in-the-Data-API-in-the-UK-
Agents can now reauthorise the Bank feed as soon as it expires without contacting the client or asking them to do the reset.

This will help avoid the time invested in chasing the customers and waiting for them to reauthorise the Bank feeds as they expire in 90 days.
To set up an Accounting Period first go to Settings on the left-hand menu of a client’s dashboard, go to the Account Period section and then click on Edit in the top right-hand corner.

The accounting period is the key thing in Bookkeeping. Whenever you add a Company or LLP the Accounting periods are created by default and going ahead you can always create them. To create new periods kindly click on Adjust Accounting Periods and it will redirect you to the following screen.
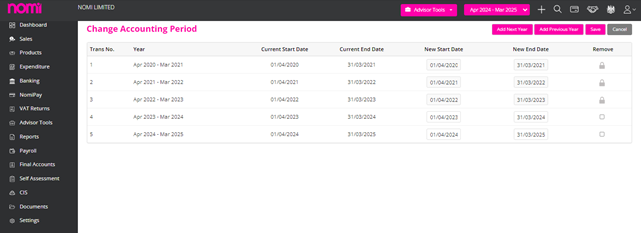
On this screen, you can click on ‘Add Next Year’ and it will create a New Accounting Period. To Add the Previous Year, you will have to click on the label in the top right corner and then you can do comparative reports in Final Accounts. To change the dates of Accounting Periods you can always enter the dates under New Start Date and New End Date and then click on Save.
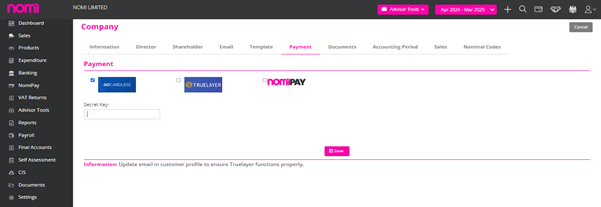
To integrate a GoCardless account to Nomi first go to Settings on the left-hand menu of the client’s dashboard, go to the Payment section and then click on the Edit button in the top right-hand corner. You will then need to tick the GoCardless tick box where it will then ask you for a Secret Key.
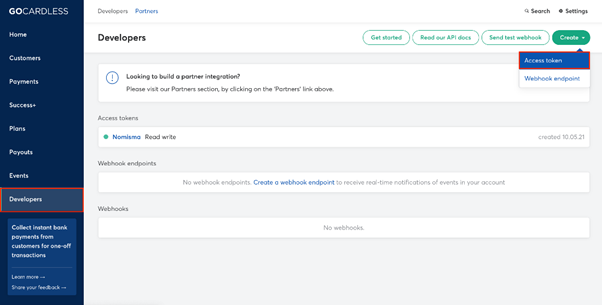
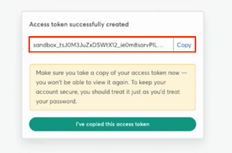
Then go to the GoCardless website (if you have not signed up for a GoCardless account then sign up as soon as possible), go to Developers on the left-hand menu, click on the Create button in the top right-hand corner and select Access Token.
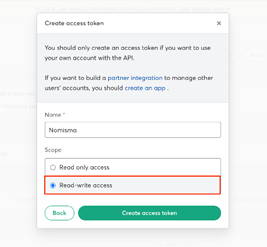
Enter a name, select the Read-write access option for the Scope field and then click Create Access Token. This will generate an Access Token which will need to be copied and pasted in the Secret Key field back on Nomi and then saved.
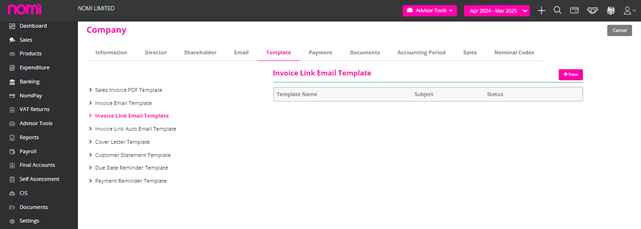
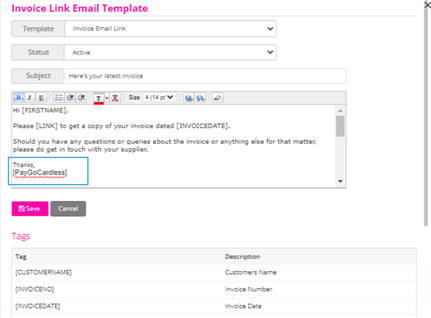
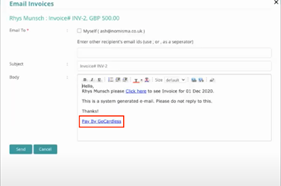
To take one-off adhoc payments from clients directly from an email, go to Template within the Settings section of a specific client, select the Invoice Link Email Template and add [PayGoCardless] within the Body section of the template. Once this has been done, click Save and this will create a link within the email that will take the client to GoCardless for payment (if a mandate has not been set up with the specific client, then one will have to be created in order for them to be able to make the payment).
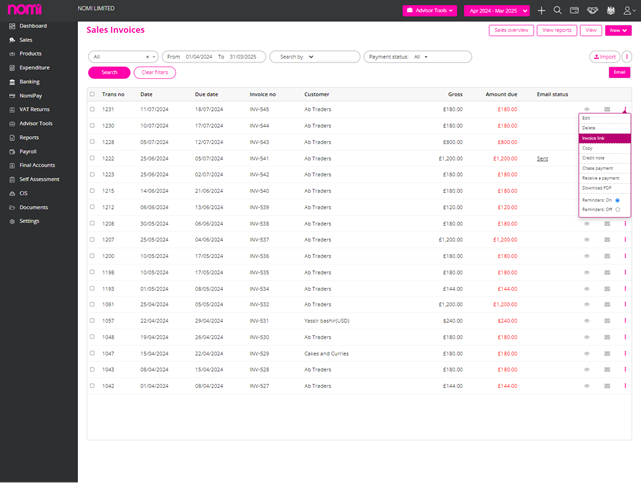
The GoCardless payment link will be specific to Invoice Link emails. Go to Sales, click on the three dots on the right-hand side of the particular invoice and then select Invoice Link. It will then show the Invoice Link Email created within the Template section of Settings and will provide the link to GoCardless for the client to click on.
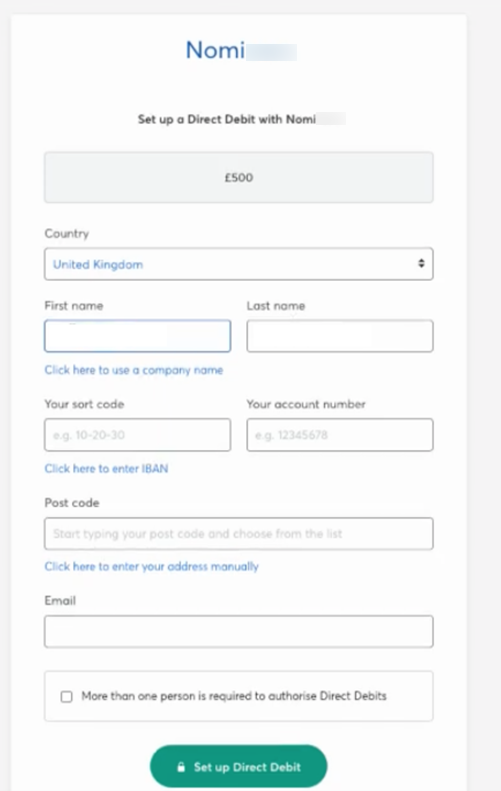
If a mandate has not been set up for the client in question, the client can use the link within the email to go through the process of setting one up by entering the relevant details and then clicking on Set Up Direct Debit.
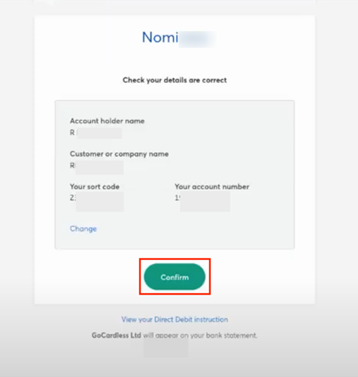
Once all the details are correct click on the Confirm button to process the Payment. This will reflect the payment in Nomi with a message stating that the payment has been successful. It will also reflect in GoCardless within the Customers section and then will show in the Payments section when you have selected a specific client.
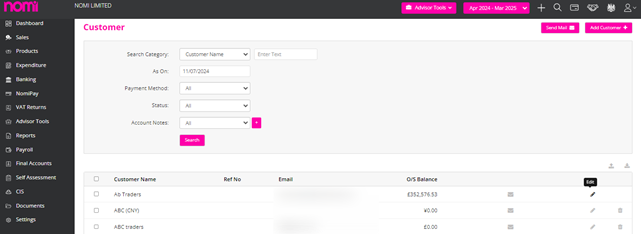
There is also the option of mapping customers within Nomi to existing mandates on GoCardless by first clicking on View in the top right-hand corner of a client’s Sales dashboard and then selecting Customer List from the drop-down options.
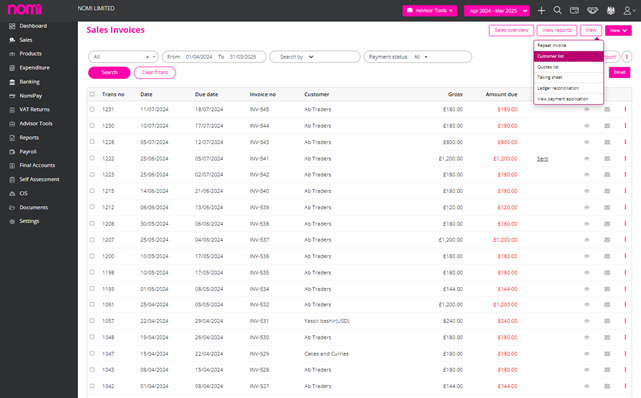
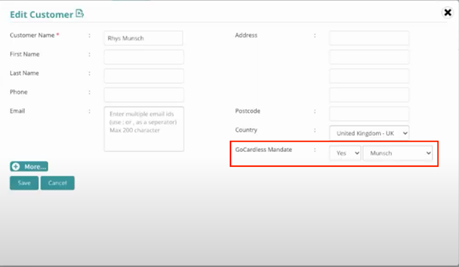
Then select Edit on the right-hand side of the customer this will be done for and within the GoCardless Mandate field select Yes and the correct name (this will be the same as the name that has been set up on GoCardless for this customer). Once the mandate has been enabled, the customer will then be able to pay through Nomi via GoCardless. If a customer that has a mandate set up with GoCardless has not yet been set up as customer on Nomi yet, you can use this same process so that mandate is enabled when setting them up as customer.
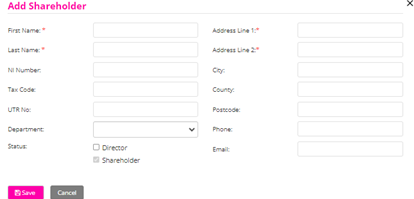
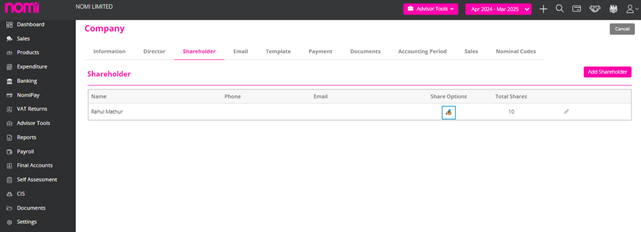
You can add a Shareholder record similar to that of a director and for this, you will have to first go to Settings on the left-hand menu of the client’s dashboard, go to the Shareholder section and click on the Edit button in the top right-hand corner and click on Add shareholder. A pop-up will appear where you will have to fill in the details and then save the record.
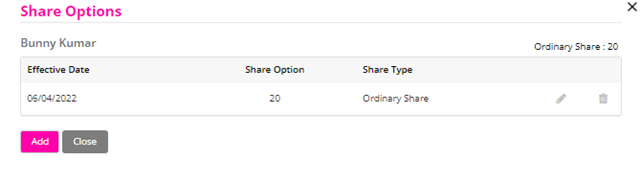
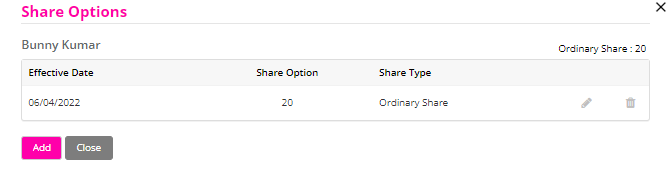
Once the Shareholder has been added, click on the Share Options icon and then enter the relevant information such as Share Type, Effective Date and the amount of shares. Once this is done, click Save.
To add a director, first go to Settings on the left-hand menu of the client’s dashboard, go to the Directors section, click on the Edit button in the top right-hand corner and click on Add Director.
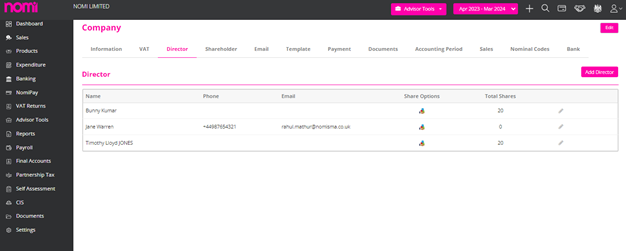
Any records of Directors are imported directly from COHO whenever you add a Company. However, you can also add them manually by clicking on the Add Director label. As you click on this a pop-up will appear where you have to enter the details manually.
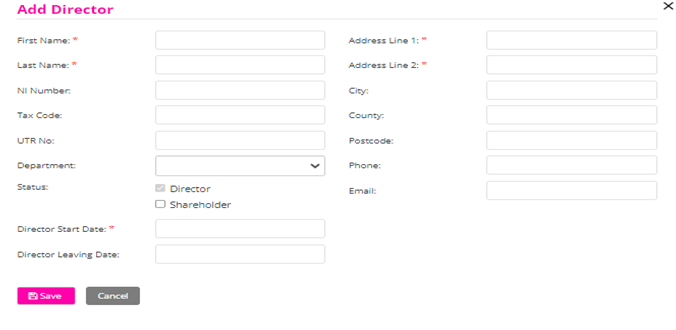
On this screen, you will have to enter the mandatory fields such as First Name, Last name, Address Lines 1 and 2 and the Director Start Date. If the Director is a Shareholder, then you can also tick the checkbox ‘Shareholder’.
To allocate the shares you will have to click on the icon under share options. This will allow you to add the shares for any of the directors who are shareholders.
Agent Setup
As you log in to Nomi, you will have to navigate to settings. Under integrations, you will find iwoca integration along with others offered in Nomi. On this screen, you will have to click on the label Enable and this will enable the iwoca integration under Nomi.
If you find the label named disabled, then it means it is already enabled. From here you will have to access a client record i.e. Company. Let’s take the example of an existing one i.e. Nomi.
Client List
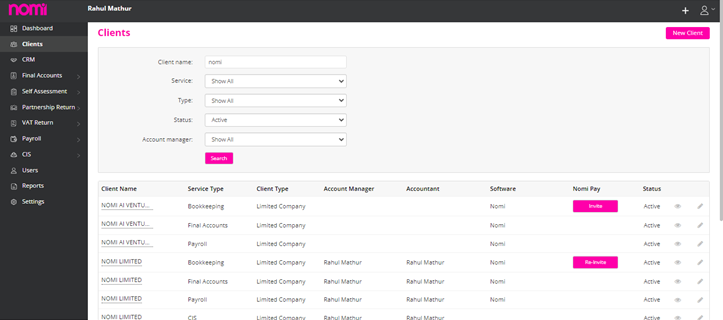
As of now, the iwoca integration is available for Companies only. Here we will click on the name of Nomi Limited for the Bookkeeping record, and this will take us to the beautiful Bookkeeping Dashboard.
Bookkeeping Dashboard
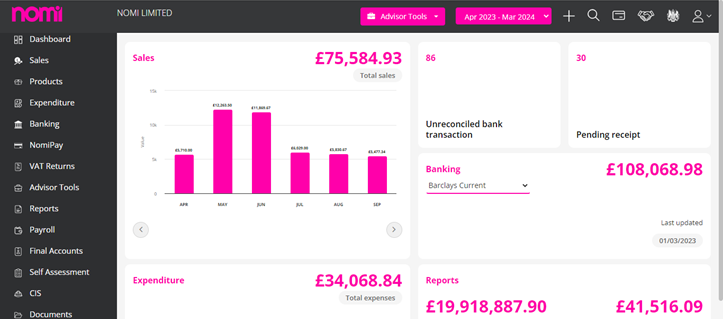
We can see a fresh view of the Bookkeeping dashboard which gives an overview of sales under the bar graph along with unreconciled bank transactions, pending receipts and expenses.
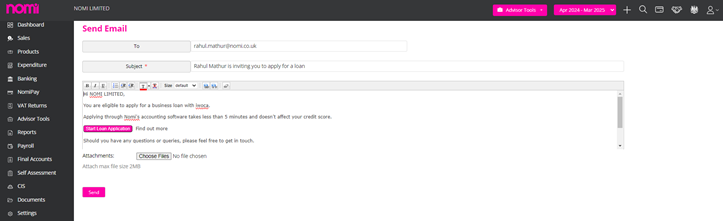
Invite Client to apply for loan
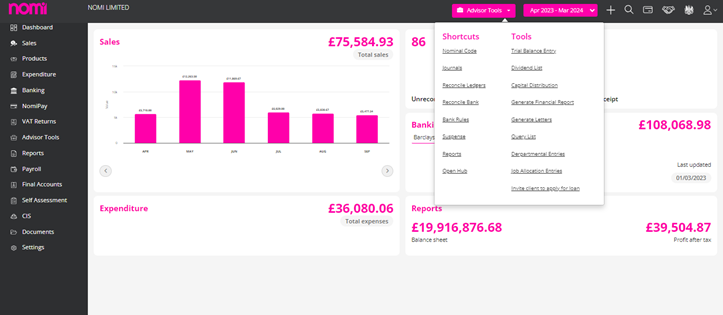
To apply for loan we have to click on Advisor tools on the header and there we will find ‘Invite client to apply for loan’. As we click on it then it redirects to an email. You will have to send this email to the customer so they can start the loan application process. The pop-up contains the email address saved under the Client record. However, if you want to send it to a different email then you can manually type in the email address.
Start Loan Application
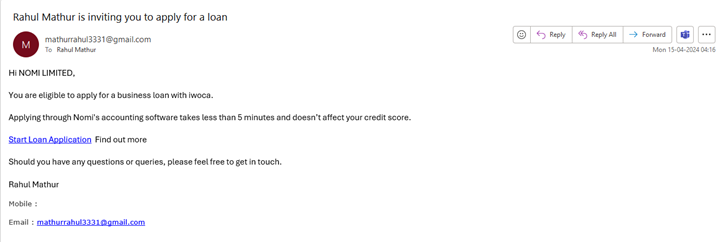
As the client receives the email they will click on the link start loan application link and this redirects them to the Nomi iWoca landing page.

Tick the checkbox for agreeing with terms and conditions and click on ‘Apply Now’. It allows you to apply for funds starting from £1000- £500000
By clicking on Apply now it takes you to the get started screen.
Get Started
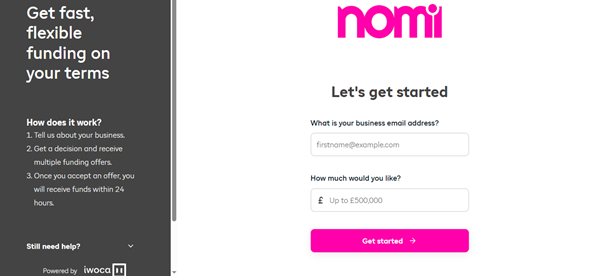
Here you have to enter the business email address and the amount of loan you would like to receive. As you click on get started it will show you a message that it has set up an account and shared the password in an email sent to your business email address.
Introduce your business
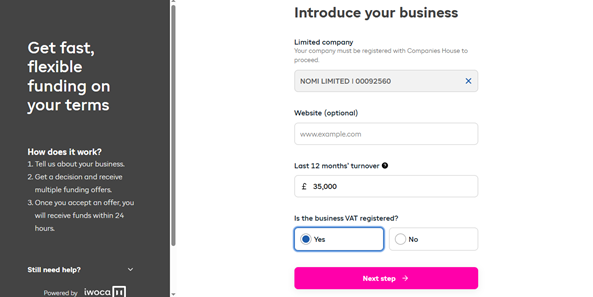
It will pick the business name however you have to provide the website (optional), turnover of the last 12 months and mention if the business is VAT registered or not.
Tell us about yourself
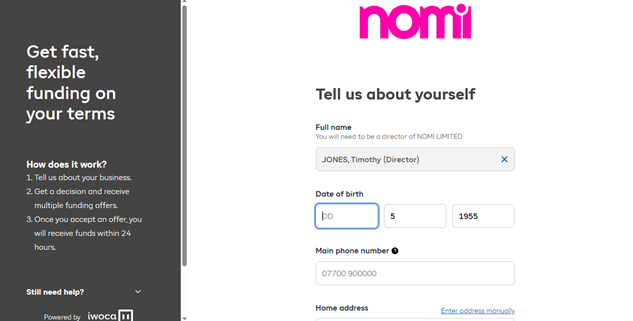
The director’s name will be picked automatically; however, you can remove the initial selection and then choose from the available names. Provide their date of birth, mobile number, and home address.
You have to then tick the checkbox ‘I’ve read and agreed to all terms & conditions’ and then click on Get Decision.
As you click on this it will run the checks based on the information provided and you will receive multiple funding offers. As you accept an offer you will be receiving the funds within 24 hours of your application.
To update Invoice settings you will have to navigate to Bookkeeping>>Settings>>Sales>>Click on edit and then you can make all the relevant changes to the Invoices.
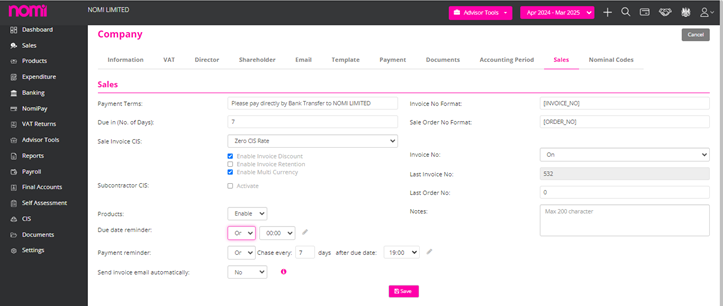
Under Sales, you can edit and update the following:
Nomi offers two invoice templates: the Simple Invoice Template and the Standard Invoice Template.
To add or remove tags from the Simple Invoice Template:
To add or remove tags in the Standard Invoice Template:
To edit tags in the Quote Template:
To change tags in the Credit Note Template:
To update tags in the Simple Invoice Template:
To change tags in the Standard Invoice Template:
To make changes to the Credit Note email template:
To edit the Customer Statement email template:
To update the Invoice Email Link template:
To update the Supplier Statement template:
To update the Due Date Reminder email:
To edit the Payment Reminder email:
To update the Quotes email template:
Nomi integrates with:
Once you turn on GoCardless, TrueLayer, or NomiPay, a “Pay Now” button will show on your invoices. This lets clients pay directly using the selected method, helping you get paid faster.
To turn on the “Pay Now” button:
Note: Update email in the customer profile to ensure Truelayer functions properly.
If your accounting period is more than 365 days:
To change the payment terms for future invoices:
This will apply to all new invoices.
To update the company’s phone number or email:
To add or change the company registration date:
To update the company registration number:
To upload a logo that shows on invoices:
To assign an accountant or account manager:
To add a director for a client, follow the appropriate steps based on the module you are using:
If you’re using the Bookkeeping module:
If you’re using the Final Accounts module:
To add a shareholder for a client, follow the appropriate steps based on the module you are using:
In the Bookkeeping module:
In the Final Accounts module:
To add a director’s leaving date or deceased date, follow the steps based on the module you are using:
In the Bookkeeping module:
In the Final Accounts module:
To add members for a Limited Liability Partnership (LLP) client, follow the appropriate steps depending on the module you are using:
In the Bookkeeping module:
In the Final Accounts module:
To add the last date or deceased date for a member of an LLP client, follow the steps according to the module you are using:
In the Bookkeeping module:
In the Final Accounts module:
To add the last date or deceased date for a partner in a partnership client, follow the steps according to the module you are using:
In the Bookkeeping module:
In the Final Accounts module:
To add partners for a Partnership client, follow the appropriate steps depending on the module you are using:
In the Bookkeeping module:
In the Final Accounts module:
To add a sole trader for a client, follow the steps based on the module you are using.
Please note: Only one sole trader can be created per client.
In the Bookkeeping module:
In the Final Accounts module:
To enter the last date as a sole trader for a client, follow the steps based on the module you are using:
In the Bookkeeping module:
In the Final Accounts module:
To enter profit and loss ratios for members in an LLP, follow the steps based on the module you are using:
In the Bookkeeping module:
In the Final Accounts module:
Note: If a member is not appearing, ensure their Start Date is entered. The End Date will automatically populate when a new Start Date is added.
To enter profit and loss ratios for partners in a Partnership, follow the steps based on the module you are using:
In the Bookkeeping module:
In the Final Accounts module:
Note: If a partner is not appearing, make sure the Start Date is entered. The End Date will auto-fill when a new Start Date is entered.
To delete a director, follow the steps based on the module you are using:
In the Bookkeeping module:
In the Final Accounts module:
Please note: The delete button will not appear if there is any data or transactions linked to the account.
To delete a shareholder, follow the steps based on the module you are using:
If you are using the Bookkeeping module:
If you are not using Bookkeeping (using the Final Accounts module):
Please note: The delete button will not appear if there is any data or transactions linked to the account
To delete a member in an LLP using NOMI, follow the steps based on the module you are using:
Bookkeeping module:
Final Accounts module:
Note:
The Delete button will not appear if the member has any data or transactions linked to their account.
To delete a partner in a Partnership using NOMI, follow the steps based on the module you are using:
Bookkeeping module:
Final Accounts module:
Note:
The Delete option will not be visible if the partner has any linked transactions or data.
By default, CRM access is not provided under any account. This is something which is provided by the Support/Sales Team at the request of the user. The CRM Instance is created and after that, a CRM option shows on the left-hand side whenever a user logs into Nomi.
To Generate a quote/contract you will have to first add a lead or you can also generate a quote/contract for an existing client or contact. There is a 9-step process which you have to follow:
Quotes and Contract Dashboard
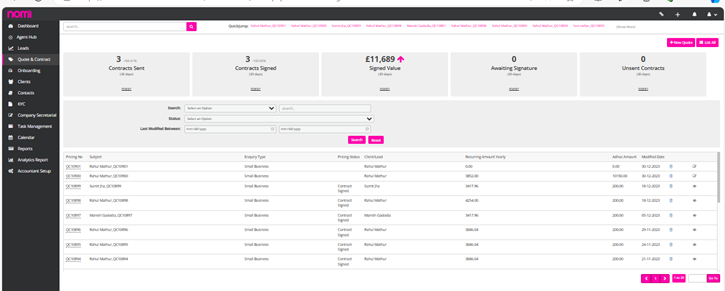
This is the dashboard-like leads that shows the data concerning the past 30 days i.e. The contracts sent/ Contracts Signed, the business generated i.e. the signed-up value in the past 30 days. Anything under Awaiting signature means that the contracts sent by you but still not signed by Leads. This helps you keep track, and you can then follow up on the leads. If you have missed sending any contract that is created, then you can review that and send it to the lead for E-sign.
All the Quotes and Contracts that you generate get listed on this screen and if something is in draft you can again edit that record and complete the process.
We will now create a Quote and Contract by clicking on +New Quote in the top right corner.
Creating a New Quote
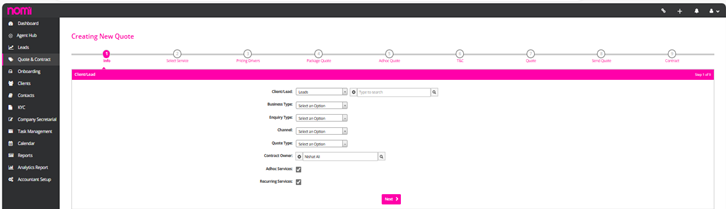
It’s a 9-step process that helps you create a New Quote and Contract and then you can get it signed electronically by the Lead. The software allows you to create a quote and contract not only for a Lead but also for an existing Client or Contact.
Here you need to enter the name of the lead and select from the search column. This will populate the details that you have recorded. You have to set the quote type to new/renew and select whether you are offering Recurring or Ad hoc services or both. Click on next and this takes you to select the services tab.
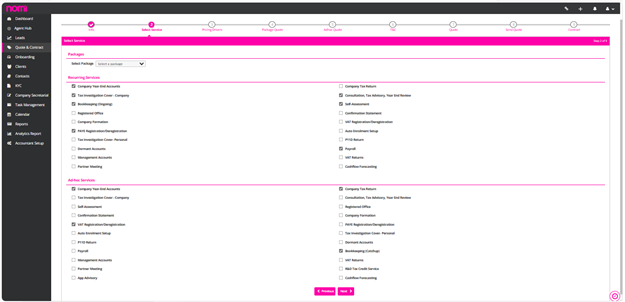
Select Service
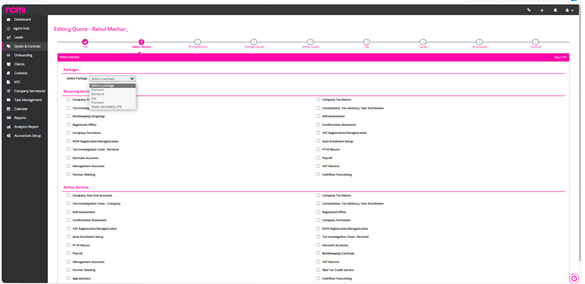
On this screen, you can select the packages from the dropdown such as Premium/Standard and Lite. Based on your selection the services that are included in the package are selected by default and if you want to include any other services then you can select those services as well. In case you don’t want to offer a package then you may select the services as agreed with the lead. All the services and packages can be customised under Accountant Setup>>Pricing Matrix.
Pricing Drivers
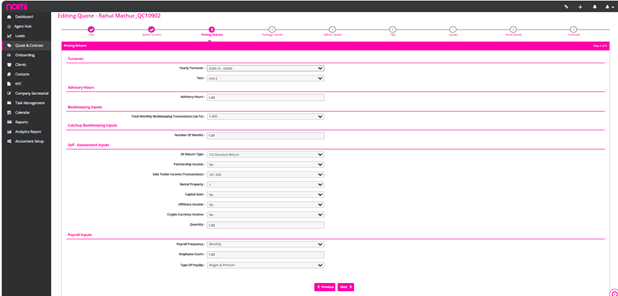
The next screen is pricing drivers which help you decide the factors such as turnover threshold, Monthly Bookkeeping transactions, Type of Self-Assessment, and the various supplementary forms if any, Payroll frequency and the count of Employees, etc. All these are preset under the Value Pricing Matrix. (On this screen we have to set up the parameters of pricing drivers)
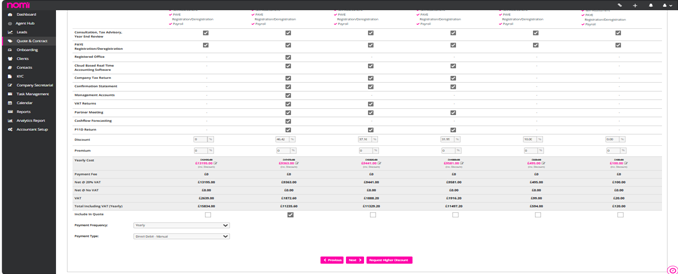
Package Quote
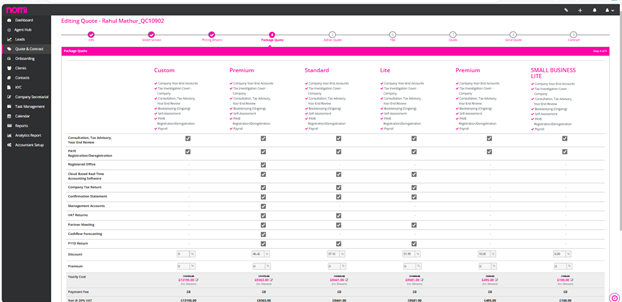
On this screen, you will find a Custom package based on the services you have selected and then you will see three more packages viz Premium/Standard and Lite. These packages include the services which are a part of the Custom package and apart from that they also offer extra services and there are few discounts on these packages. In case you want to upsell the services and get extra for a few services that you offer then you may give the lead a choice to choose between the custom package and the premium/standard or lite package.
On this screen, you can also select the mode of payment i.e. Direct Debit or Bank Transfer or Direct Debit- Go Cardless. As soon as the contract is signed by the lead a Direct debit Mandate is sent to the customer and they can set this up. This further helps you in collecting the payments automatically on a specific date. Junior Staff members can also request a higher discount in case they need to offer that to close a deal.
Ad hoc Quote
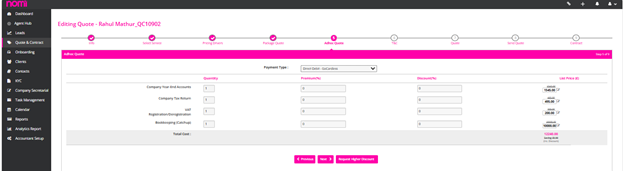
As you click on next, it takes you to the Ad hoc quote and on this screen, you will find services like VAT Registration/P11D Submission/Bookkeeping (Catchup). In case you want to give any discounts then you may do so.
Terms and Conditions
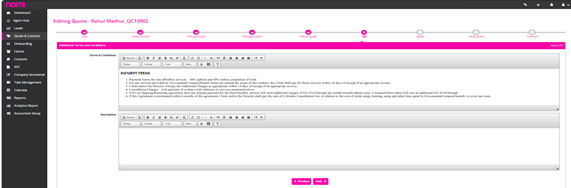
Here you will be able to see the Payment Terms and Conditions, i.e. coming from a template. This is a default one, however, we can make necessary changes in the Appendix 2 T&C templates under Accountant Setup.
Generate a Quote
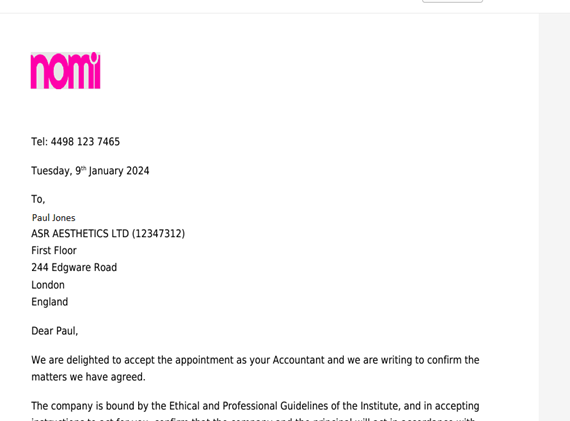
On this screen, we can see the Quote that is generated. It will show the logo of your firm and then the packages you have selected on the Package Quote screen. Which gives the lead an option to choose from. It also includes the ‘Statement of Facts’ which shows all the services and what will be done in that contract of service.
In case everything is agreed upon and the lead does not want any quote and is looking forward to a Contract of the Services that are agreed then you may skip and go to the Contract generation.
Send Quote
On this screen, you will see an HTML version of the quote, and this looks more professional as compared to the traditional PDF version.
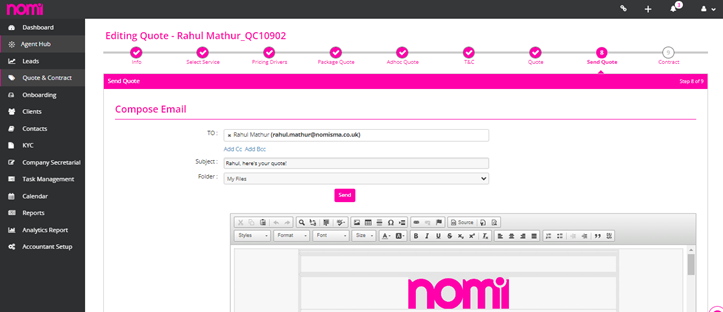
This is sent as an email and there is a link in this. The client has to click on that link and then they are redirected to a webpage. Here they have an option to Accept or Reject the quote. As soon as they do this you will receive an email saying that the quote has been accepted or rejected by the customer and then you take the necessary action.
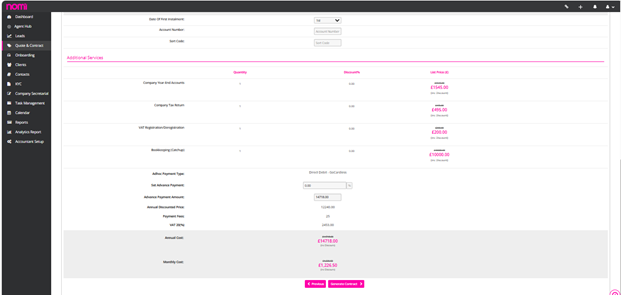
Contract

The quote is accepted by the Lead, and they chose the Premium package as compared to the custom package as it adds more value. You have to choose a premium package from the dropdown menu and then all the services that are a part of the premium package will be listed. The payment method will be the same as selected earlier and then you may click on ‘’Generate Contract”.
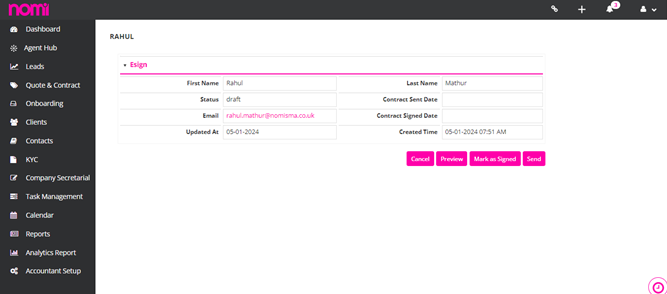
Contracts E-Signature
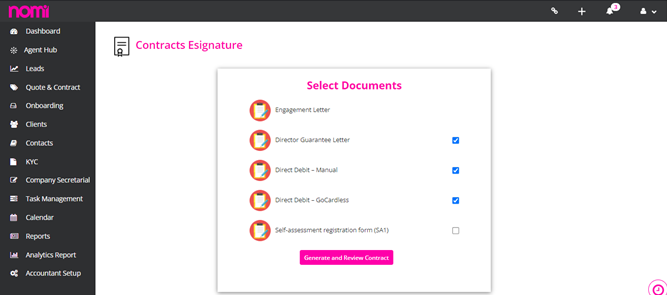
On this screen, you can see the Engagement Letter is selected by default. It also gives you the option to select other documents viz Director Guarantee letter where the director of the company provides you with a guarantee that in case of any default in payment, he will become personally liable, and all of your dues are met. You can set up the Direct debit with the lead and collect the payments automatically. You don’t have to do it separately and this is a part of LOE and helps save a lot of Admin time.
Finally, you have to click on Generate and Review Contract and then it takes you to a screen where you may preview the contract before sending it to the client for E-Signature.
Preview and Send the Contract
Here you can click on Preview and in a pop-up the Contract PDF will be generated which you will send to the client.
The Lead will receive the contract E-sign email where they have to click on the link and then they can sign this Electronically.
As the contract is signed by the client the direct debit Mandate is sent to the customer and the payment method is also set up.
While signing the Contract if the E-sign fields are overlapping then the most probable reason for this is the logo size. While uploading the logo you have to take care that it should be of a banner style and the size should be 800 (width) x 200 (height) pixels and formatted as JPEG, JPG, X-PNG or PNG. If the logo size is larger than this then the placement of the Signature Tag is changed.
To create a Self-Assessment profile you will have to add them as Contacts. Then you will have to update the following details:
After updating all the above fields, you will have to tick the check box ‘Self-Assessment Required’ and click on Save. This will create an Individual record under Self-Assessment on compliance.
When you do the compliance sync you have to make sure that the services are marked as ‘Active under the Compliance and Deadlines tab and software is set to Nomi. If you do not mark the service as Active and then complete the Compliance Sync process, then all the records are created in Nomi Compliance but as ‘Inactive records’. You can later mark the services as Active in CRM or else under Compliance you can set them from Inactive to Active.
Confirmation statement submission failures can occur due to several reasons. Below are some common issues and their solutions:
Common Reasons for Confirmation Statement Submission Failures
Steps to Resolve Confirmation Statement Submission Failures
By addressing these common causes and following the steps to resolve submission failures, you can improve the accuracy and reliability of confirmation statement submissions to Companies House.
Company incorporation status being “pending” can occur due to several reasons. Here are some common causes and their solutions:
Common Reasons for Pending Company Incorporation Status
Steps to Resolve Pending Incorporation Status
By addressing these potential issues and following these steps, you can help expedite the incorporation process and resolve any pending status efficiently.
You can start with KYC checks. This is done by a third-party provider called ID3 Global. They check the International PEPS, Mortality Database, and a few other databases and generate a score between 0 to 2400. This will also tell you the status of the Individual KYC check i.e. Pass, Refer or Fail. Pass means everything is matched with the data you provided i.e. address/Driving License or Passport Number. Refer means some of the data has matched and some did not match but still you can check with the individual and proceed further. Fail means a negative score which indicates that something is wrong on that record. This acts as a showstopper, and you need to check the data and redo the KYC. A certificate of KYC is generated by ID3 Global as and when KYC is done.
Webforms streamline lead automation. By creating a web form and integrating the iframe and HTML code into your website, you can generate a ‘Contact Us’ form. Any information left by visitors will automatically set them up as leads in Nomi.
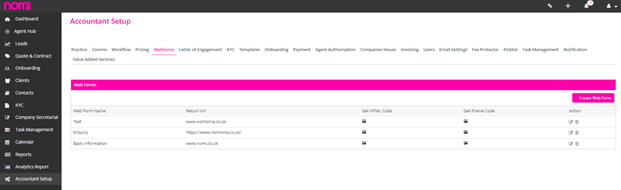
Create New Webforms
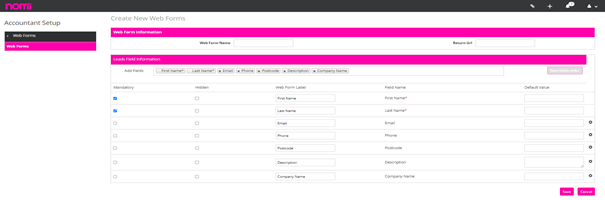
On this page, you have the option to input a name for the web form and its return URL. Following that, you can choose the fields and designate some as mandatory, like First Name, Last Name, Email, and Phone, ensuring you can easily reach out to them.
You will have to set up the Incoming and Outgoing SMTP under Accountant Setup>>Email Settings. You can set up the incoming email server of your email id and for outgoing you can verify the SMTP from AWS. This will send all the emails under your email ID using AWS SMTP. You may also contact support for troubleshooting any email setup-related issues you face.
To enter the company’s UTR number, follow either of the methods below:
Method 1:
Method 2:
To enter the Company District Number, please follow either of the two methods below:
Method 1:
Method 2:
You can change the Accounting Standard by following either of the methods below:
Method 1:
Method 2:
To add or update a Dormant period, please follow the steps below:
If a Dormant and Trading period already exists and you need to extend the Dormant period, you must first convert the existing Dormant period to Trading, and then convert the full Trading period back to Dormant. Please follow the steps below:
This will effectively extend the Dormant period to cover the Trading period duration.
You can download accounts in PDF format only.
No, only the PDF format is available for download.
No, Nomi does not support uploading iXBRL files.
You can download the CT600 form in PDF format only.
No, Nomi automatically attaches the accounts when submitting the CT600.
Follow the steps below to download either Draft or Final Accounts:
To download the CT600 form, follow the steps below:
To download the CT Computation, please follow the steps below:
In the Final Accounts > Documents tab, under the Attachments section.
In Nomi, only one director can sign the accounts.
To attach a document for record-keeping or email purposes, follow these steps:
Note: Any document attached to the Documents page can be sent to the client via email.
To download the electronic or submission receipt, follow the steps below:
To download the CT600 electronic receipt, follow these steps:
To add internal notes in the Final Accounts module, follow these steps:
Note: Internal notes are for internal reference only.
You will be unable to make changes or edit information from the Company Details page under the Final Accounts module if:
Note: To make changes, you must first unlock or open the accounts, if appropriate and permitted.
To update the company registration number from the final accounts
Note:
All fields marked with a red asterisk ( * ) are mandatory. Please ensure every required field is filled before clicking Save, or the system will not allow you to proceed.
To update the company registration date from the final accounts. Please follow the steps below:
To update the Company Address from final accounts, follow these steps:
Update the address fields:
Note: All fields marked with a red asterisk ( * ) are mandatory. Please ensure all required fields are completed before saving.
The CAC Code is the Company Authentication Code.
It’s given by Companies House and used to verify your company when submitting information online.
You can update it using either of the following methods:
Method 1 – From Company Details:
Method 2 – From Account Settings:
Note: The CAC Code is a mandatory field (indicated with a red asterisk). Ensure it is correctly filled before saving.
The Company District Number is used to identify the jurisdiction or processing district for company records, often required for filing purposes.
To edit the ‘Guarantees and other financial commitments’ note in FRS 105 accounts, kindly follow these steps:
To include or exclude the ‘Guarantees and other financial commitments’ note from full or filleted accounts in FRS 105, follow the steps below:
Yes, To Publish/ unpublish the ‘Guarantees and other financial commitments’ note, please follow the steps below:
To make changes to the Total note under “Guarantees and other financial commitments” for FRS 105 accounts, please follow these steps:
To include or exclude the Total note under “Guarantees and other financial commitments” from filleted or full accounts in FRS 105, please follow these steps:
To publish/ unpublish the Total note, under “Guarantees and other financial commitments” in FRS 105, please follow these steps:
To make changes to the Subsidiary Company note under “Guarantees and other financial commitments” for FRS 105, please follow these steps:
Please follow these steps to update the Contingent Liabilities under “Guarantees and other financial commitments” note:
Here’s how to edit the Charges on Assets note under “Guarantees and other financial commitments”
To change the Capital Commitments note under “Guarantees and other financial commitments” FRS 105, follow the steps below to make changes to this note:
To update the Other Financial Commitments note under “Guarantees and other financial commitments” in FRS 105, follow the steps below:
To include or exclude the Subsidiary Company note under “Guarantees and other financial commitments” from the FRS 105 Short Report, follow the steps below:
To include or exclude the Contingent Liabilities note under “Guarantees and other financial commitments” from the FRS 105 Short Report, follow the steps below:
To include or exclude the Charges on Assets note under “Guarantees and other financial commitments” from the FRS 105 Short Report, follow these steps:
To include or exclude the Capital Commitments note under “Guarantees and other financial commitments” from the FRS 105 Short Report, follow the steps below:
To include or exclude the Other Financial Commitments note under “Guarantees and other financial commitments” from the FRS 105 Short Report, follow the steps below
To publish or unpublish the Subsidiary Company note under “Guarantees and other financial commitments” in FRS 105, kindly follow these steps:
To update the visibility of the Contingent Liabilities note under “Guarantees and other financial commitments” in FRS 105 accounts, please proceed as follows:
To manage the Charges on Assets note under “Guarantees and other financial commitments” for FRS 105, follow these steps:
Certainly! To update the Capital Commitments note under “Guarantees and other financial commitments”, please:
To publish or unpublish the Other Financial Commitments note under “Guarantees and other financial commitments”, simply:
To include or exclude the Subsidiary Company note under “Guarantees and other financial commitments” from the FRS 105 Full Report, please follow these steps:
To control the visibility of the Contingent Liabilities note under “Guarantees and other financial commitments” in the FRS 105 Full Report:
To include or remove the Charges on Assets note under “Guarantees and other financial commitments” from the FRS 105 Full Report:
To adjust the Capital Commitments note under “Guarantees and other financial commitments” for inclusion in the FRS 105 Full Report, kindly:
To include or exclude the Other Financial Commitments note under “Guarantees and other financial commitments” from the full report:
To add or update general information under FRS 102 1A:
To add or edit the Statement of Compliance under FRS 102 1A, follow these steps:
To edit Paragraph 1 and Paragraph 2 of the Statement of Compliance under FRS 102 1A, follow these steps:
To edit or publish the main Significant Accounting Policies note under FRS 102 1A:
To edit or publish the Basis of Preparation under Significant Accounting Policies note under FRS 102 1A:
To edit either Sale of Goods or Rendering of Services under Revenue Recognition under FRS 102 1A:
To edit the Foreign Currency under FRS 102 1A, follow the steps below:
To edit the Rental Income under FRS 102 1A, please follow the steps below:
To edit the Interest Income under FRS 102 1A, follow the steps below:
To edit the Borrowing cost under FRS 102 1A follow the steps below:
To edit the Intangible Fixed Assets, like Goodwill, Development Costs, or Patents under FRS 102 1A, follow the steps below:
To enter the average number of employees in FRS 105 accounts:
No, you cannot unpublish this note. It is a required part of the FRS 105 accounts and will stay visible in the reports once you enter the number of employees.
No, you can not exclude this note from the FRS 105 accounts. It’s a required part of the report. Once you enter the number of employees, the note will automatically show in both the full and short reports and can’t be removed.
Yes, Nomi includes a Transition to FRS 105 note.
Yes, if it applies, you can add a deferred tax working table in the Transition to FRS 105 note. It helps show any tax-related adjustments made during the switch to FRS 105.
You can enter text in the Transition to FRS 105 note using either of these two methods:
Method 1: Direct Edit
Method 2: Through the Dropdown
To publish or unpublish the Transition to FRS 105 note, follow these steps:
To publish or unpublish the text section in the Transition to FRS 105 note, follow these steps:
To include the Transition to FRS 105 note in the filleted accounts under FRS 105, please follow the steps below:
To include the Transition to FRS 105 note in the full accounts, follow these steps:
To include the text in the filleted or full accounts, follow these steps:
To include the deferred tax working table in the Transition to FRS 105 note, follow these steps:
If you want to add your note or not use the default notes, you can use the Free Form options in Nomi. There are two available: Free Form 1 and Free Form 2.
To use one of them:
To enter the average number of employees in the FRS 105 accounts, follow these steps:
No, this note is required by FRS 105 rules. Once you enter a number, the note will automatically show and cannot be unpublished.
No, this note is a required part of FRS 105 accounts. It will appear automatically once the number is entered, and it cannot be removed from either the full or short report.
Yes, Nomi includes the Transition to FRS 105 note by default.
Yes, if it’s needed, you can add a deferred tax working table to explain tax-related adjustments during the transition to FRS 105.
You can add text in two ways:
Method 1: Direct Note Edit
Method 2: Via Dropdown > Text Section
To publish or unpublish the full note:
To manage the text part of the note:
To include it in the filleted (short) accounts:
To include it in the full accounts:
To include the text content in either report:
To include the working table:
You can use the Free Form notes if you want to add custom content or avoid default notes.
Here’s how:
To display solicitor details in the final accounts, follow these steps:
To display bank details in the final accounts, proceed as follows:
To insert page breaks in the Full Accounts report:
To add page breaks in the Filleted Accounts report:
To update the balance sheet approval date:
To display all income types on the detailed income statement:
To hide all income types on the detailed income statement:
To display dividend and retained earnings:
To hide dividend and retained earnings:
To update the name of the Financial Statement:
To include the Director’s Report in the Full Accounts:
To exclude the Director’s Report:
To add the Director’s Report to the Filleted Accounts:
To remove the Director’s Report from Filleted Accounts:
To add or edit the Principal Activity in the Director’s Report:
To add or edit content in the Going Concern section:
To add or update charitable donation details:
To update the Small Company Provision:
To edit the Director Responsibilities:
To change the signing date:
To include the Proprietor’s Report in the final accounts:
To include the accountant’s report in the filleted accounts, follow these steps:
This ensures that the accountant’s report will appear in the filleted accounts as required.

To exclude the accountant’s report from the filleted accounts, proceed with the following steps:
This will remove the accountant’s report from the filleted accounts.

To include the accountant’s report in the full accounts, follow these steps:
This will ensure that the accountant’s report is added to the full accounts.

To exclude the accountant’s report from the full accounts, follow these instructions:
This will remove the accountant’s report from the full accounts.

The Accountant’s Report can be presented in several standard formats. You can choose from the following options:
These formats allow flexibility based on professional body guidelines or specific client preferences.
To change the format of the Accountant’s Report, follow these steps:
Click Save to apply the chosen format.

To update or modify the Engagement Letter Date in the Accountant’s Report:

To edit or update the Accountant Report Approval Date, follow these steps:

To include the Partner’s Report in the partnership accounts, follow these steps:
This will ensure the Partner’s Report is included in the partnership accounts.
To exclude the Partner’s Report from the partnership accounts, follow these steps:
This will remove the Partner’s Report from the partnership accounts.

To enter the Principal Activity in the Partner’s Report:
To add a Going Concern statement:
To add details of a charitable donation:
To enter Small Company Provision details:
To add or update Partner’s Responsibilities:
To update the signing date:
To include or remove the Cover Page from the final accounts:
To manage the Company Information page:
To control the Income Statement page visibility:
To include or exclude the Statement of Financial Position:
To include or exclude the Notes to the Financial Statement section in the partnership final accounts, follow these steps:
To manage the inclusion or exclusion of the Detailed Income Statement in partnership final accounts, proceed as follows:
To enable comparison with the previous year in partnership final accounts, follow the steps below:
To exclude the comparison with the previous year in partnership final accounts, follow these steps:
To display a comparison with the previous year in Sole Trader/Proprietor’s final accounts, follow these steps:
This ensures that the report displays a side-by-side comparison with figures from the previous year.
To remove the comparison with the previous year in Sole Trader/Proprietor’s final accounts, follow these steps:
To include the Proprietor’s Report in the final accounts:
To remove the Proprietor’s Report from the final accounts:
To add or modify the Principal Activity for a Proprietor or Sole Trader:
To include or edit the Going Concern note in the Proprietor or Sole Trader’s report:
To add or update Charitable Donation details:
To update the Small Company Provision:
To update the Proprietor Responsibilities section in the Proprietor’s Report:
To change the Signing Date in the Proprietor or Sole Trader’s report:
To send an eSign from Final Accounts, follow these steps:
This ensures that the required documents are sent securely for digital signature.
To send an email or share attached documents from Final Accounts, follow the steps below:
This feature allows you to streamline communication and securely share important financial documents.
Yes, emails can be scheduled in advance from Final Accounts. Here’s how to schedule an email:
This feature is particularly useful for planning ahead and ensuring timely communication.
To view emails that have been scheduled:
You can review all upcoming scheduled emails and make changes if required.
Yes, all eSign emails sent from Nomi are password protected for enhanced security. The recipient must enter the correct password to open and sign the document, ensuring that only the intended individual can access it.
No, only eSign emails sent from Final Accounts are password protected to safeguard sensitive documents. All other emails, including those with general attachments or communication, are not password protected.
No, password protection for eSign emails cannot be disabled in Nomi. This is a built-in security feature designed to ensure that sensitive documents are accessed only by the intended recipient, maintaining confidentiality and data security.
No, you cannot change the eSign email password in Nomi. The password is automatically generated and fixed to maintain a consistent security standard across all eSign communications.
The password for a Sole Trader eSign email is the Sole Trader’s registration date as entered in Nomi. It must be entered in the format DD/MM/YYYY, including the slashes.
The password for a Partnership eSign email is the partnership’s registration date as recorded in Nomi. Ensure it is entered in the format DD/MM/YYYY, including the slashes, when opening the document.
The password for an LLP (Limited Liability Partnership) eSign email is the LLP’s registration date as entered in Nomi. It should be entered in the correct format, DD/MM/YYYY, when accessing the document.
The password for a Limited Company eSign email is the company’s registration date as entered in Nomi. The date must be in the DD/MM/YYYY format, including the slashes.
Here’s the updated, polished version of your content with improved grammar, clear formatting, and added descriptive details while preserving the original meaning.
To bring forward the notes from the previous year into the current Final Accounts for a Limited Company, follow these steps:
This feature helps maintain continuity and consistency in your financial reporting by carrying over important disclosures from the prior year.
To add or update general information within the FRS 105 notes, please follow these steps:
This allows you to keep the general information section current and accurate according to the company’s details.
To control whether the general information note appears in the FRS 105 Short Report, follow these steps:
To manage the inclusion of the general information note in the FRS 105 Full Report:
To control the visibility of the general information note in FRS 105 accounts:
Publishing the note makes it visible in the final accounts, while unpublishing hides it as needed.
To update or add information to the Directors’ Advances, Credit and Guarantees note for FRS 105 accounts, follow these steps:
This note is essential for disclosing any financial transactions or guarantees involving directors, ensuring transparency in the accounts.
To manage the publishing status of the Directors’ Advances, Credit and Guarantees note for FRS 105, follow these steps:
To include or exclude this note from the filleted accounts (FRS 105 Short Report), follow these steps:
To include or exclude this note from the full accounts (FRS 105 Full Report), proceed as follows:
To edit the Overdrawn note under Directors’ Advances, Credit and Guarantees:
To adjust the publishing status of the Overdrawn note:
To include or exclude the Overdrawn note from the FRS 105 Short Report:
To include or exclude the Overdrawn note from the FRS 105 Full Report:
To publish or unpublish the Advance note under Directors’ Advances, Credit and Guarantees:
Click Save to finalize your changes.
To manage the inclusion or exclusion of the Advance note under Directors’ Advances, Credit and Guarantees in the FRS 105 Short Report, follow these steps:
To control the visibility of the Advance note in the FRS 105 Full Report, follow these steps:
Click Save to confirm your changes.
To edit the content of the Advance note under Directors’ Advances, Credit and Guarantees in FRS 105:
Click Save once your changes are complete.
To edit the ‘Guarantees and other financial commitments’ note in FRS 105 accounts, kindly follow these steps:
To I include or exclude the ‘Guarantees and other financial commitments’ note from full or filleted accounts in FRS 105 follow the below steps:
Yes, To Publish/ unpublish the ‘Guarantees and other financial commitments’ note, follow the steps below:
To make changes to the Total note under “Guarantees and other financial commitments” for FRS 105 accounts, follow these steps:
To include or exclude the Total note under “Guarantees and other financial commitments” from filleted or full accounts in FRS 105, follow these steps:
To publish/ unpublish the Total note, under “Guarantees and other financial commitments” in FRS 105, follow these steps:
To make changes to the Subsidiary Company note under “Guarantees and other financial commitments” for FRS 105, please follow these steps:
Please follow these steps to update the Contingent Liabilities under “Guarantees and other financial commitments” note:
Here’s how to edit the Charges on Assets note under “Guarantees and other financial commitments”
To change the Capital Commitments note under “Guarantees and other financial commitments” FRS 105, follow the steps below to make changes to this note:
To update the Other Financial Commitments note under “Guarantees and other financial commitments” in FRS 105, please follow the steps below:
To include or exclude the Subsidiary Company note under “Guarantees and other financial commitments” from the FRS 105 Short Report follow the steps below:
To include or exclude the Contingent Liabilities note under “Guarantees and other financial commitments” from the FRS 105 Short Report follow the steps below:
To include or exclude the Charges on Assets note under “Guarantees and other financial commitments” from the FRS 105 Short Report, follow these steps:
To include or exclude the Capital Commitments note under “Guarantees and other financial commitments” from the FRS 105 Short Report, follow the steps below:
To include or exclude the Other Financial Commitments note under “Guarantees and other financial commitments” from the FRS 105 Short Report, please follow the steps below
To publish or unpublish the Subsidiary Company note under “Guarantees and other financial commitments” in FRS 105, kindly follow these steps:
To update the visibility of the Contingent Liabilities note under “Guarantees and other financial commitments” in FRS 105 accounts, please proceed as follows:
To manage the Charges on Assets note under “Guarantees and other financial commitments” for FRS 105, follow these steps:
To update the Capital Commitments note under “Guarantees and other financial commitments”:
To publish or unpublish the Other Financial Commitments note under “Guarantees and other financial commitments”, simply:
To add or remove the Subsidiary Company note from the FRS 105 Full Report:
To control the visibility of the Contingent Liabilities note under “Guarantees and other financial commitments” in the FRS 105 Full Report:
To include or remove the Charges on Assets note under “Guarantees and other financial commitments” from the FRS 105 Full Report:
To show or hide the Capital Commitments note in the FRS 105 Full Report:
To include or exclude the Other Financial Commitments note under “Guarantees and other financial commitments” from the full report:
To add or edit general information under FRS 105, follow these steps:
To add or edit the Statement of Compliance under FRS 102 1A, please follow these steps:
To edit Paragraph 1 and Paragraph 2 of the Statement of Compliance under FRS 102 1A, follow these steps:
To edit or publish the main Significant Accounting Policies note under FRS 102 1A:
To edit or publish the Basis of Preparation under Significant Accounting Policies note under FRS 102 1A:
To edit either Sale of Goods or Rendering of Services under Revenue Recognition under FRS 102 1A:
To edit the Foreign Currency under FRS 102 1A, please follow the steps below:
To edit the Rental Income under FRS 102 1A, follow the steps below:
To edit the Interest Income under FRS 102 1A, follow the steps below:
To edit the Borrowing cost under FRS 102 1A, follow the steps below:
To edit the Intangible Fixed Assets like Goodwill, Development Costs, or Patents under FRS 102 1A, follow the steps below:
Ensuring that submissions are complete, accurate, and timely can help minimize delays. If a submission remains pending for an extended period, contacting Companies House for clarification and guidance is recommended. However, if it is pending for more than expected, you should click on ‘Get Response’ or refresh the submission screen every 5 minutes until the response is fetched from the Companies House. Additionally, you can also click on the Companies House link and check whether the submission is updated on Filing History.
Submissions to Companies House may be marked as “Pending” for several reasons. Understanding these reasons can help ensure that your submissions are processed smoothly and efficiently. Here are some common reasons why a submission might go under “Pending” status:
Reasons for Pending Status
Steps to Address Pending Submissions
Submissions to Companies House going under “Pending” status are not uncommon and can be due to a variety of reasons, from processing times and incomplete information to manual reviews and technical issues.
To claim losses in CT600 you will have to navigate to Final Accounts>>Click on CT 600 Tax Return (Left Pane) in the dropdown list you will have to click on CT Adjustments which is the last option. Under CT Adjustments there are different sections for losses.
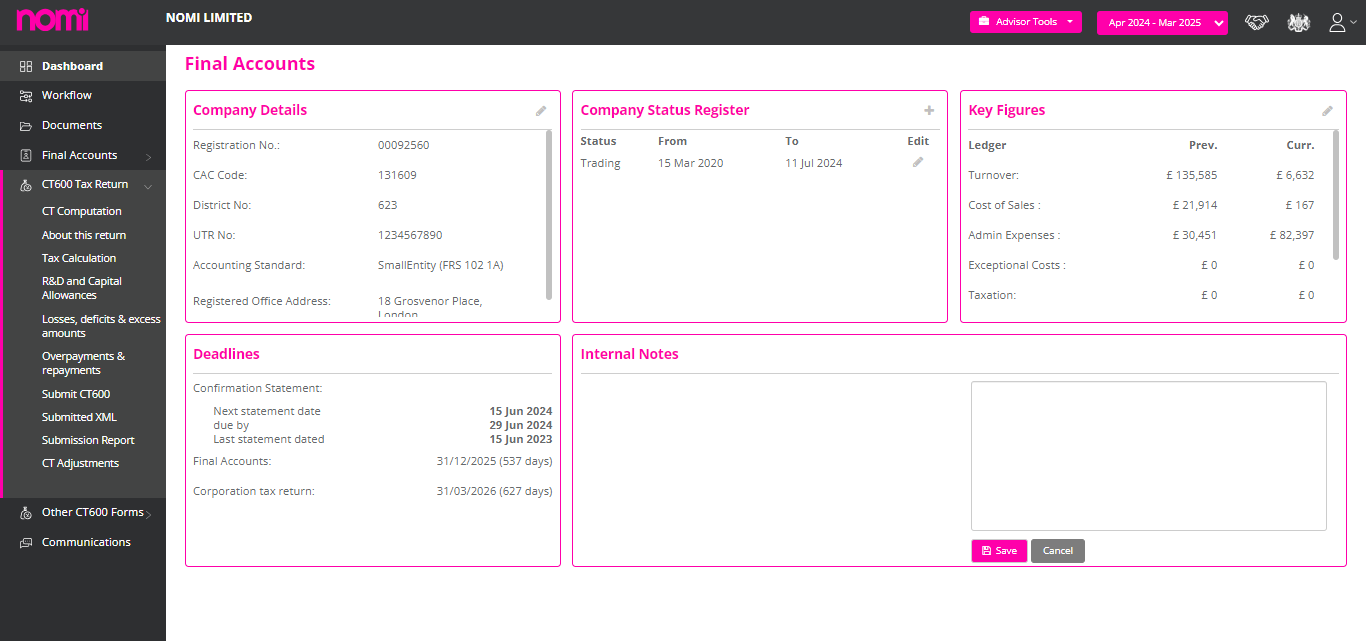
If you are looking to make any general loss adjustments, then kindly click on the Profit/Loss Adjustments Tab. If there are any Trading Losses which you want to claim, then click on this tab and enter the values under the relevant boxes.
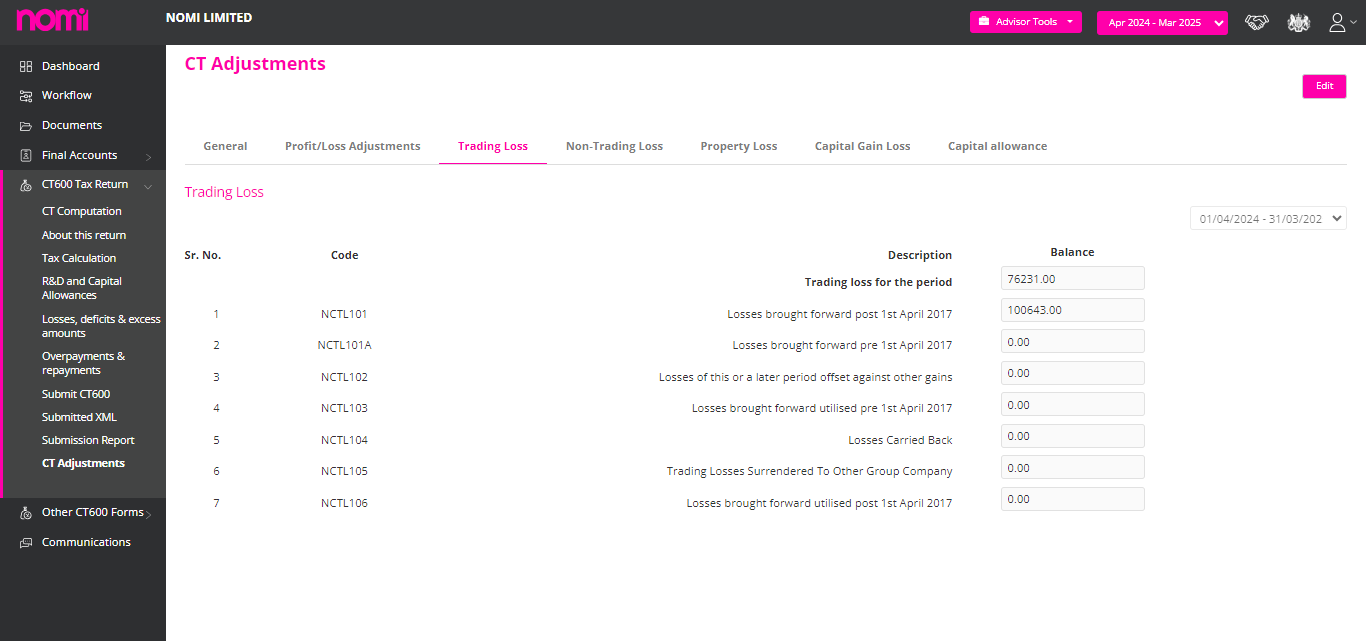
If there is a trading loss this year and you want to carry back to the previous period, then enter the values in the box Losses carried back. There are different boxes where we can update the values and adjust the Trading losses. There are different tabs on this screen, and you can claim the losses by entering values in the relevant boxes.
To check the submission failure under CT600 you will have to navigate to CT600 Tax Returns>>Submission Report and there you will find the submission status Log. Here you can see the reason for the failure as all the messages are coming from HMRC.
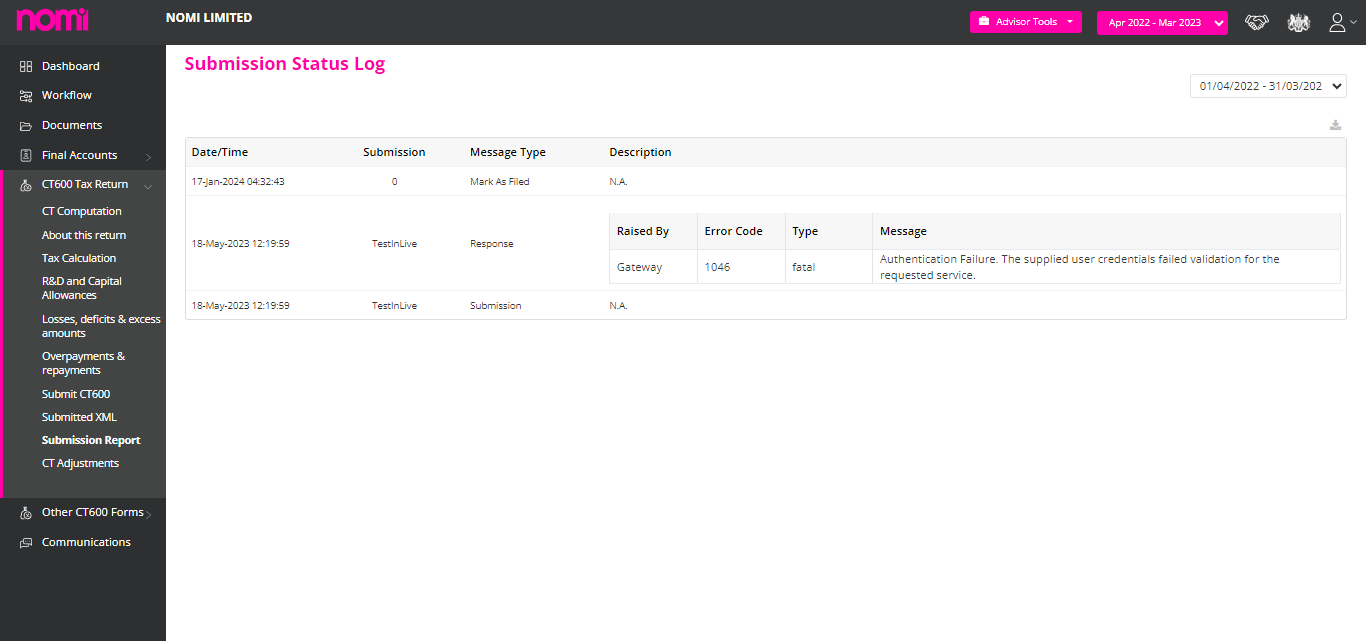
After making relevant changes you can file the Tax return again. Similarly, to check any submission failures for Accounts you will have to navigate to Final Accounts>>Submit Accounts. On this screen, it will show you the submission status as you click on that it will give you the reason for failure in a pop-up. You can view the error message, make relevant changes and then make the submission again.
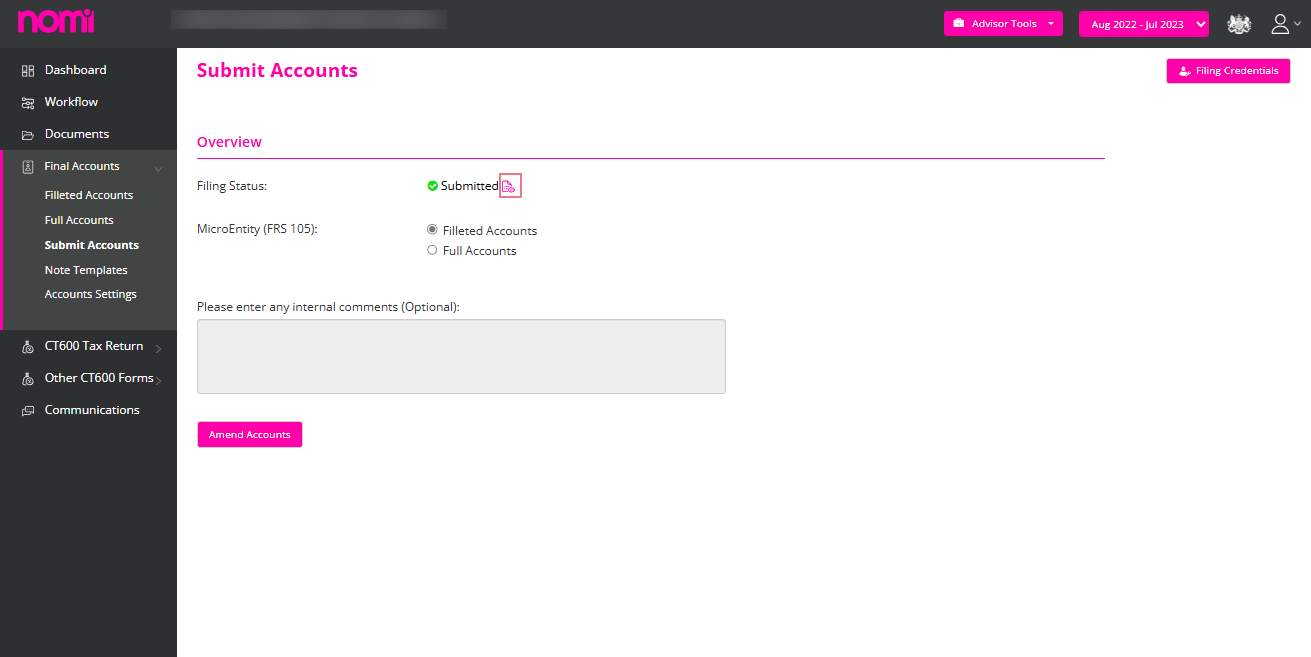
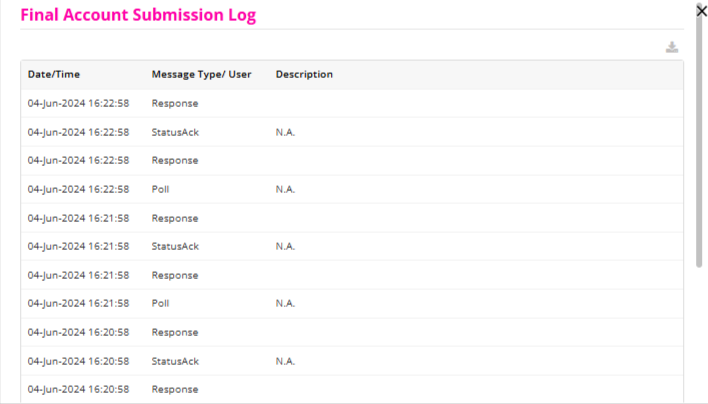
You can always contact Nomi Support and they will help assist you further with resubmissions or any error messages while submitting the Accounts or CT600.
To claim R&D you can navigate to Final Accounts>>Other CT600 Forms>>CT Other Adjustments>>R&D Claim. Under this screen, you can select the Company Type i.e. SME or Large Entity. Then you have to select the Method Type i.e. SME R&D Relief or RDEC. Then you will have to fill in the below details:
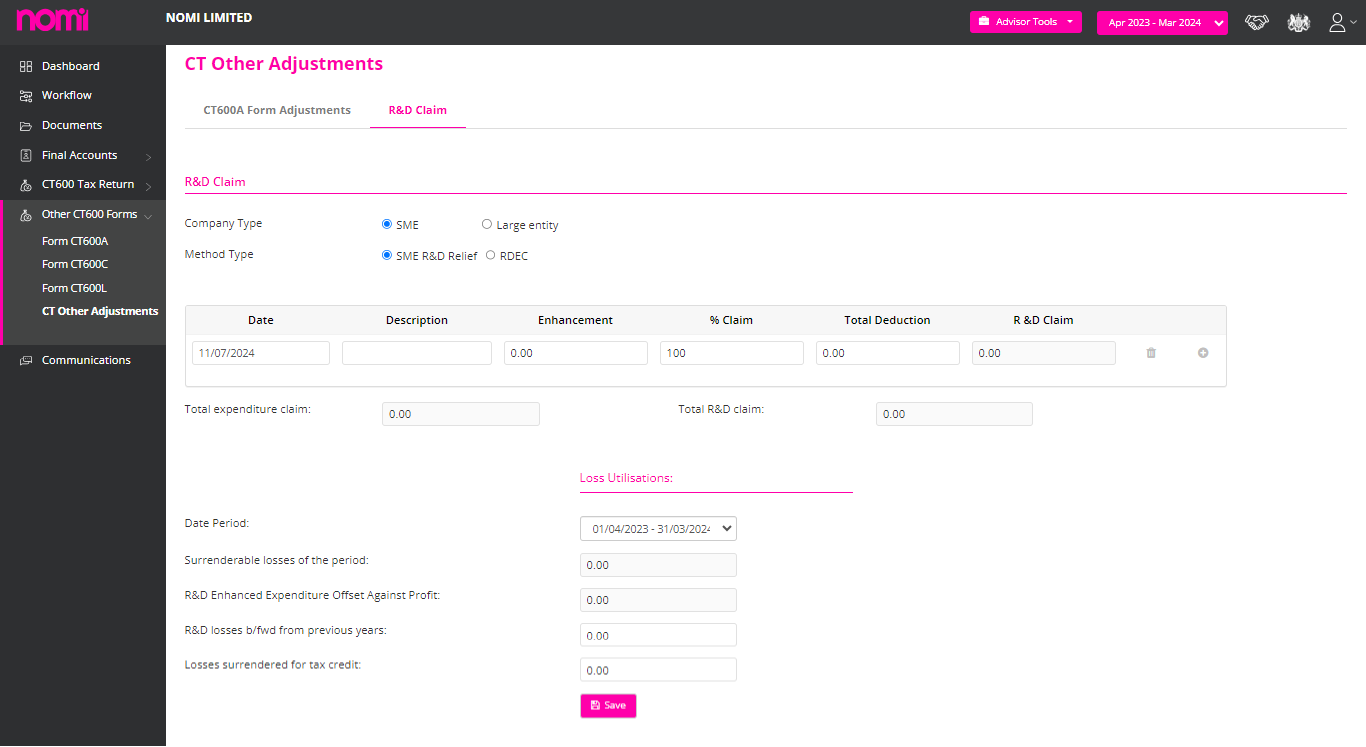
Based on the above entries, it will show you the amount of the R&D claim and the Total expenditure.
As of now, we cannot make changes to the Final Accounts Report headers or particular account types in Nomi.
To make changes in Note Templates you will have to navigate to Final Accounts>>Note Templates>>Click on Pencil Icon to edit and then make the relevant changes in the Notes.
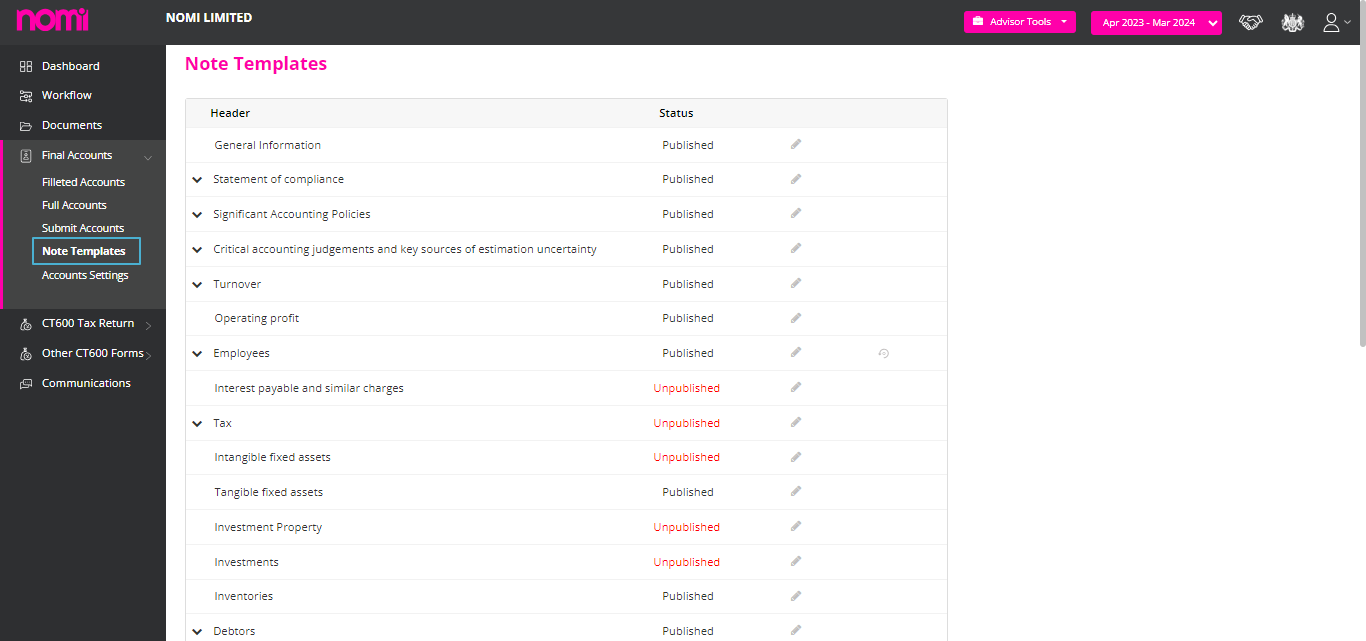
After this, you can navigate to Final Accounts>>Click on Filleted Accounts/Full Accounts and see the impact of changes in the Notes to Final Accounts.
To file the amended accounts you will have to first lock the period and then mark the accounts manually submitted by clicking on ‘Mark as Filed’ and also provide the comments. After this, you will get an ‘Amend Accounts’ label on the page. As you click on ‘Amend Accounts’ then a pop-up will appear ‘By making amendments, the accounts may update based on recent new developments. Are you sure, you would like to continue?
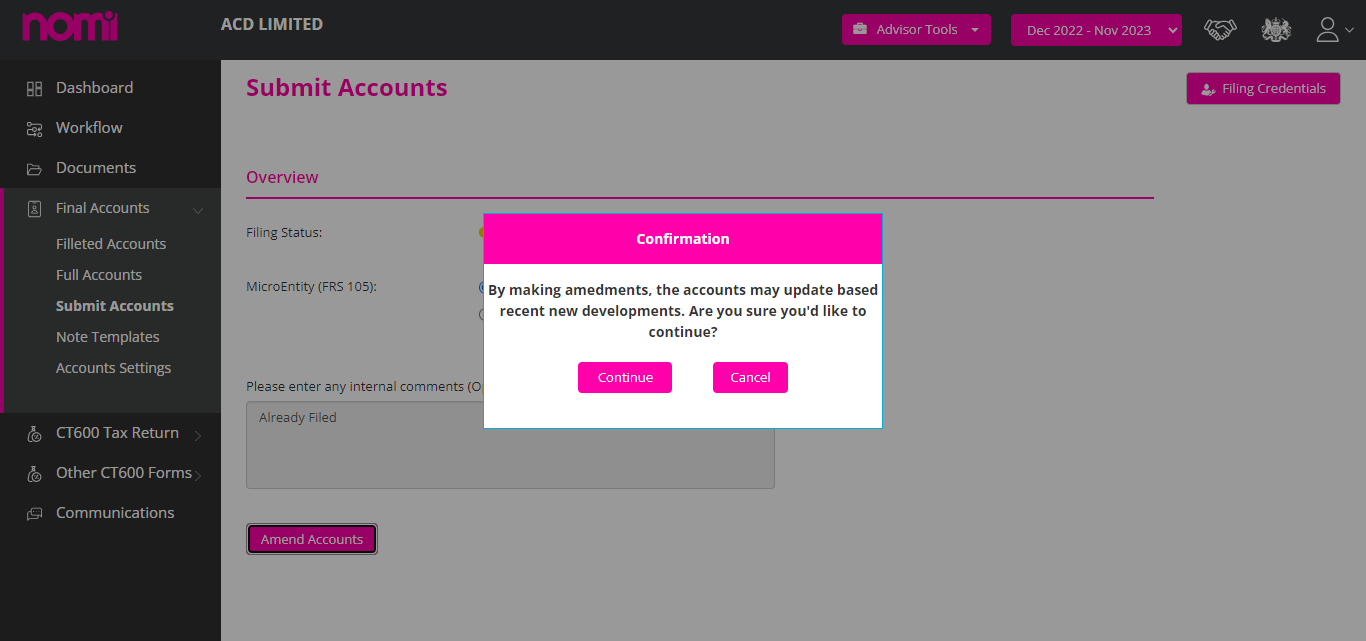
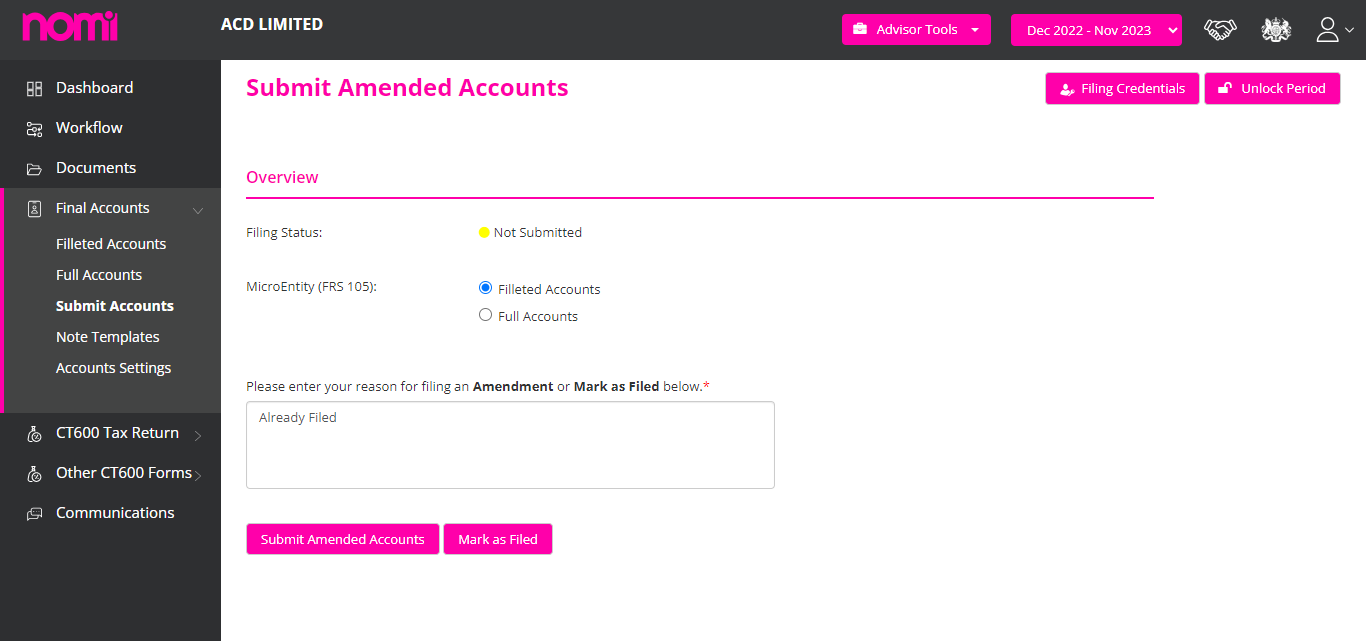
You will have to click on ‘Continue’ and it will show you a ‘Submit Amended Accounts’ label. Here you will have to provide the reason for Filing Amended Accounts. You can also see that on the Filleted Accounts, the heading of the Accounts is changed to ‘Amended Accounts’.
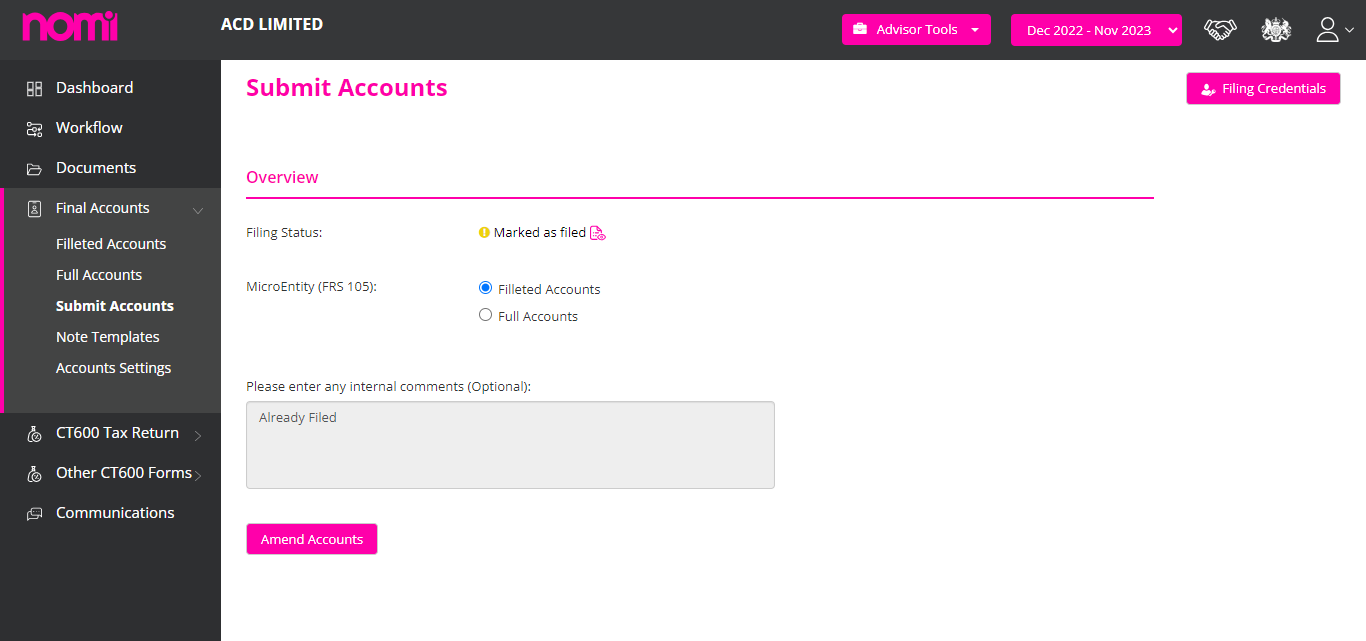
The Tag is changed and when it is filed to the company’s house then under the filing history it will show you as ‘Amended Accounts rather than Micro Entity or Accounts for Small Companies. If you have submitted the Accounts from Nomi, then it will show you the Amend Accounts label and you can follow the rest of the process which is the same as when you file it from other Accounts.
To add the allowances you will have to navigate to CT600 Tax Return>>CT Adjustments>>Capital Allowances.
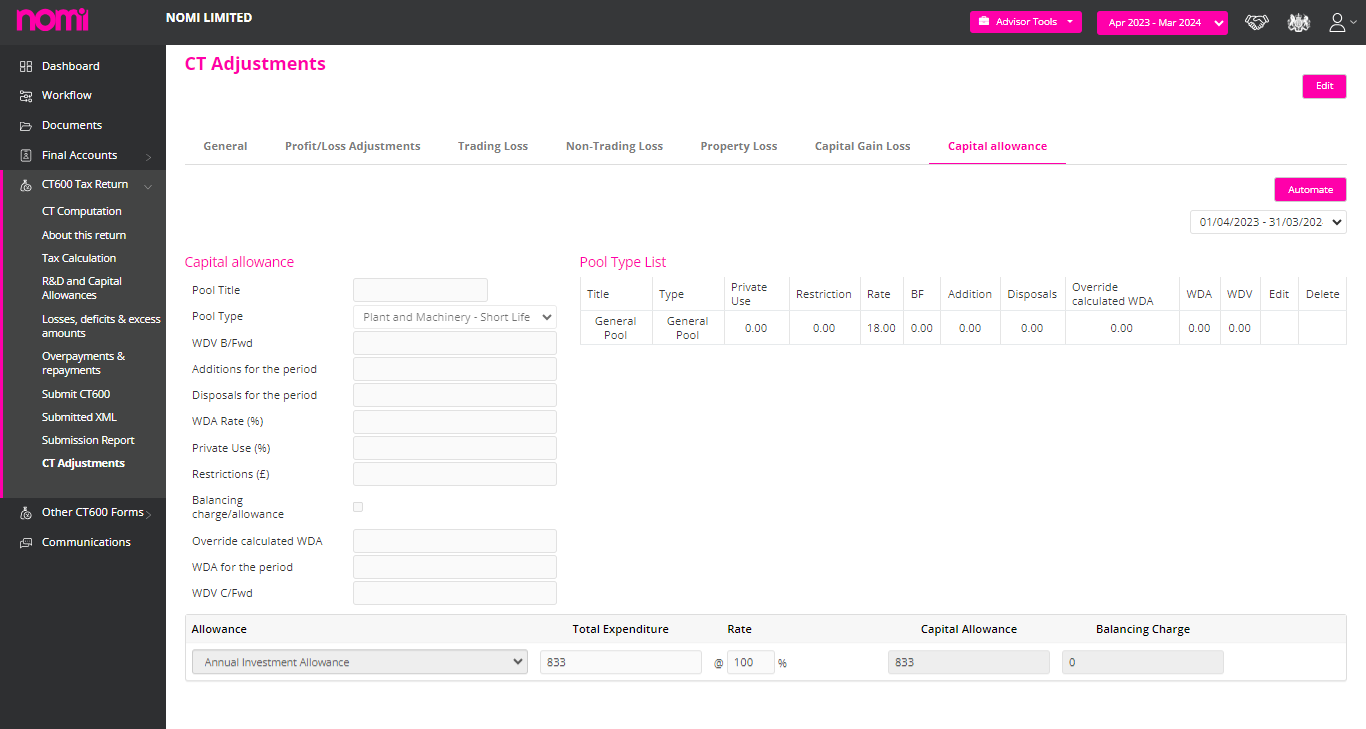
On this tab, you can record the Annual Investment Allowance, First Year Allowance, Super Deduction Allowance, Special Rate Allowance etc. and if there is a pool type allowance then the user can update from the Pool type allowance list.
To change the status from Dormant to Trading you can navigate to Final Accounts>>Dashboard. Here the Company Status Register is present where you can change the Status from Dormant to Trading or vice versa.
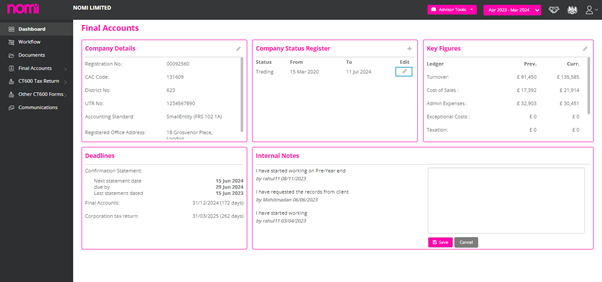
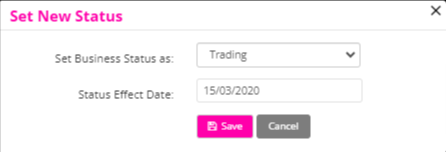
To change the status, you click on the edit icon change the Business Status as Trading or Dormant and update the status effect date. If you get a message ‘Company status must start from the company registration date’ then please set the status effect date as the company registration date and then make the relevant changes.
If you access the CT600 and it shows as dormant then please check the Company Status Register on Final Accounts Dashboard. It will be set as Dormant.

You can edit the period and set the status to Trading post which the CT600 Computation and CT600 will show as Trading.
Marginal relief is a tax provision designed to help companies whose profits fall just above the lower threshold for the higher rate of corporation tax. It effectively creates a smoother transition between the lower and higher rates of corporation tax by reducing the tax burden on companies that would otherwise face a sudden increase in their tax liability. However, there are several reasons why marginal relief might not be calculated or applied:
Reasons Why Marginal Relief Might Not Be Calculated
Steps to Ensure Marginal Relief is Calculated Correctly
Marginal relief is a beneficial provision for companies with profits just above the lower threshold, but it only applies under specific conditions. Ensuring accurate profit calculation, accounting for associated companies, staying updated with current tax legislation, and checking for administrative errors are crucial steps in ensuring marginal relief is correctly calculated. If in doubt, seeking the assistance of a tax professional can help ensure compliance and optimization of tax liabilities.
Presenter ID and Presenter Authentication
Presenter ID and Presenter Authentication are key elements used by Companies House in the UK to identify and verify the identity of individuals or entities submitting documents on behalf of companies. These mechanisms ensure that only authorized individuals can file documents, providing a layer of security and accountability. This is required for every Agent if they are looking to file Accounts to Companies House through any third-party software.
Presenter ID
Presenter ID is a unique identifier assigned to individuals or entities that submit documents to Companies House. This ID is used to track submissions and ensure that they are being made by authorized persons.
Presenter Authentication
Presenter Authentication refers to the process and credentials used to verify the identity of the person or entity submitting documents to Companies House. This authentication ensures that submissions are made by authorized presenters and helps prevent unauthorized access or fraudulent filings.
Importance in Filing with Companies House
Presenter ID and Presenter Authentication are essential components of the document submission process to Companies House. They provide a secure and efficient way to manage filings, ensuring that only authorized individuals can submit documents on behalf of companies. This system enhances security, accountability, and compliance with regulatory requirements, ultimately contributing to the integrity of corporate records.
You can enter the Client’s Credentials by navigating to Bookkeeping>>Settings>>General Information>>Accountant Information>>Change HMRC Configuration>>Company Level.
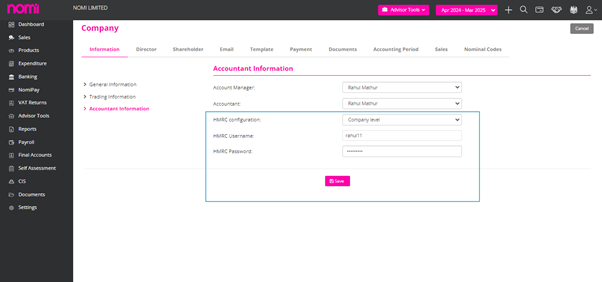
After this, you can update the HMRC Username and HMRC Password of the client. Alternatively, you can update the Client’s credentials while filing the CT600 by navigating to Final Accounts>>CT600 Tax Return>>Submit CT600>>Edit Filing Credentials>>Switch to Company Level. Here you can update the Username and Password and submit the CT600 using the Client’s Credentials.
The Dividend and Retained Earnings are not part of detailed income statements hence we have taken that off after the feedback we received.
We have a Dashboard for Accountants which is a Practice Management Dashboard for Year-end Accounts and Corporation Tax Returns. This is a super useful tool to manage all your due dates/deadlines / various filters and various statuses.
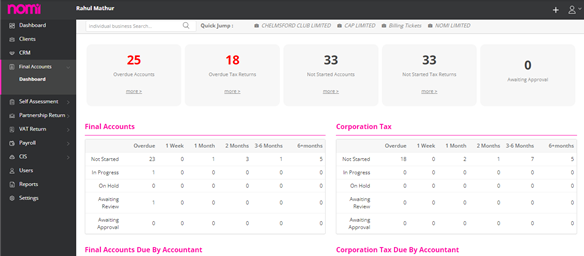
Here you can see the overdue accounts and corporation tax deadlines along with the records on which you have still not started working.
We also have a workflow through which you can update the status of your work such as in progress/On hold/Awaiting approval etc and when it is getting due i.e. 1 week/1 month/3-6 Month and if you click on the count, it will take you to that screen and the name of the companies will be listed there. You can check this for both i.e. Accounts and CT600.
From this screen, you can download the report and also use various filter options. You can also send reminder bulk emails and SMS to clients and account managers so that they can take necessary actions on time. This can save you a lot of hassle.
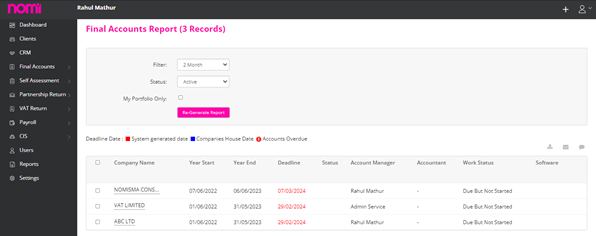
If you want to keep track of the work completed by accountants, then you can view that under this dashboard.
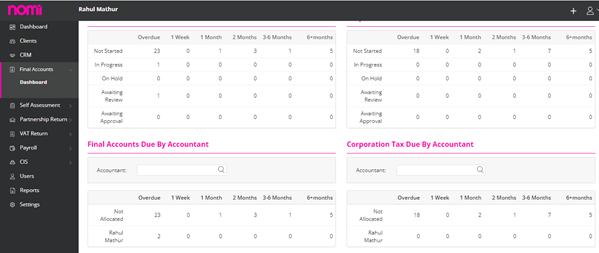
The final accounts/corporation tax due by accountants will show you what is being done with the accounts or corporation tax records assigned to various accountants and whether they are working or if anything is getting delayed.
From here you can also navigate to the individual dashboard of a Company.
Under this dashboard you can view and edit the Company details, change the reporting standard, check the trading status of the company, and view and compare the key figures of the current and past year, deadlines are listed for CS01, Accounts and Corporation Tax.
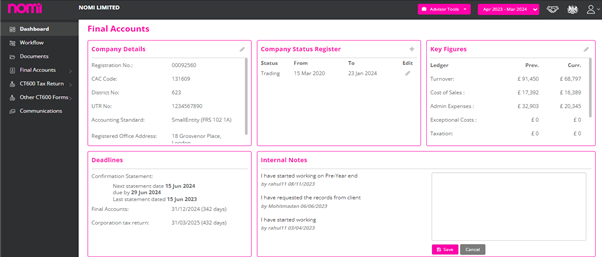
CS01 is integrated with the COHO. Accounts and CT600 are based on the logic of 9 months and 12 months from the accounting period end. In case you want to leave any notes internally then you may do so on this screen.
This is more like status management and this system at the moment does not automatically send notifications or reminders to client managers or clients, but you can use this system to send bulk emails and reminders to clients. Overall, this is a snapshot of the stages of your client and is a great tool for effective client management and updating them.
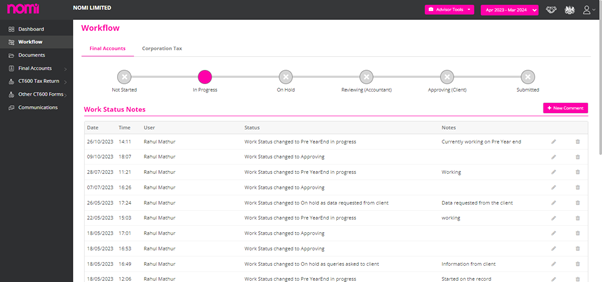
You can manage all your work by providing comments and updating the current work status. Any senior team member can keep track of the work done through various statuses as this is linked with the practice dashboard. Here the checklist will also appear which you can create globally under Agent Hub settings, and it shows you the submission status as well.
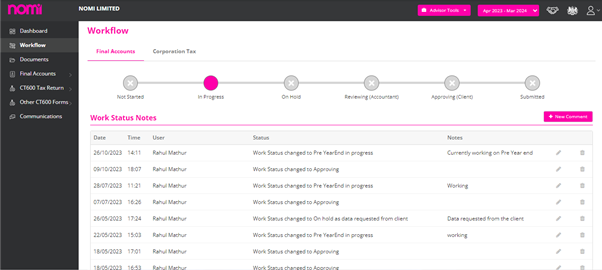
Usually, the Bookkeepers and Accountants use both services due to the integration we offer, however, if you are not using the bookkeeping then you may mark it inactive by clicking on the edit icon on the right side and under the general tab you can select the services from Bookkeeping and Final Account to Final Accounts only.
We have also offered the Final Accounts Practice Dashboard which lets you know what is due or overdue with context to Final Accounts and Corporation Tax.
To open a Final Accounts record you will have to click on Final Accounts service of the Client. If only the final accounts service is active and not the bookkeeping, then it will take you to a dashboard with limited access to Bookkeeping.
Bookkeeping Dashboard with Limited Access
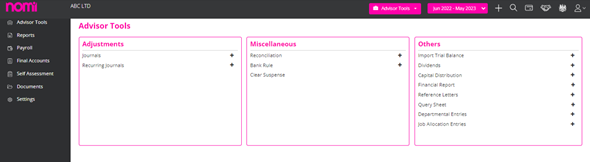
NOTE: If you are managing the bookkeeping in Nomi then you don’t have to import the trial balance as all the data is updated from bookkeeping into final accounts and all the modules are well-integrated.
As you can see, we have limited access to the bookkeeping module. Here we can take all the necessary actions that are required before we start with the Final Accounts and Corporation Tax.
We can set up the Accounting Period under settings>>Accounting Periods. When we import the Company/LLP then it imports the current Accounting Period, however, if we want to prepare a comparative report then we need to add the previous accounting periods. For this, we have to click on settings and then on the Accounting Period Tab. Here we can click on Adjust Accounting periods and on the next screen we can click on the labels Add Next Year or Add Previous Year.

To manage the long period you can also change the dates of the accounting period if required. In the event of more than 12 months period you will have to create a full period let’s say 12 months and one week. The software will then divide this period into two CT600s. The first will be for 12 Months and another for a week however for Accounts purposes the complete period is submitted.
Nominal Codes or the Chart of Accounts is the next step. If you are doing bookkeeping with some other software and a few of the accounts, you have set up are different to what we have in Nomi then you may add those under the Chart of Accounts. For this, you can click on Add Account in the top right corner, and you will have a list of different Account types you can add Incomes, expenses, Debtors, Creditors, Bank Accounts, Assets, Liabilities etc. Also, you can first search whether the Nominal you have in your bookkeeping package is available in Nomi with a different name with the help of the search option.

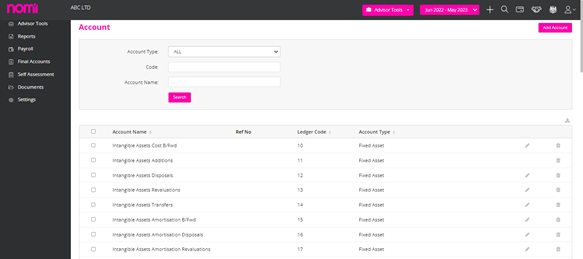
After creating all the required nominal codes, you can import the Trial Balance in Nomi which you can do with the Advisor Tools in the Header or on the left vertical pane. As you click on this you will get three options i.e. CSV, XERO, and QuickBooks. When you import the data through CSV, you can download the template and it will show three columns by default i.e. Ledger Code, Account Name and Balance. You can change the balance to Debit and Credit columns, and it will be easier for you to import the data. Now if you are not sure of the Nominals then you can skip the whole thing and only mention the Account Name i.e. Sales, Purchases etc and enter the amounts in the Debit or Credit columns. Once you have updated all the information then you may import the trial balance and map the columns correctly. This will take you to the import trial balance page where you have to enter the period-end data as the import data for the relevant accounting period and map the nominals if not mapped in the trial balance. Please make sure the Trial Balance is matched i.e. the debit should be equal to credit.
Similarly, you can import the data from Xero and QuickBooks and for that, you have to make the selection from the dropdown menu, and it takes you to the login screen of that software. After logging in you can select the client for whom you want to import the Trial balance and it will fetch all the information directly into Nomi.

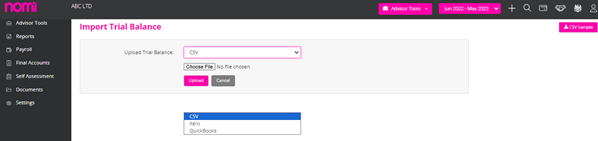
To update the data manually you have to click on the Journals option available under Advisor Tools. On this screen, you can click on Add and a pop-up will appear where you will have to mention the date of posting and description and then enter the Nominals and Debits and Credits.
So, these are a few ways through which you can update the data in Nomi in case you are not doing the Bookkeeping. If you are doing the Bookkeeping, then you have to only take care of Accounting Periods and Nominal Codes as a part of bookkeeping.
After updating all the information, you can click on Final Accounts Dashboard.
As you click on Final Accounts you can view the dashboard and update the information.
Company Details:
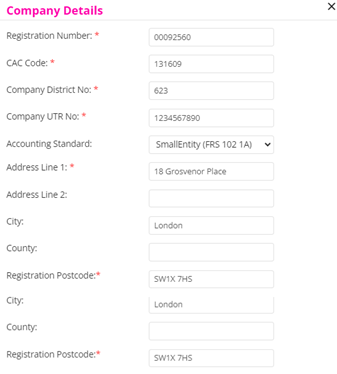
In this section, you can update the details such as Registration Number, Company Authorisation Code, Company District Number, Company UTR Number, Accounting Standard and Address Details.
Company Status register
To change the status of Corporation Tax from Trading to Dormant or Vice versa you can click on the edit icon and make the changes in this pop-up and click on save.
Key Figures
The Key figures will show you the data for both the years i.e. Current and Previous however if you are looking for a Comparative Report then click on edit and it will take you to this screen.
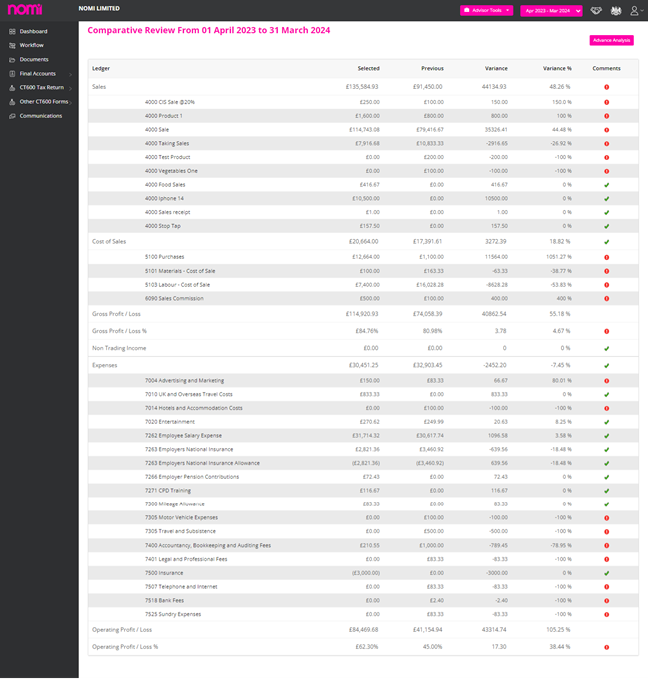
Account Settings
To make changes in the Accounts Module you will have to click on Accounts Settings, and it will redirect you to a screen where you will be able to view the Company Settings and Account Settings.
Company Settings
Under Company Settings, you will find the General and Related Settings options. The General Settings allows you to enter the Company Authorisation Code and select the signatory for the report if there is more than one signatory available in the company. You can also update the Registered office details and include the trading office address in the Accounts report. After making all the changes on this screen you can click on Save.
General
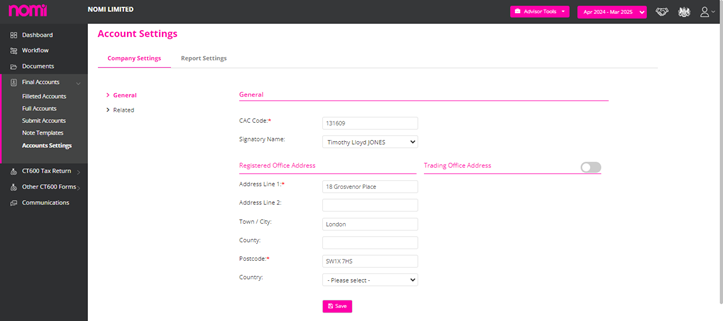
Related
Here you can mention the name of the Company Secretary if any. Choose the Director’s Name from the Director List dropdown and if you are looking to include the Accountant and Solicitors details then enable both of these options.
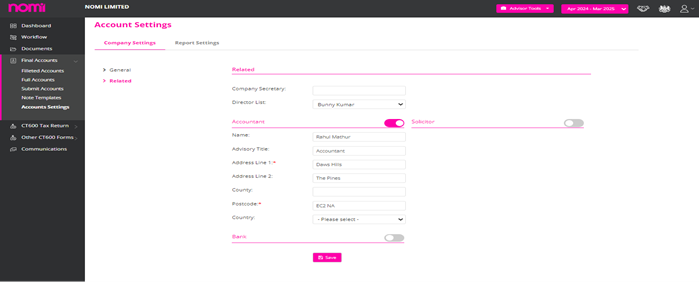
Report Settings
It is divided into three parts i.e. General, Director Report and Accountant Report.
General
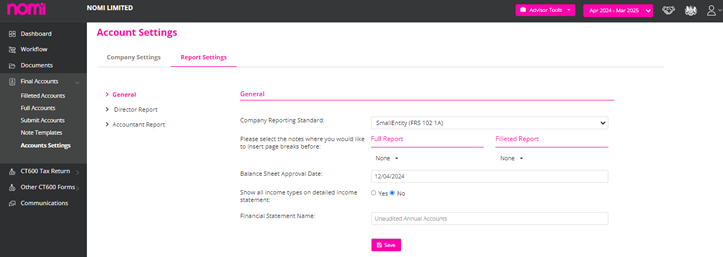
Under General, you can update the reporting standard i.e. Small Entity (FRS102 1A), Micro Entity (FRS105) and Dormant in case there was no trading. You can now insert the page break between the Notes in Full and Filleted set of Accounts. 13 notes are listed under Full Accounts and 6 under Filleted and if you wish to give a page break then just select that note and there will be a page break after that note. After this, you can enter a Balance Sheet Approval date. If you want to show all the income types on a detailed income statement, then set this option to Yes. You can also change the name of the Financial Statement i.e. Unaudited Annual Accounts or so.
Director report
You can include the director’s report in the Full Report, Filleted Report or both. Then you have to mention the principal activity of the company along with the Going Concern, Charitable donation as applicable.
The small company provisions and director responsibilities are updated by default however you can make changes if required.

Accountant Report
You can select whether you want to include the accountant’s report in a Full report, filed report or both. You can also select the Accountant Report format as per the ACCA, ICAEW or AAT i.e. as per the governing body and for any others which are not on the list you may select default or custom and in custom, you can enter the data as required. This then updates the data under the accountant report content. You can also update the Engagement Letter date and Accountant Report Approval date.
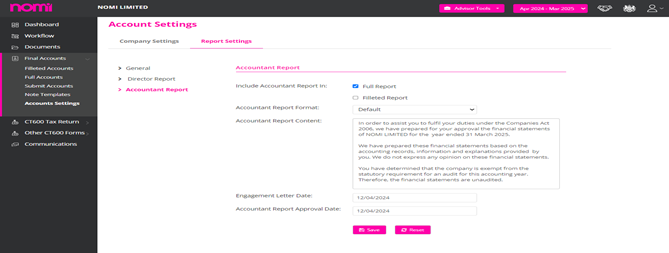
You can also get electronic approval from your client by sending the Accounts and CT600 for an E-Signature. Under this screen, you can use the predefined templates to get the data and communicate the information with the client.
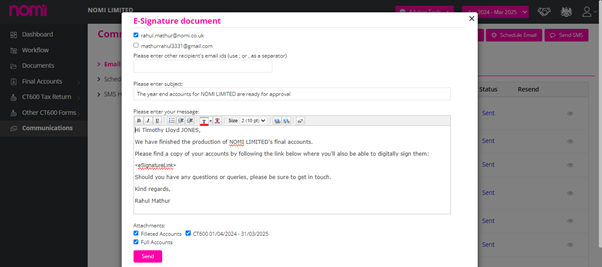
1 For the reports that are sent across through Nomi the password is usually the Date of Birth of the Individual (dd/mm/yyyy) format, these reports especially those containing sensitive or confidential information are often password-protected for several key reasons:
Password-protecting reports in the UK are a critical practice for safeguarding sensitive information, ensuring compliance with legal and regulatory requirements, preventing unauthorized access, and maintaining the integrity and authenticity of important documents. It is a fundamental aspect of effective data security and risk management strategies for organizations.
To Reduce Payments on Account you will have to navigate to Self-Assessment>>Client dashboard or click on Client Name>>Others (Left Side)>>Payments on Account>>Click on Edit>>Tick the checkbox No 10 ‘Reduce Payments’.

After this, you can enter the amount by which you want to reduce the Payment on Account in Nomi and then click on Save.
You can amend the SA100 Personal tax return by navigating to Self-Assessment>> Individual Record>>Review & File>>Submit to HMRC>>Undo Submission>>Unlock>>Set the option to yes >> Are you submitting an amendment for the current period?
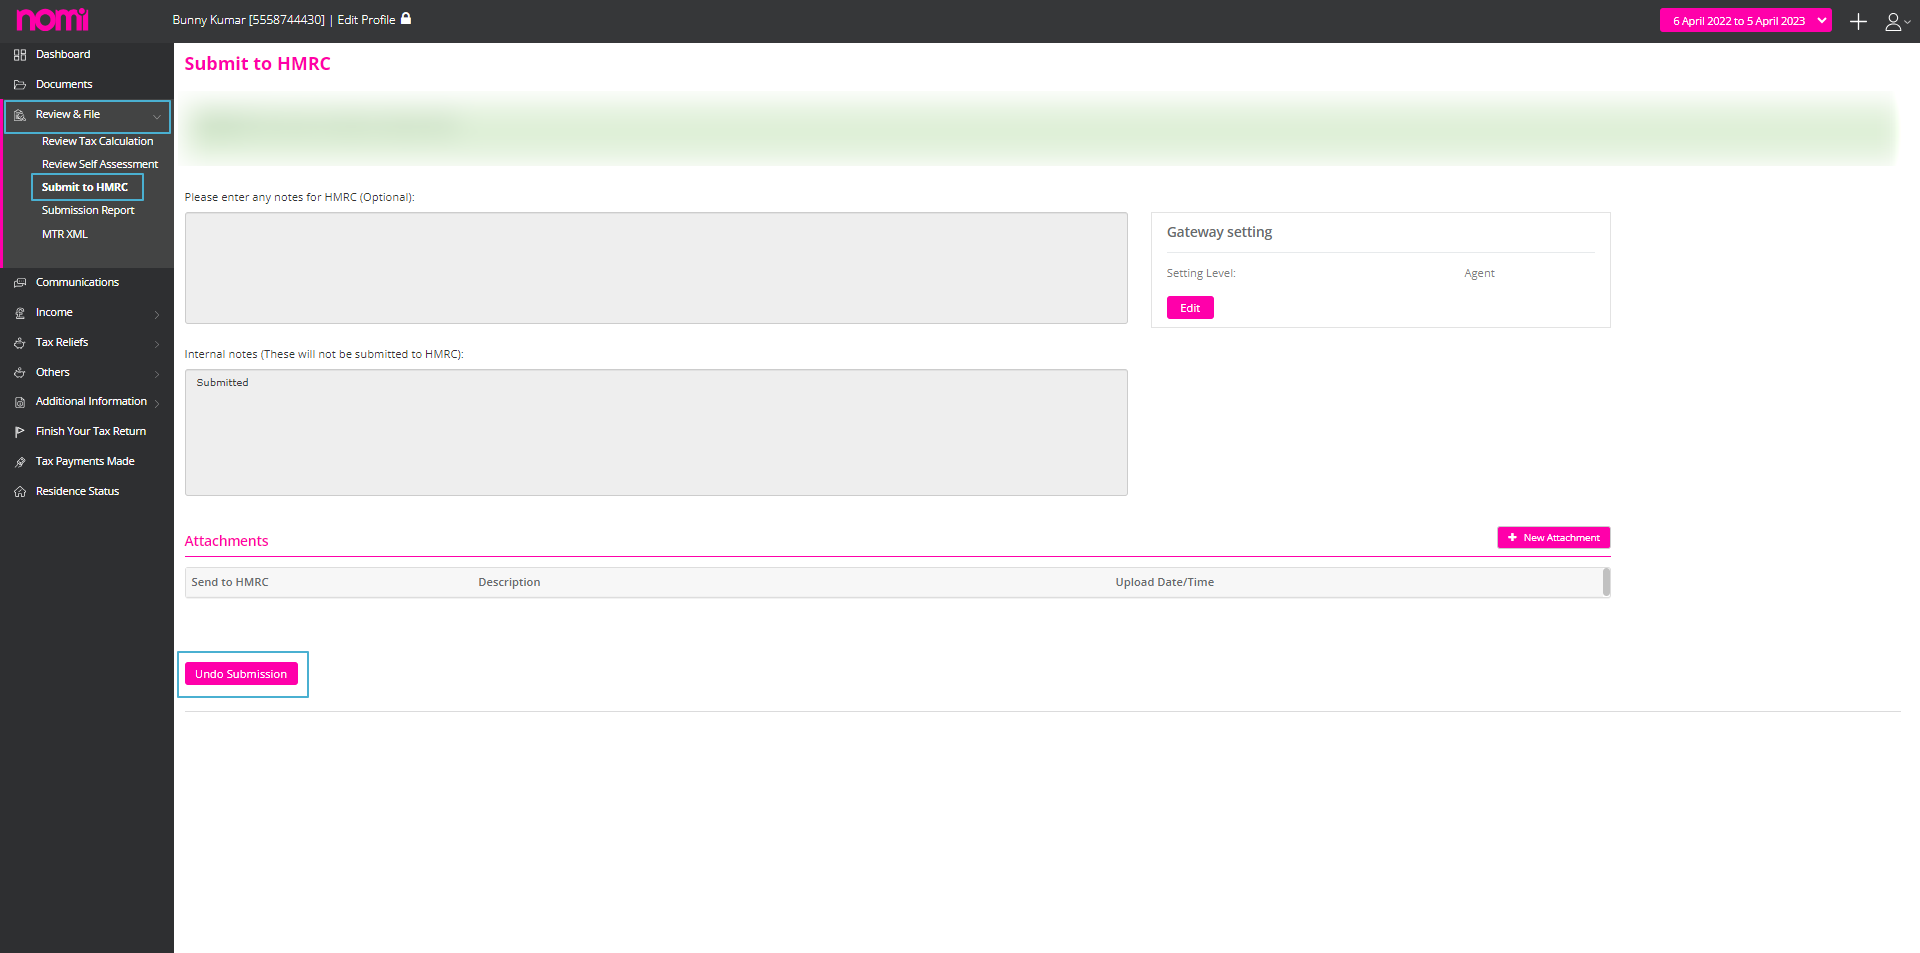
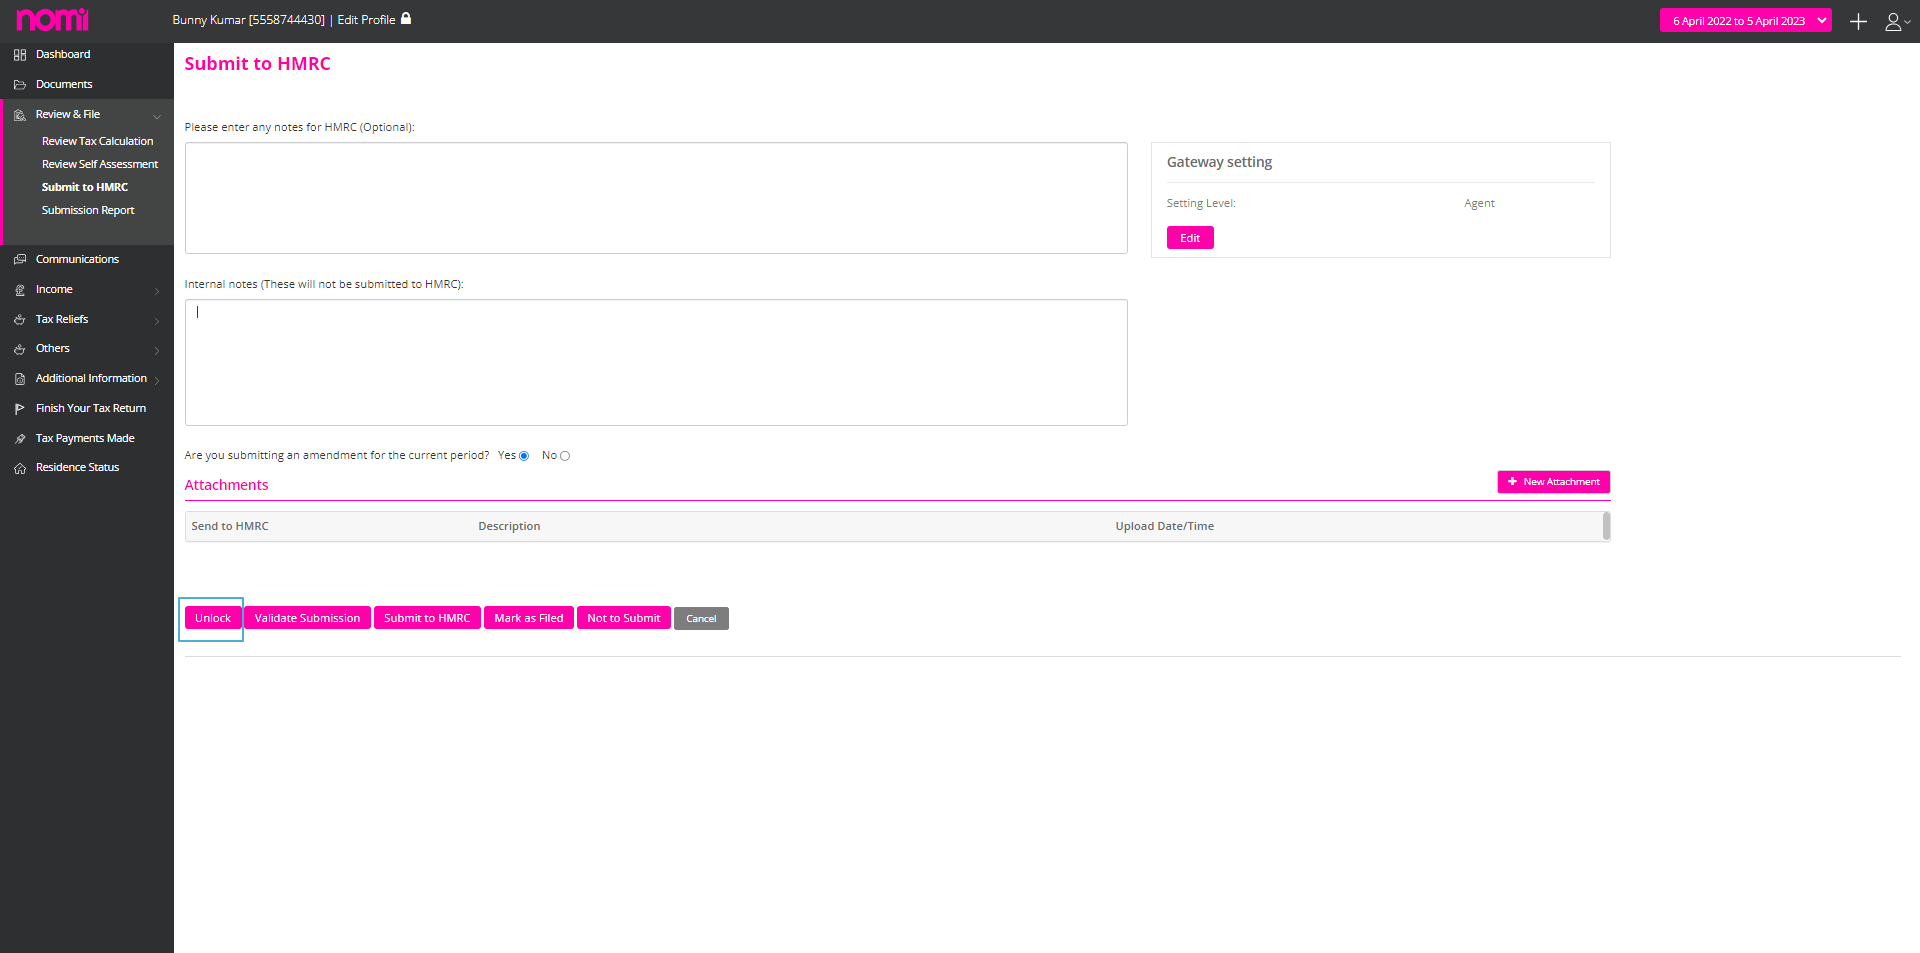
After this, enter the details which you want to amend then validate the Tax return and click on ‘Submit to HMRC’ to file the Amended SA100 Tax Return.
To add the ceased date you will have to navigate to Final Accounts>>Business Status Register>>Click on the add icon>>Set business status as “Ceased Trading” and enter the cessation date.
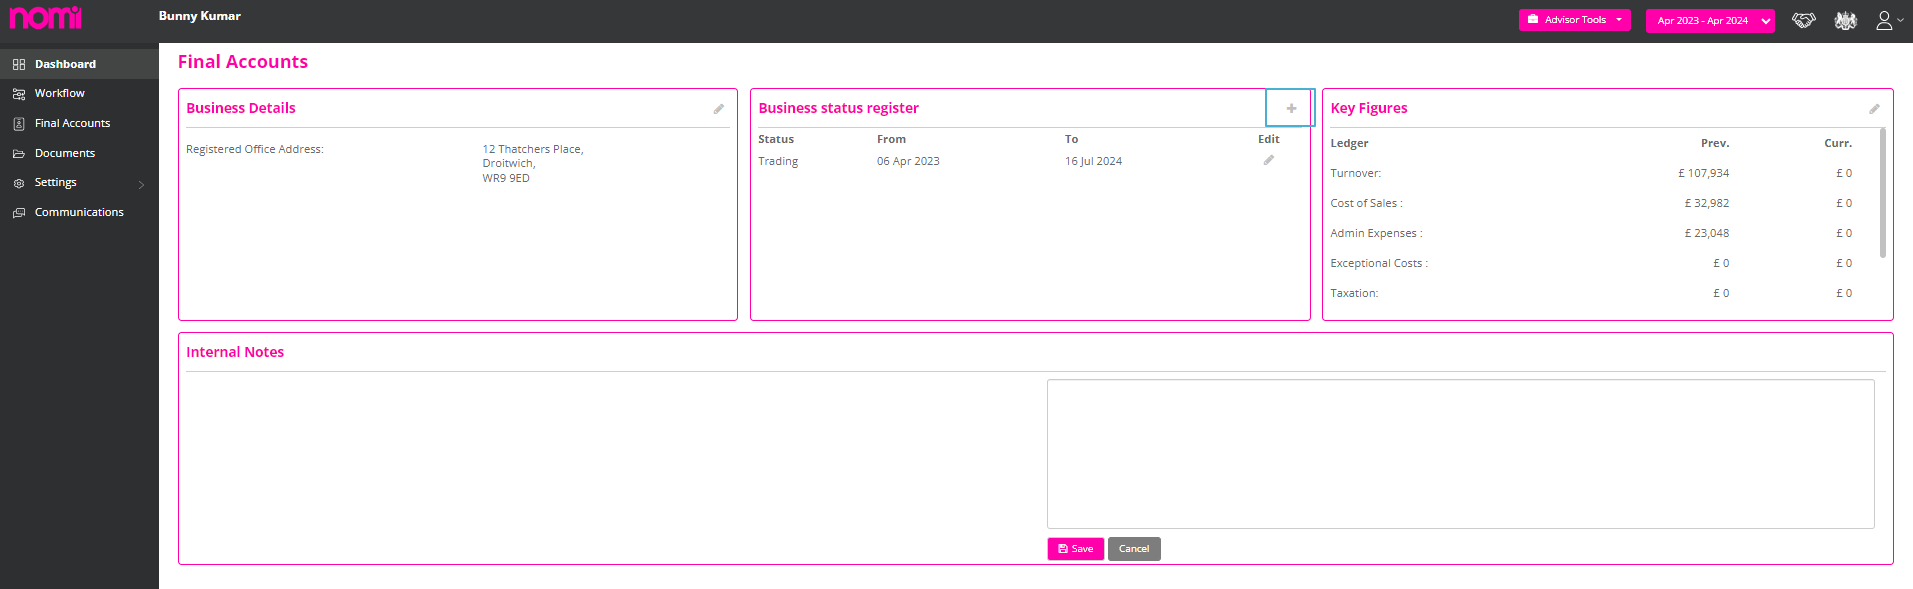

On the pop-up, you can set the Business Status to Ceased Trading and then update the Status effect date. This will populate the same date as the Date of Cessation in Box 3.8.
We can start entering the information from the left panel by clicking on Income and then we can enter the data manually for Bank interest/Pensions and Other UK income.
The Dividend Income can be further linked with the Bookkeeping Module, and you can fetch the dividend information directly into the SA100. For this, you have to first issue a dividend under the Bookkeeping Module for the Director/Individual.
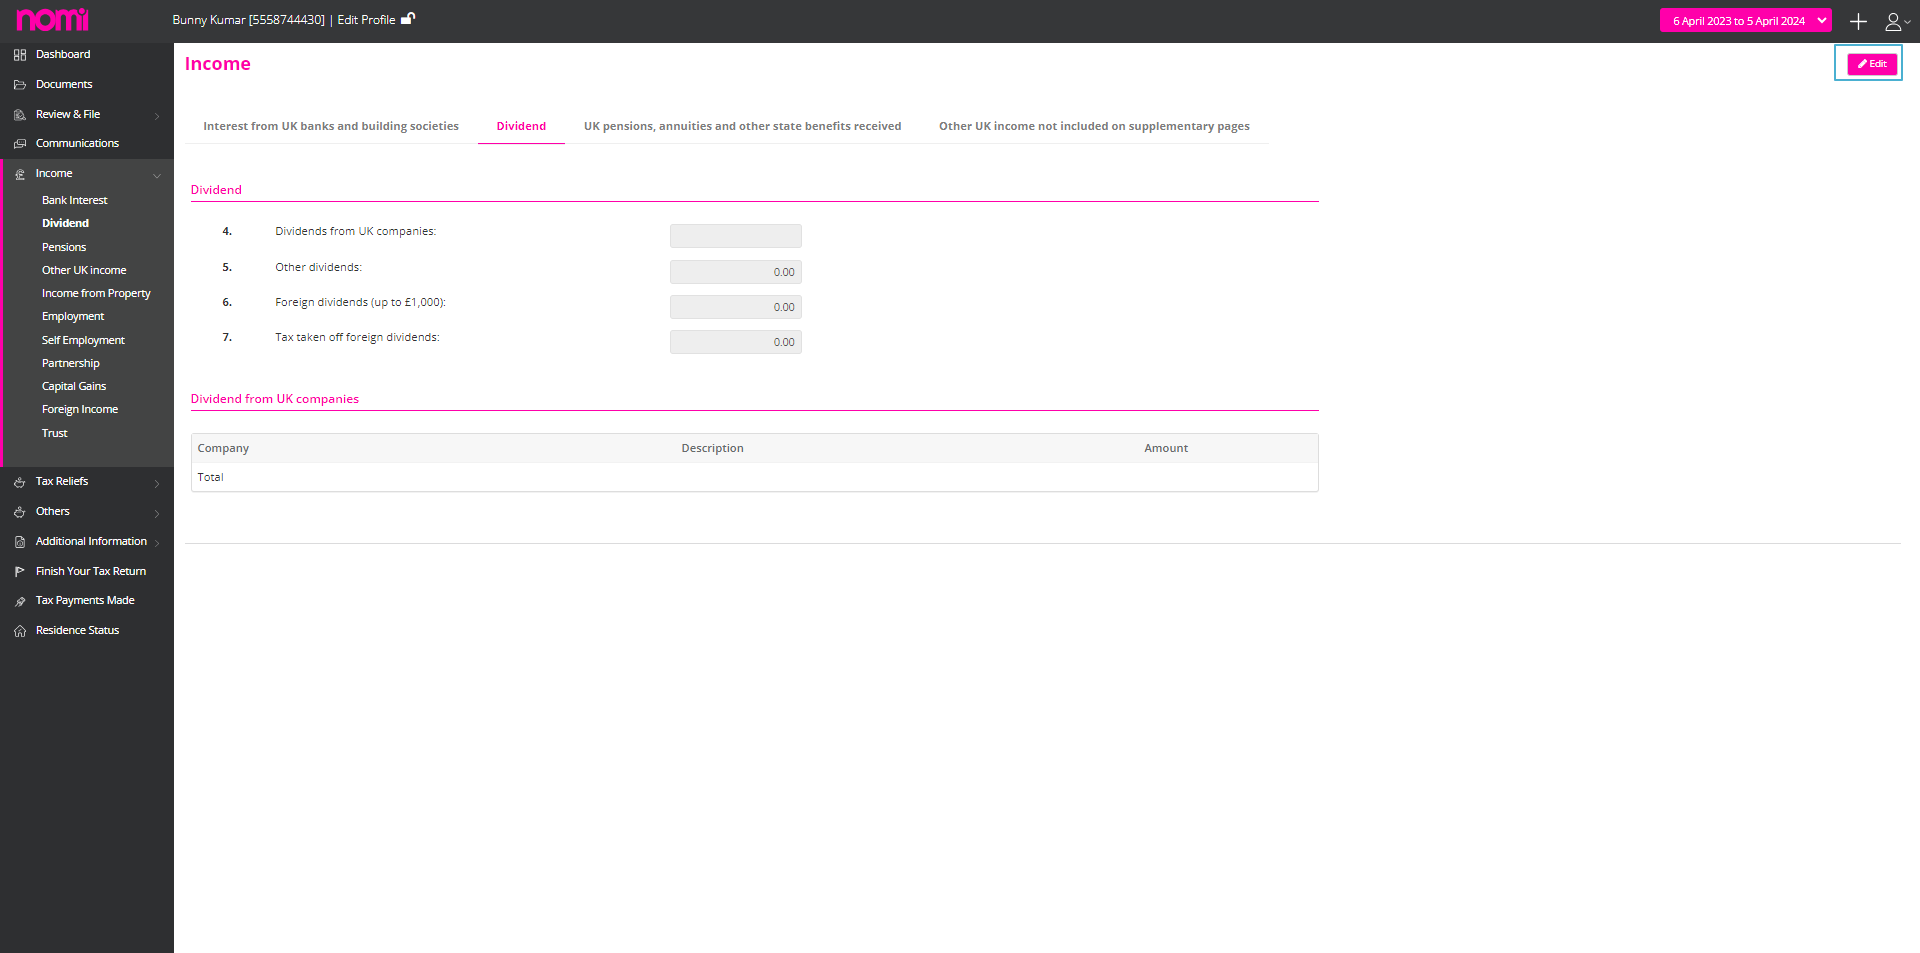

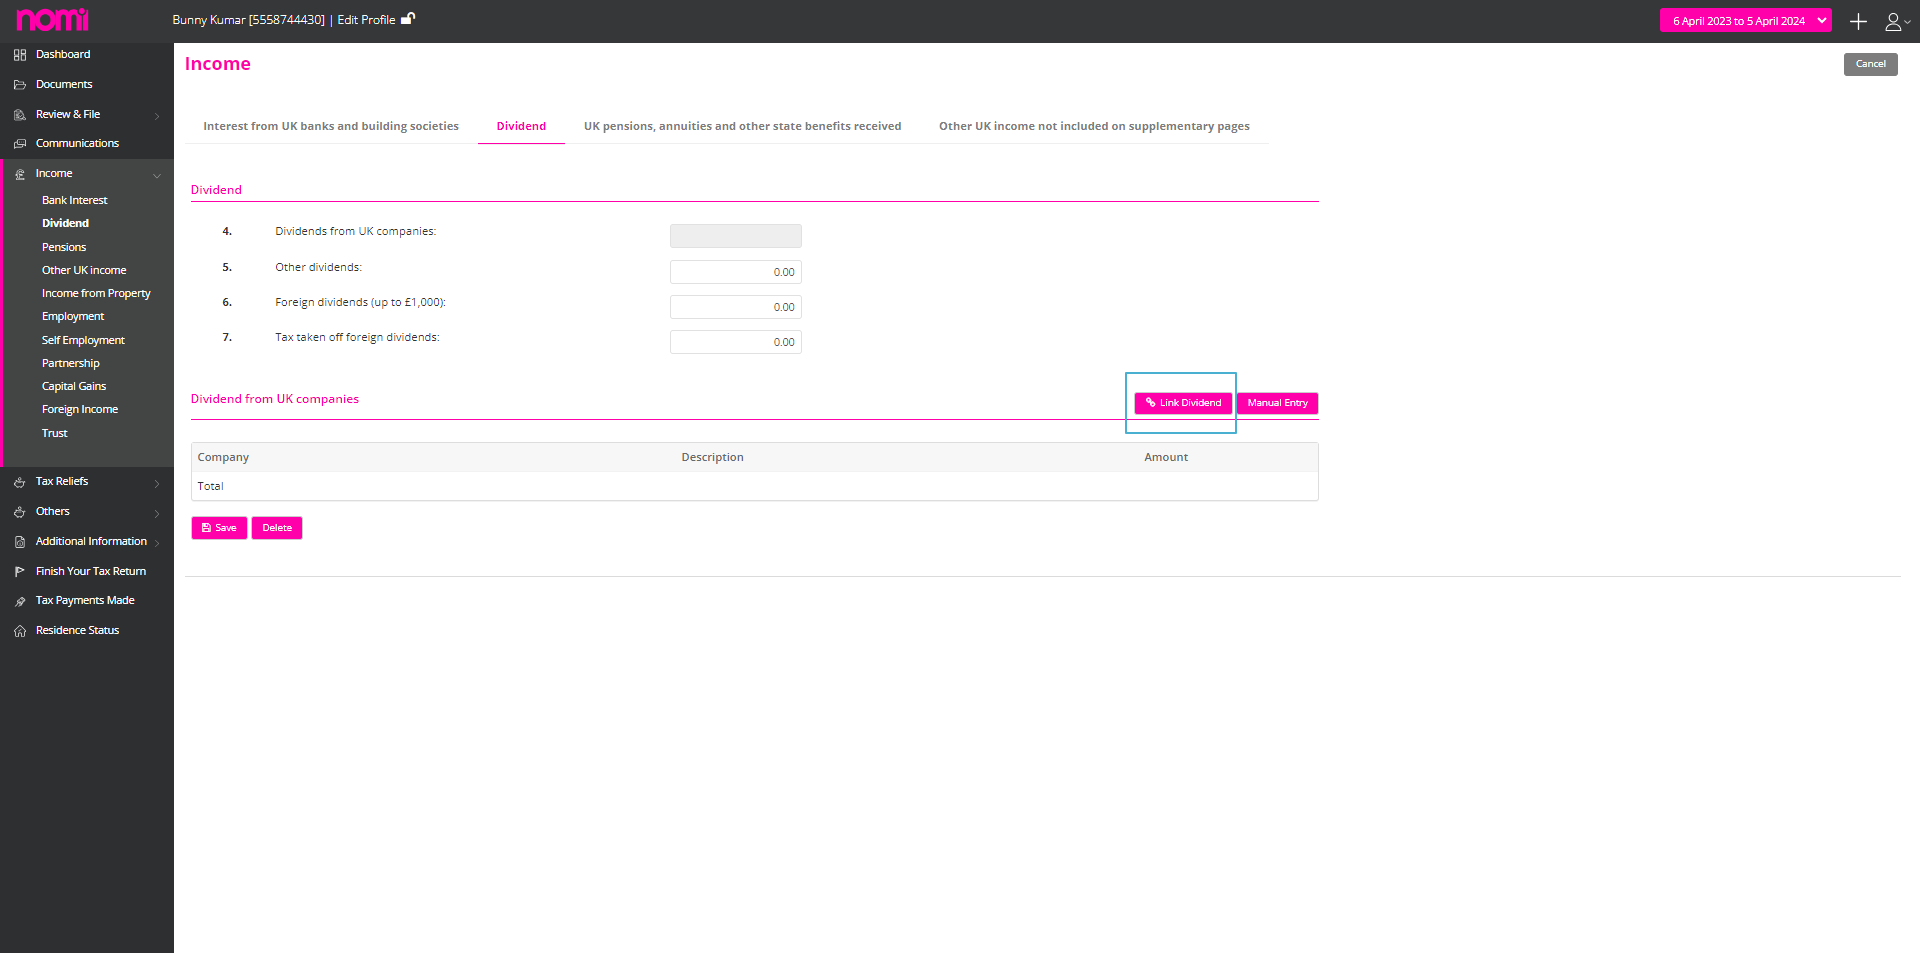
Then you need to click on the ‘Edit’ icon in the top right corner. Please note that you will always have to click on the Edit icon on every window whenever you are looking to make any changes.
‘Link Dividend’ and in the pop-up, you will see the name click on the link and all the data will be fetched from the bookkeeping module.
You can fill in the income related to property under the Income from Property supplementary form. There are two ways to update the data, the first being entering the data on the summary screen or using the Multiple Property wizard.

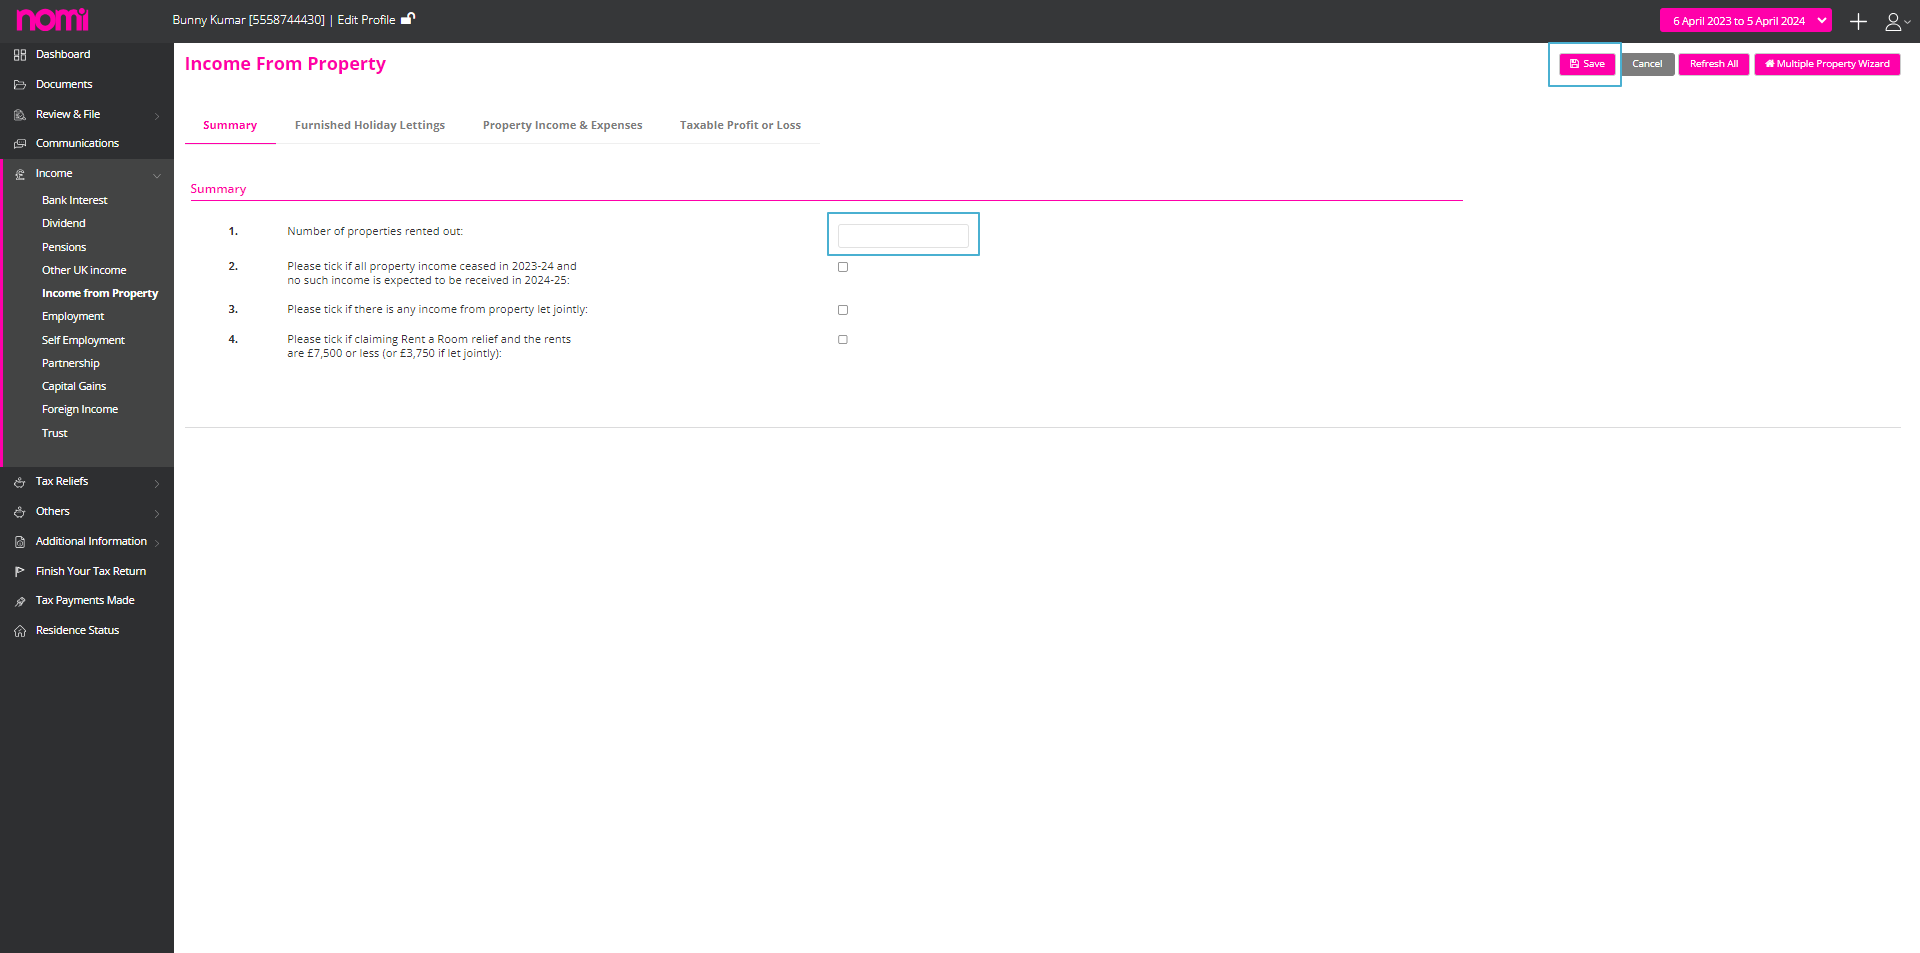
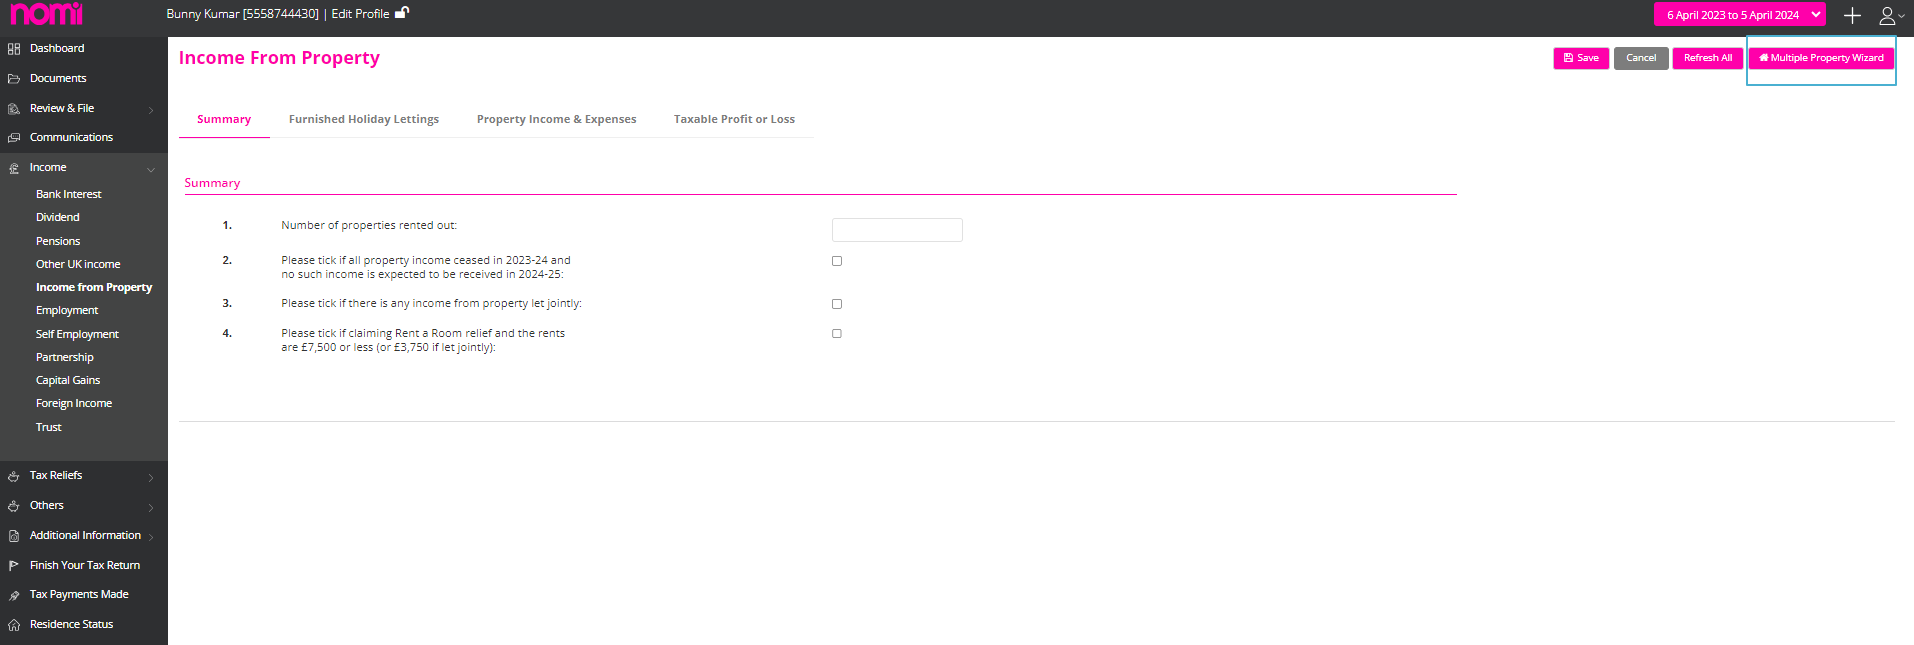

In case the individual has rental income from multiple properties then either you can use the Multiple Property wizard and record the information for different properties under this wizard, all the information is then summarized and displayed on the Income from Property page or prepare your summary for all the rental properties and enter on summary screen. Later you can also check the Residential Finance Cost Computation in the Documents section.
To remove the Class 2 and Class 4 NIC You will have to navigate to Self-Assessment>>Client dashboard or click on Client Name>>Self-employment Income>>click on National Insurance (Top right corner)>>click on 1st option (Exempt from paying class 4 NIC). It will remove class 2 NIC as well.
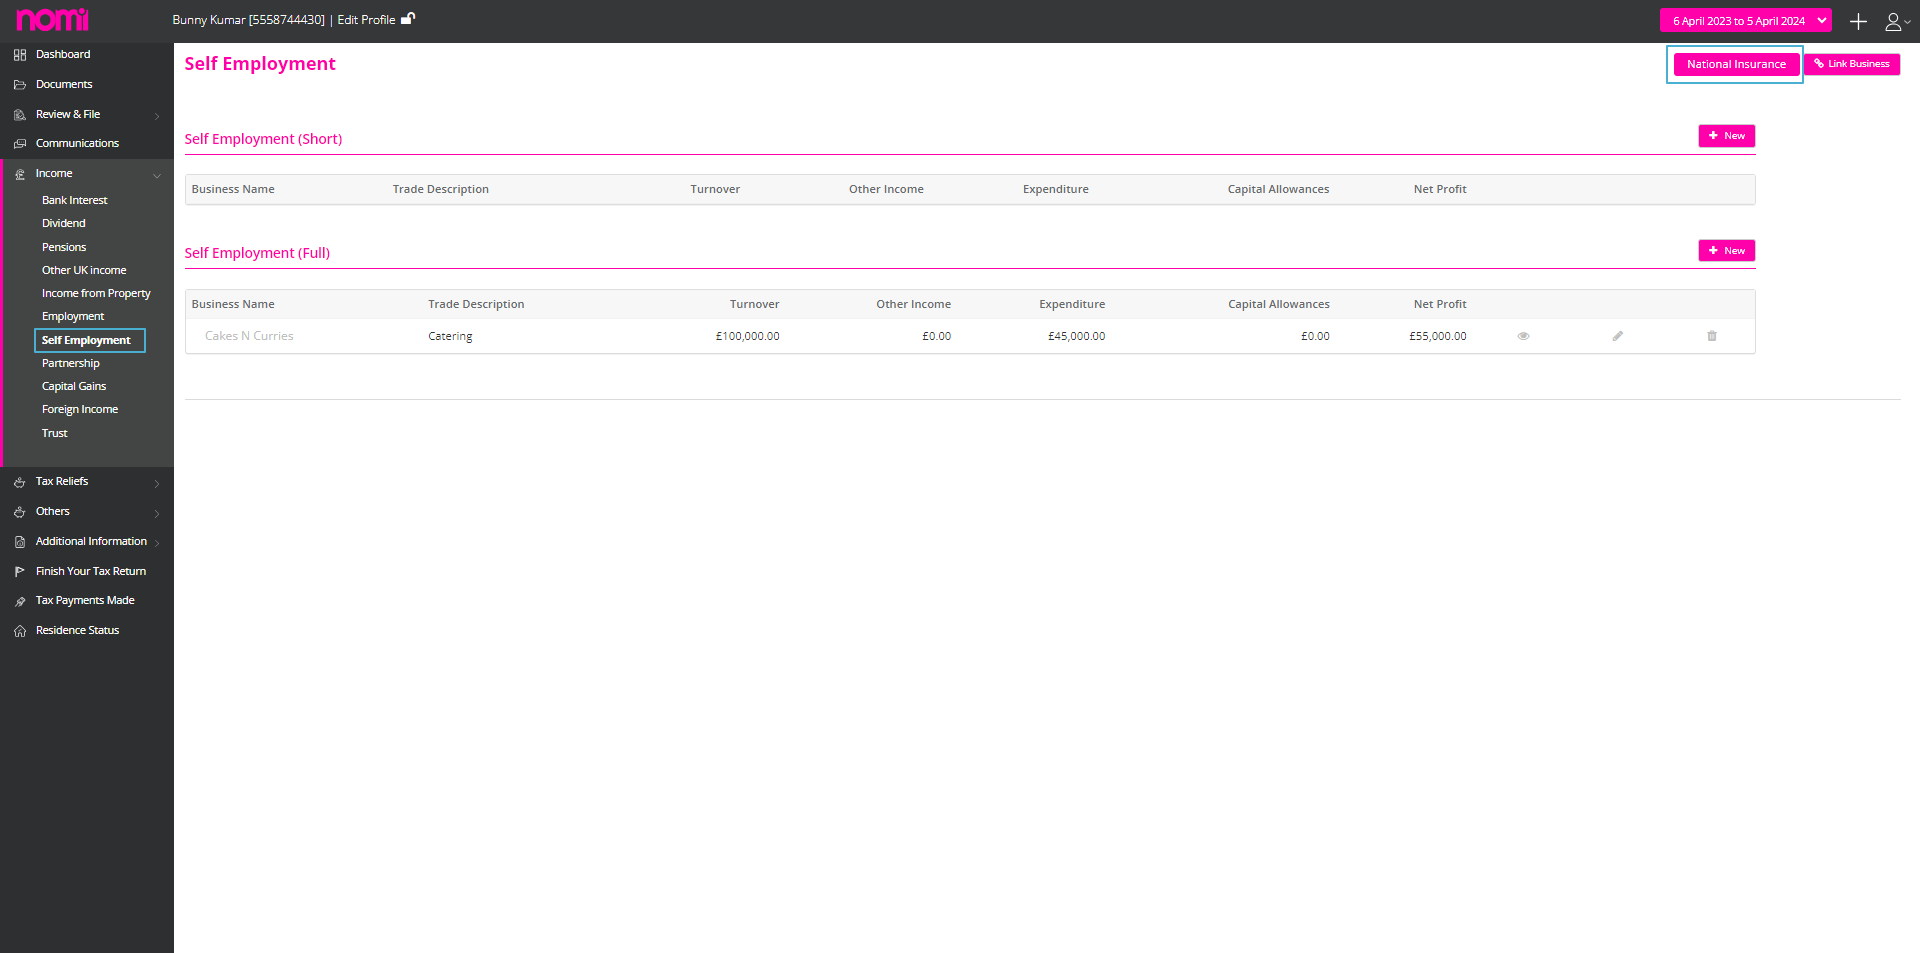
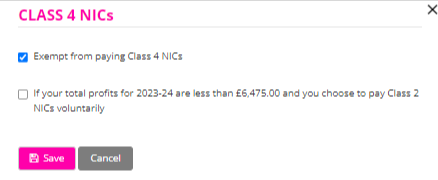
There is no option to pay voluntarily NIC 4. The client can pay voluntarily NIC 2. For this you will have to navigate to Self-Assessment>>Client dashboard or click on Client Name>>Self-employment Income>>click on National Insurance (Top right corner)>>click on 2nd box (If your total profits for 2023-24 are less than £6,475.00 and you choose to pay Class 2 NICs voluntarily)
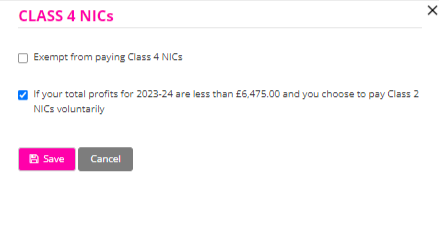
To get Data from HMRC you will have to first generate tokens by logging online into your Agent Account and allowing the software to interact on your behalf with HMRC. For this please navigate to Agent Hub>>Self-Assessment>>HMRC Data Setting.
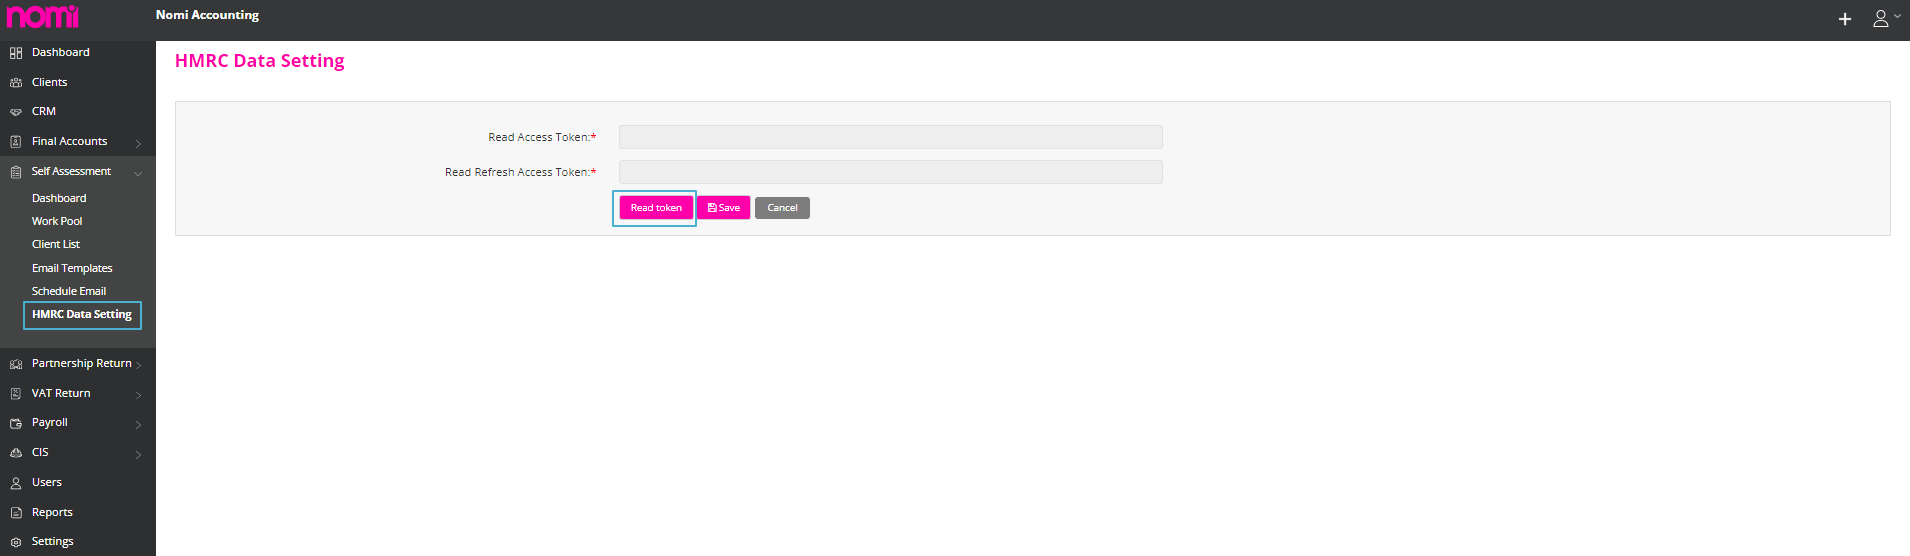
On this screen, you will have the option ‘Read Token’. You will have to click on this option, and it will redirect you to the HMRC website where you have to log in and then answer a few questions post you will be redirected to the same screen on Nomi and then you have to click on Save. The tokens will be generated, and it will enable you to import the data from HMRC.
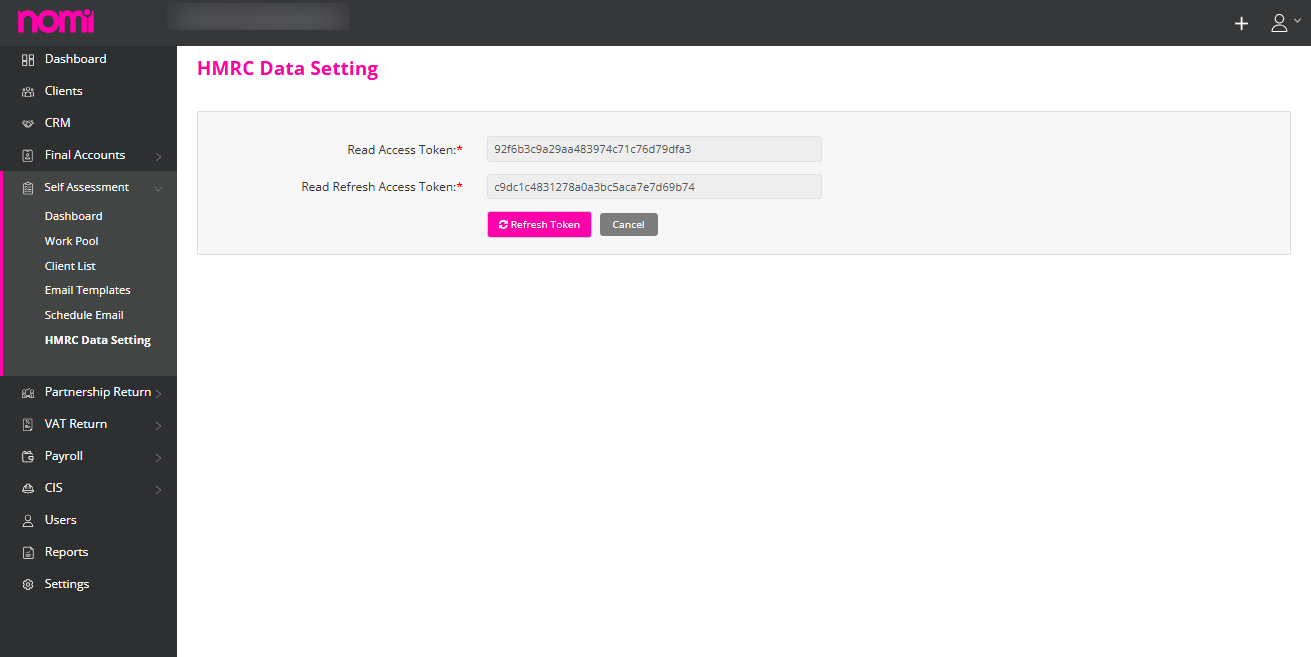
To fetch the data in individual records you will have to navigate to the SA100 dashboard by clicking on the individual name under the client list and then click on Get Data from HMRC.
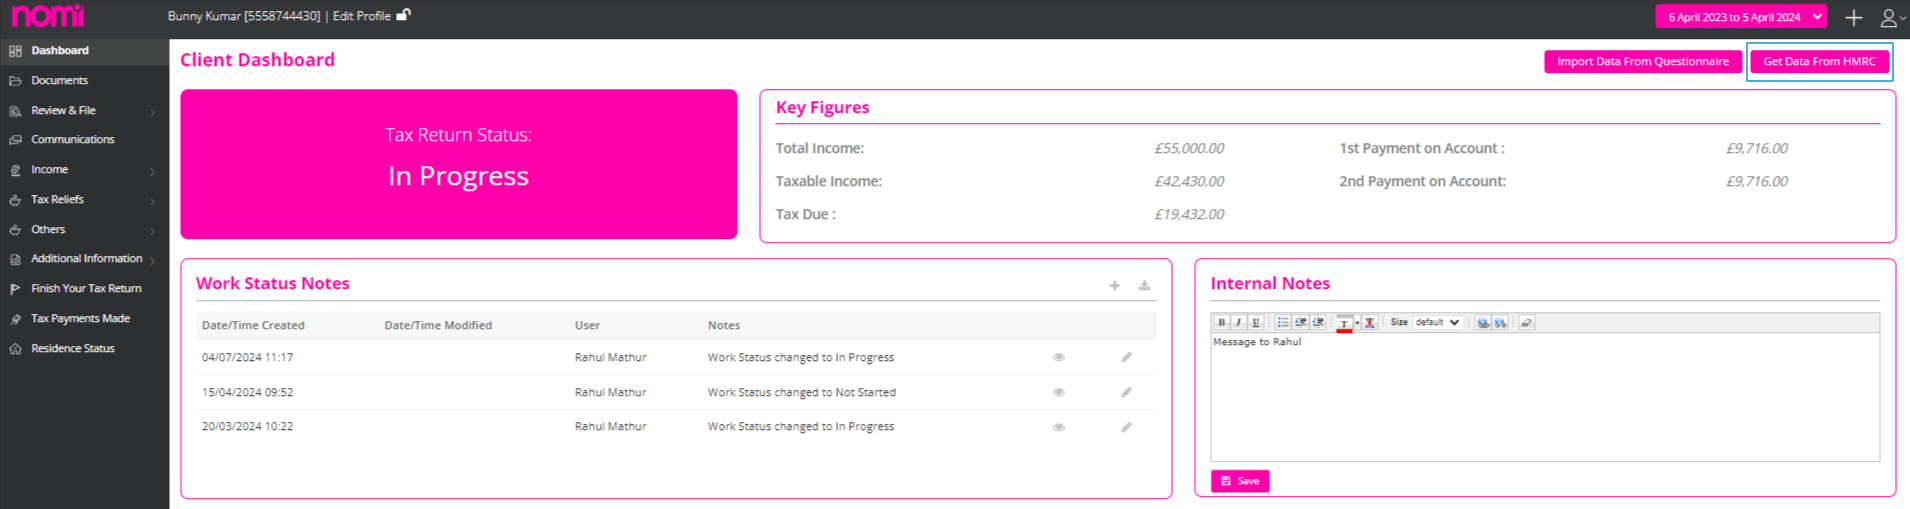
This will take you to a screen where you will see the Employment-related data, Pension, Retirement annuities, Job Seekers Allowance, and Class 1/ Class 2 NICs.
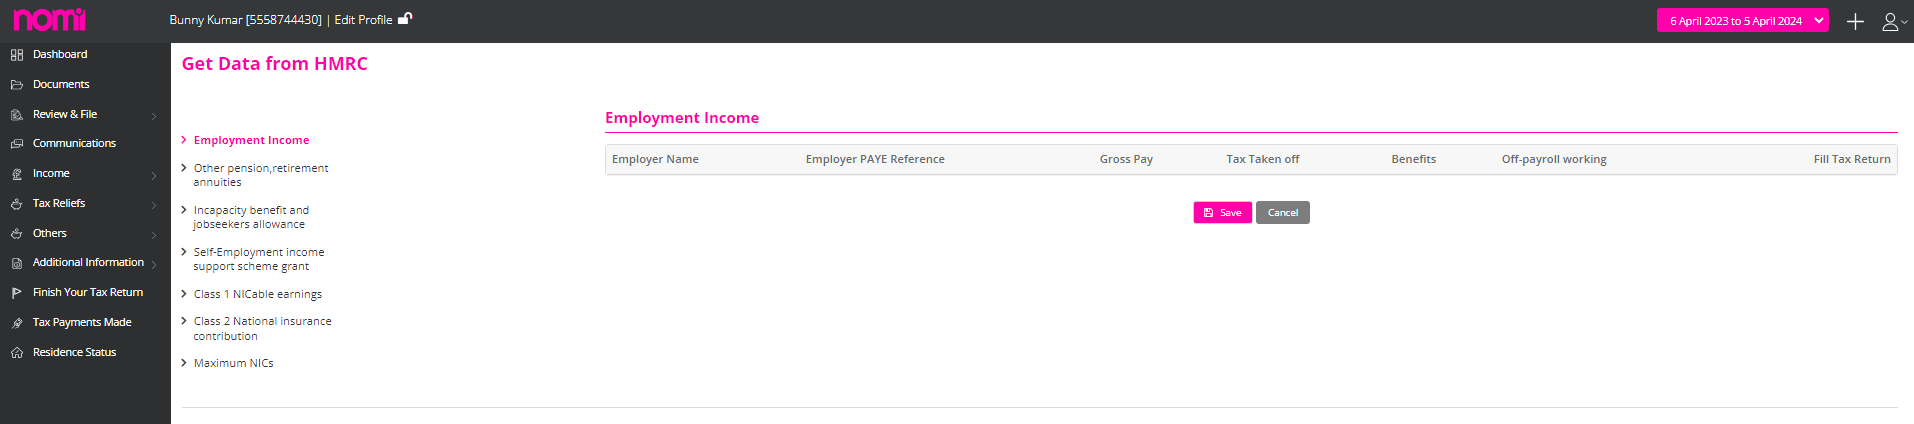
To send the Tax questionnaire you will have to navigate to Self-Assessment>>Dashboard>>Send Tax Questionnaire.
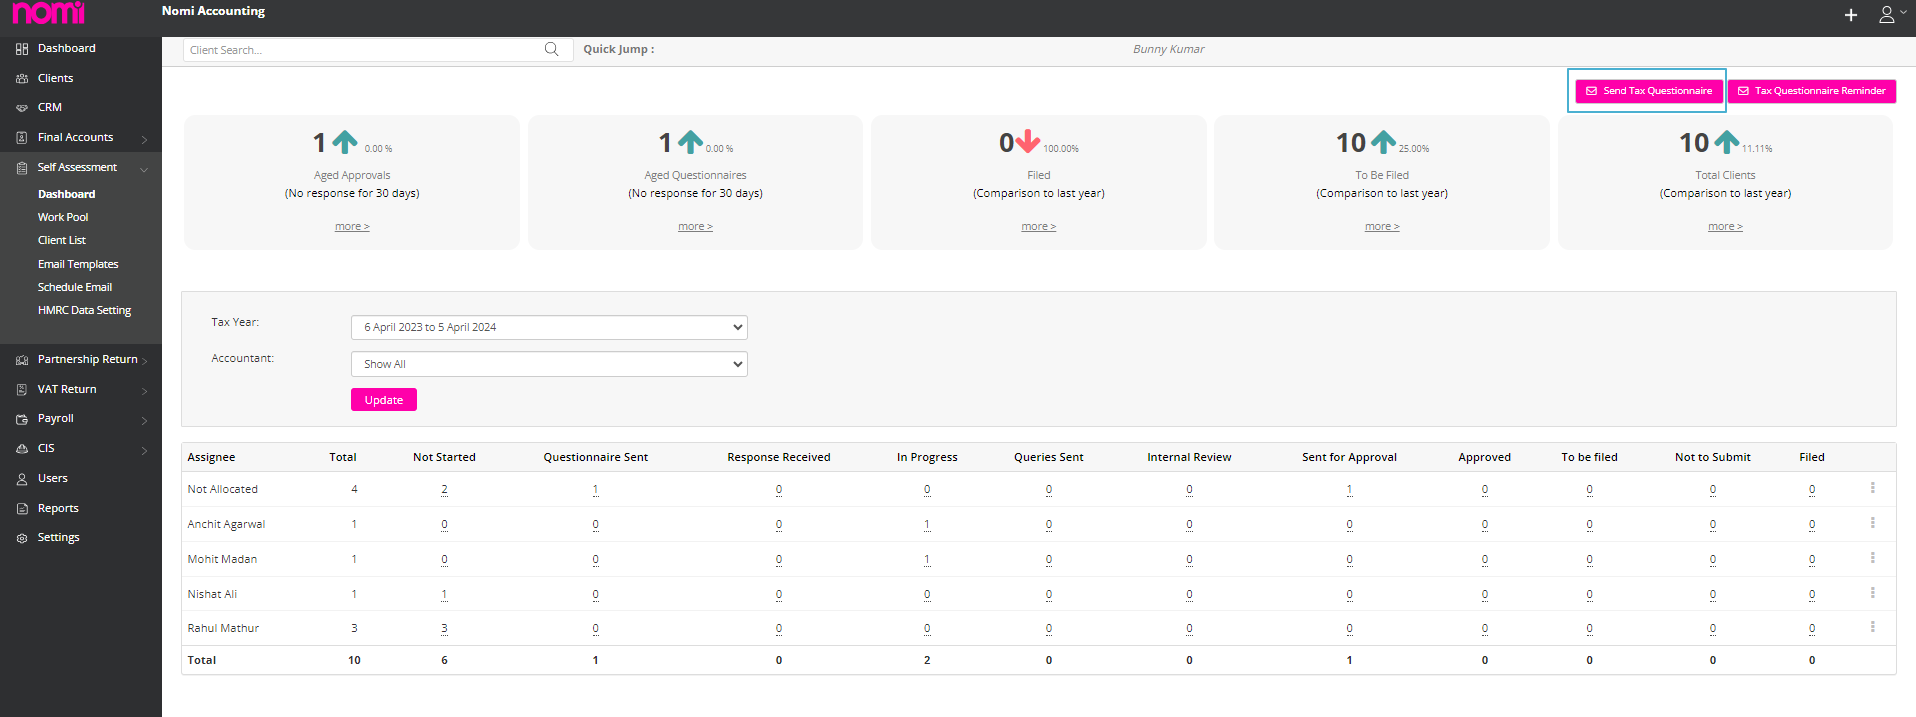
As you click on this it takes you to a 3-step wizard. On the first screen, you can choose the audience which means select those individuals to whom you want to send the Tax Questionnaire.
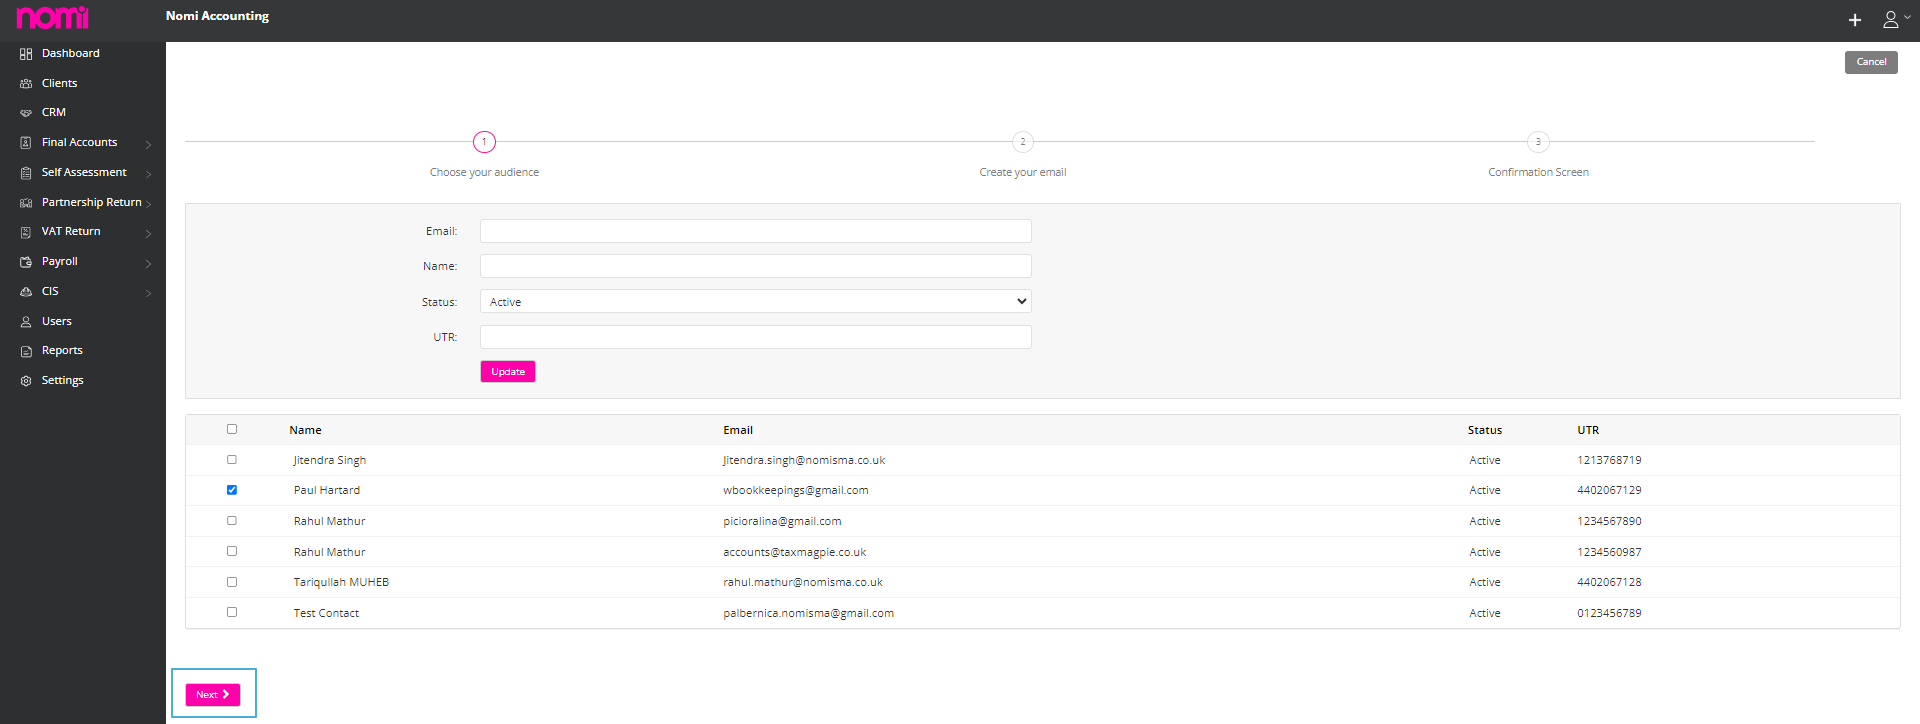
On the next screen, it will show you the email which will be sent to the individual containing the link to the Questionnaire. Here you can keep the Account Manager in CC if you want.
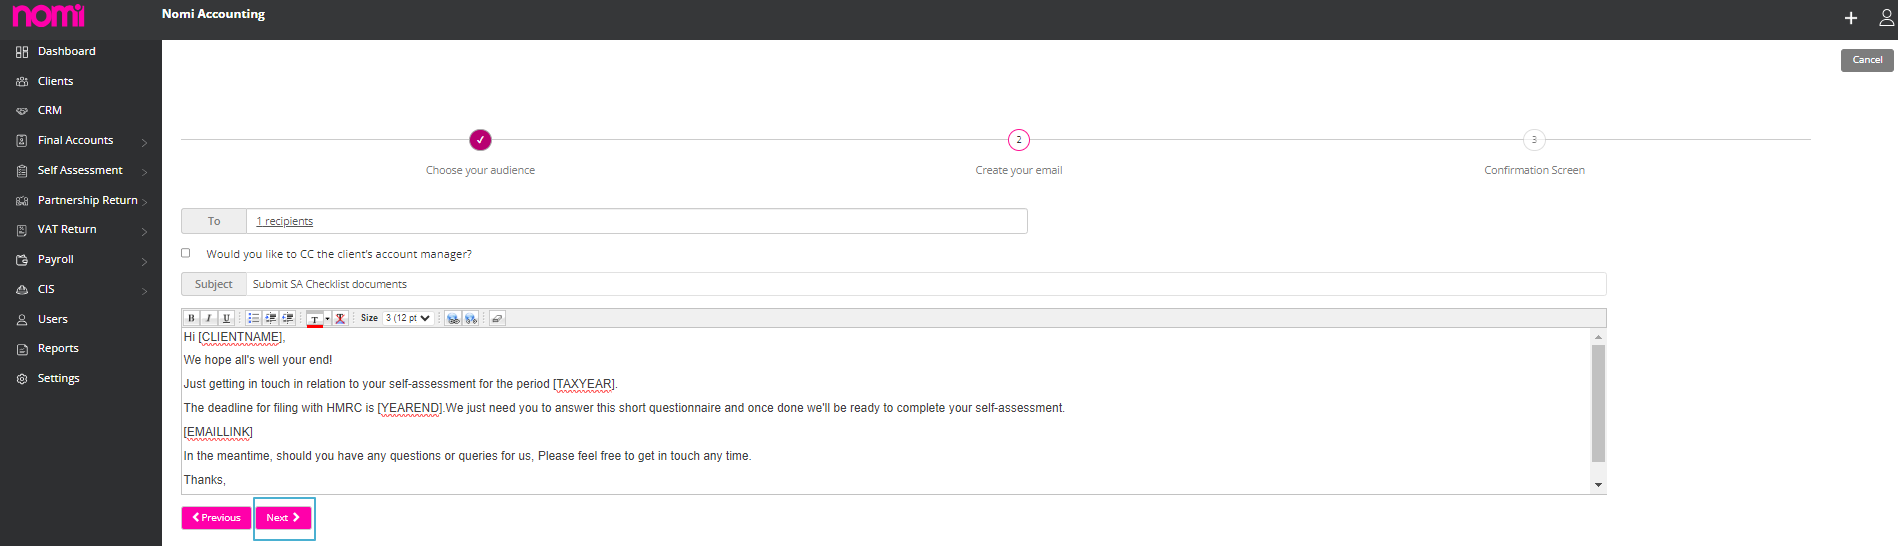
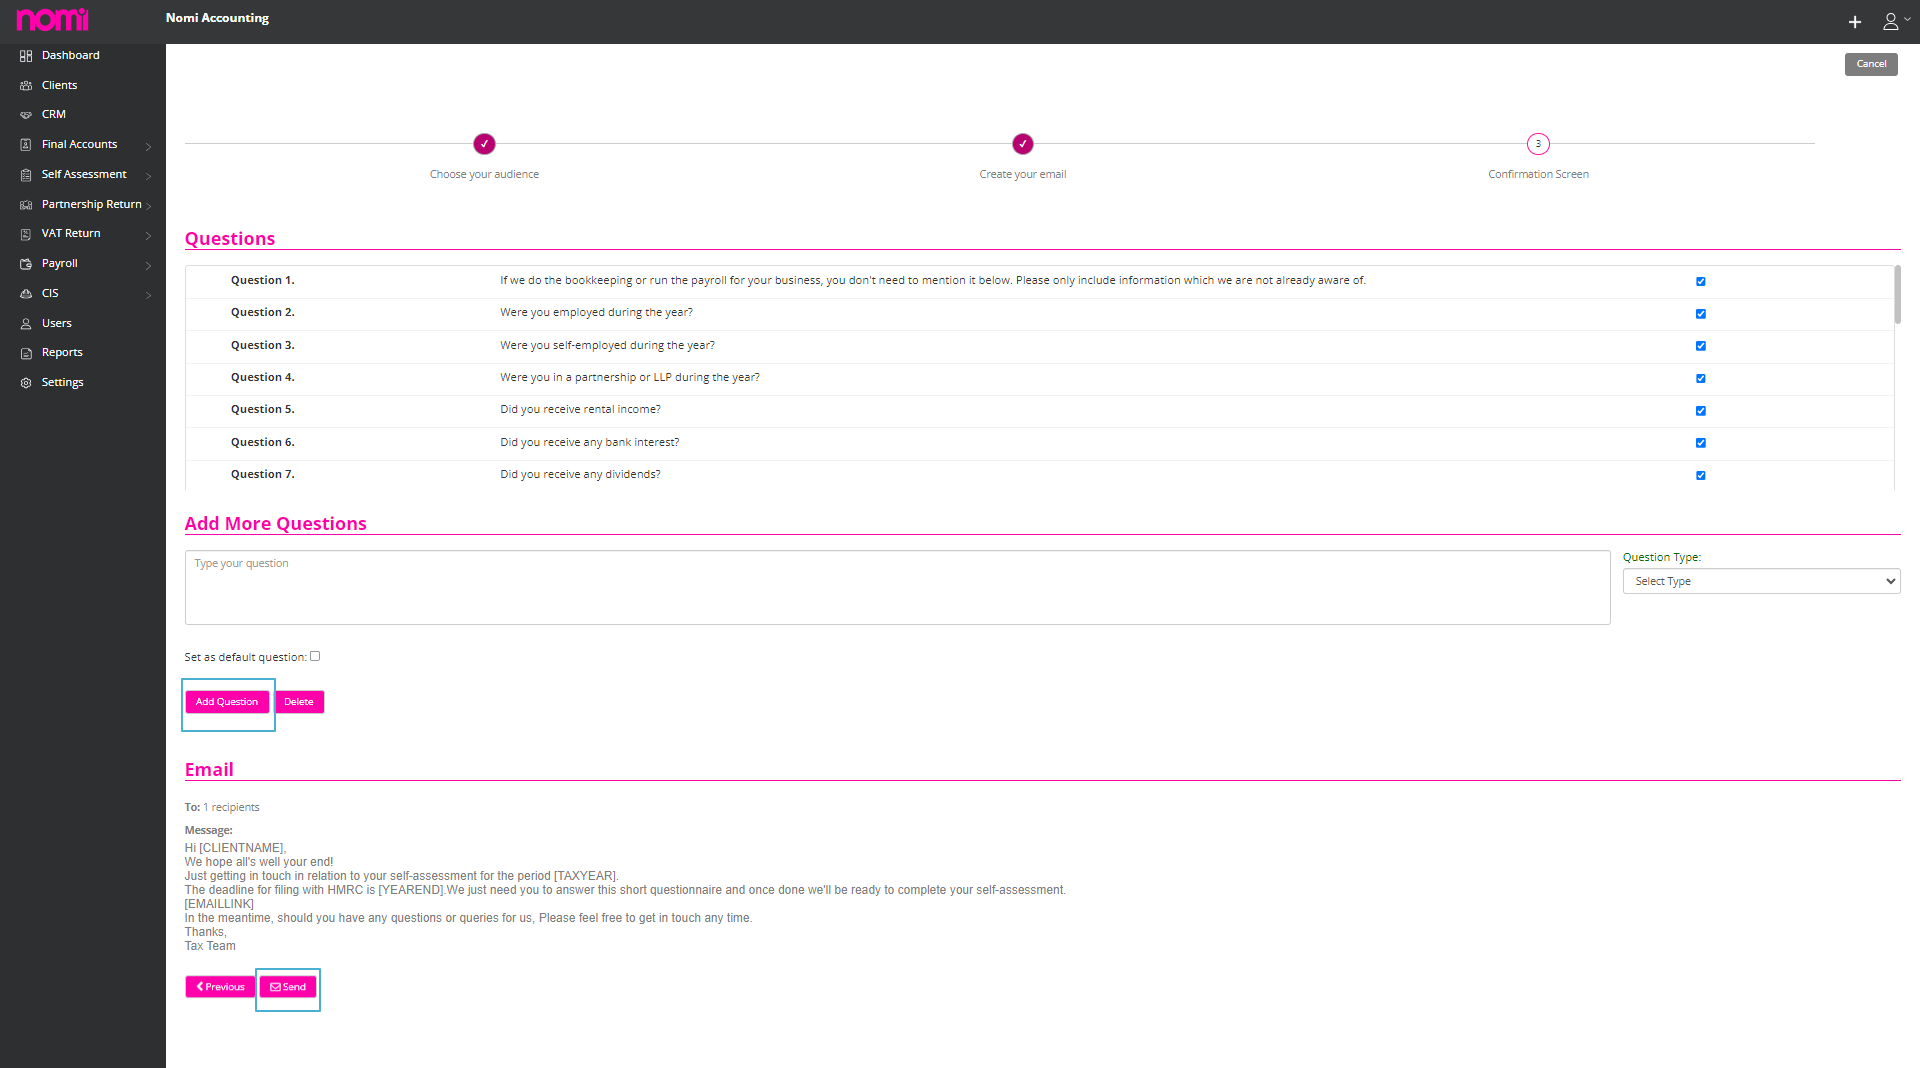
The third screen is the confirmation screen where you can see all 26 questions which are part of the Tax Questionnaire. It’s up to you whether to include all the questions or select a few from the list. It also gives you options to add a few more questions if you want and you can also use the master Tax Questionnaire where you can add the questions in Bulk for all the individuals by default.
Once you are happy with the Tax Questionnaire you can click on the send label, and it will send the email to the client. As the client receives an email there will be a link and they have to click on that. They are redirected to a webpage where they need to enter their Date of Birth to access the questionnaire and answer all the questions. Once answered the individual can submit the questionnaire and you will receive an email with the attached questionnaire and the status on the Tax return will change from Questionnaire Sent to Response received. This Tax Questionnaire can also be responded to through the Mobile App.
Yes, it is possible to see the questionnaire before sending it. For this, you will have to be on the last step of the tax Questionnaire which shows all the questions that are a part of the Tax Questionnaire.
If you want to re-send a web-based tax questionnaire to a particular client, you will have to navigate to Self-assessment>>Client dashboard or click on client name>>change work status notes as “Not Started” and save it>>communication>>click on tax questionnaire.
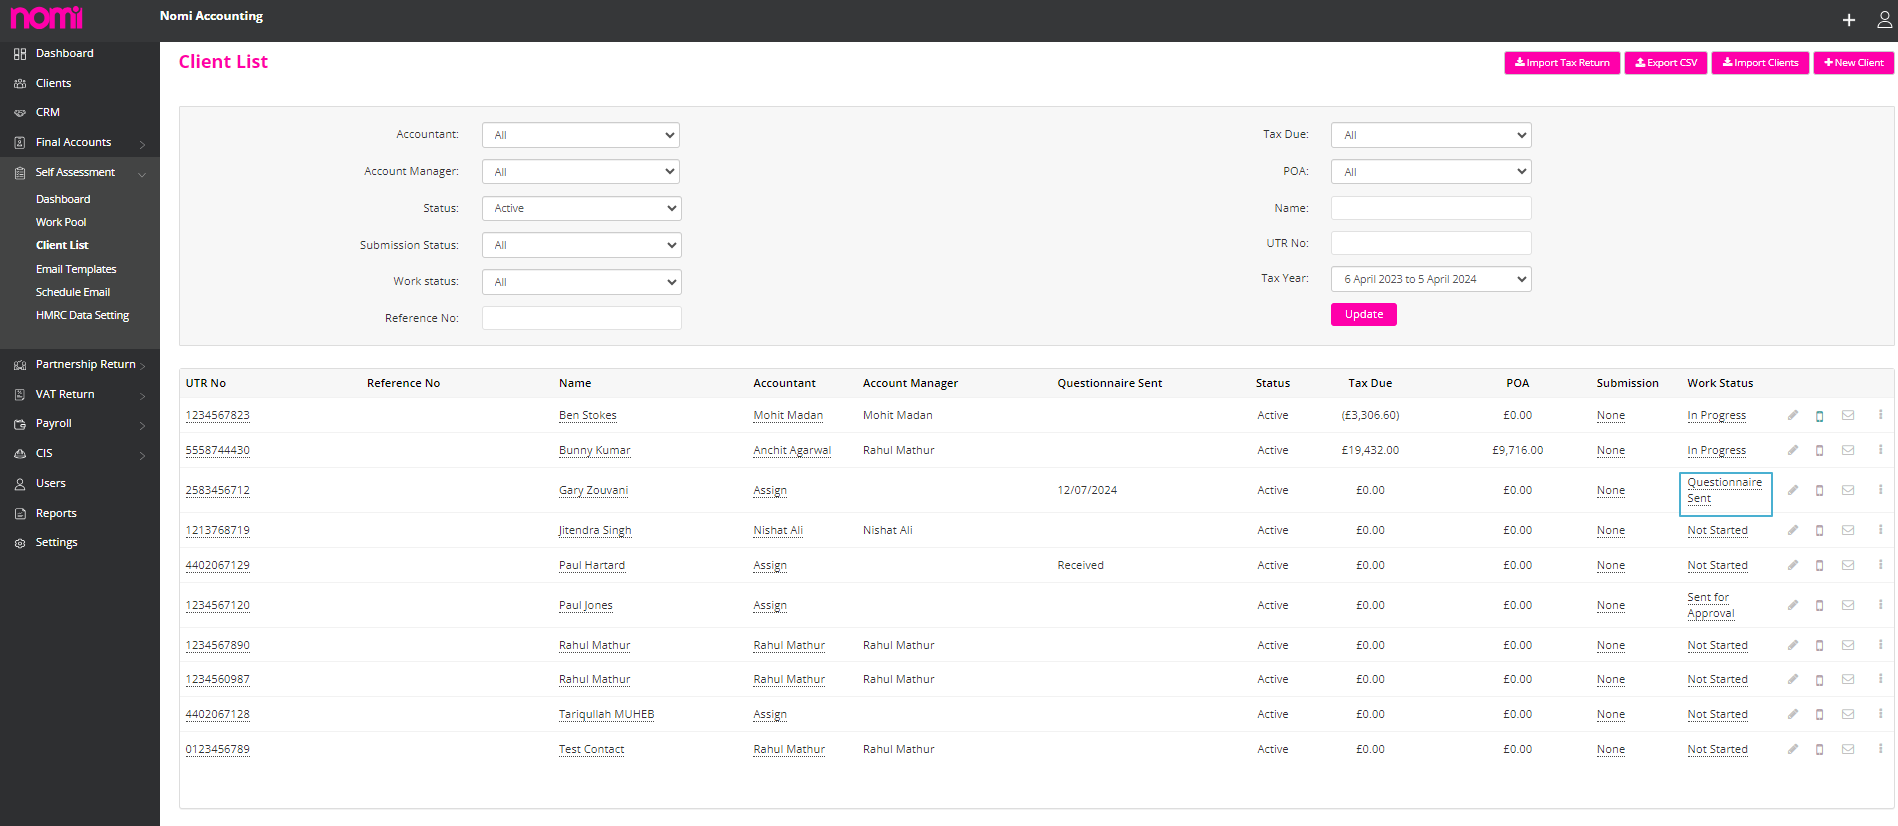
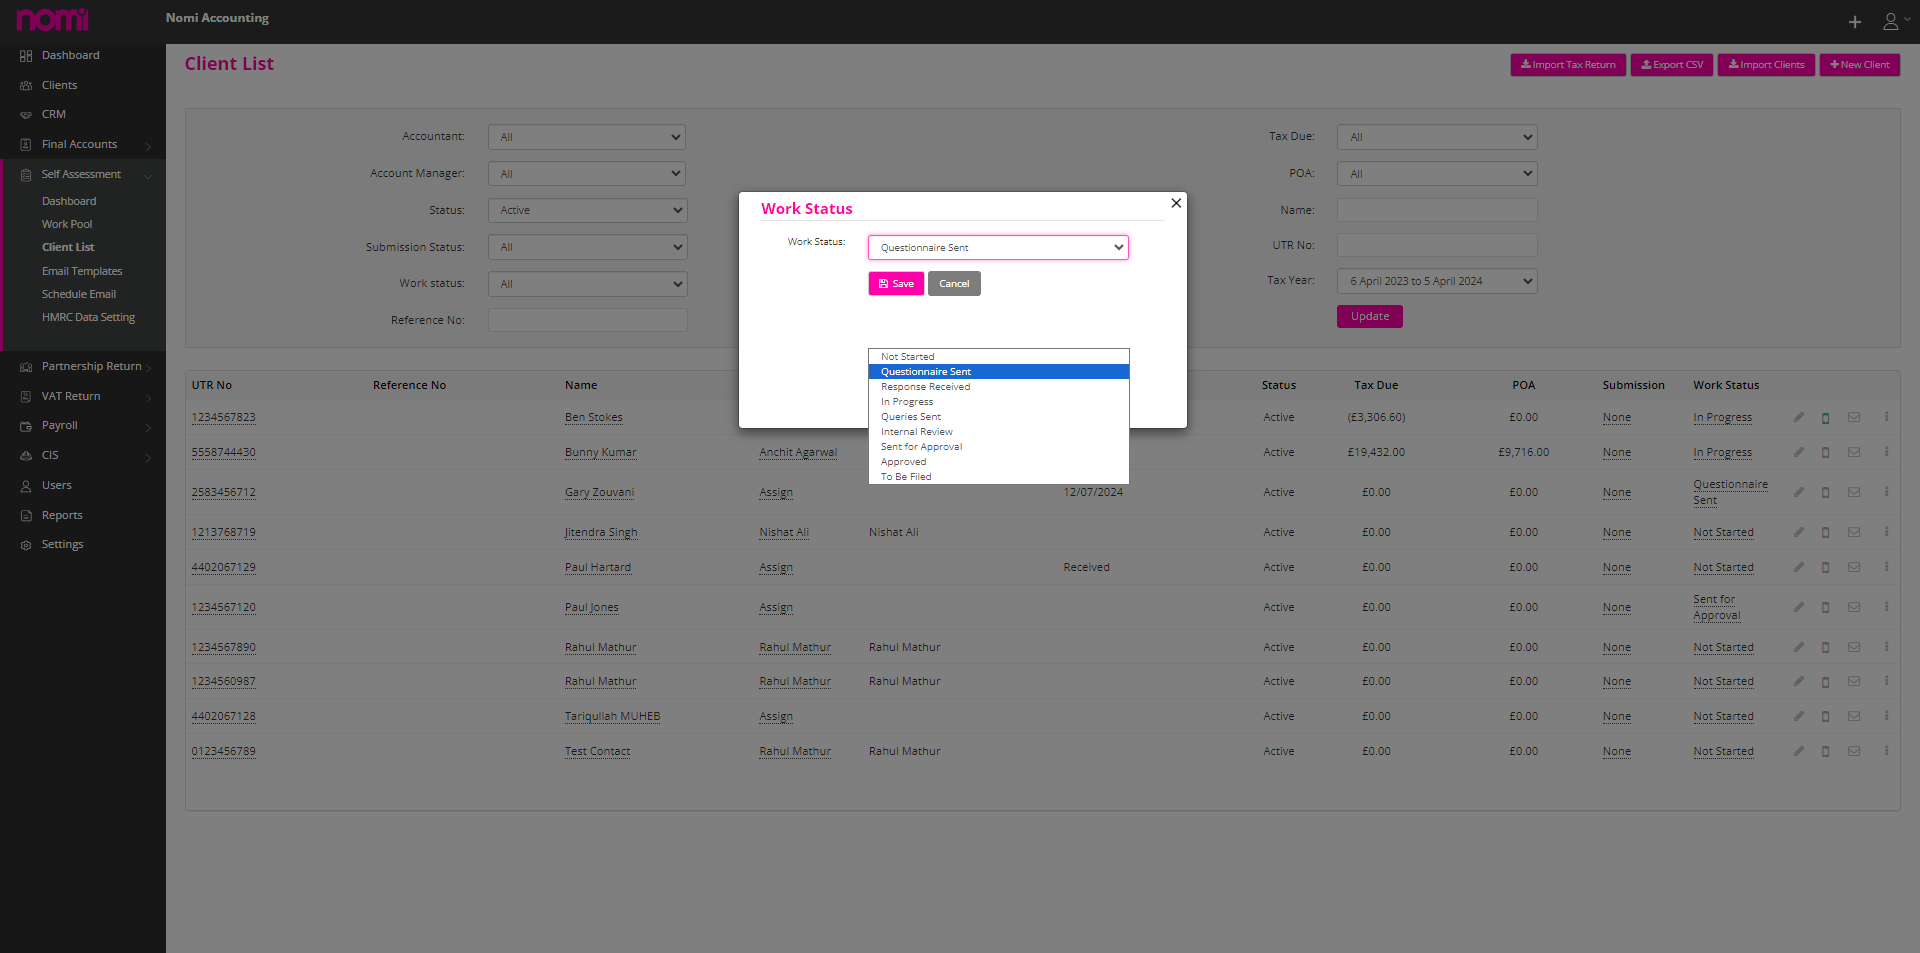
To add the email templates kindly navigate to Self-Assessment>>Email templates>>Click on +Add. On this screen, you can update the Template name, Subject, and Status and then select the Tags.
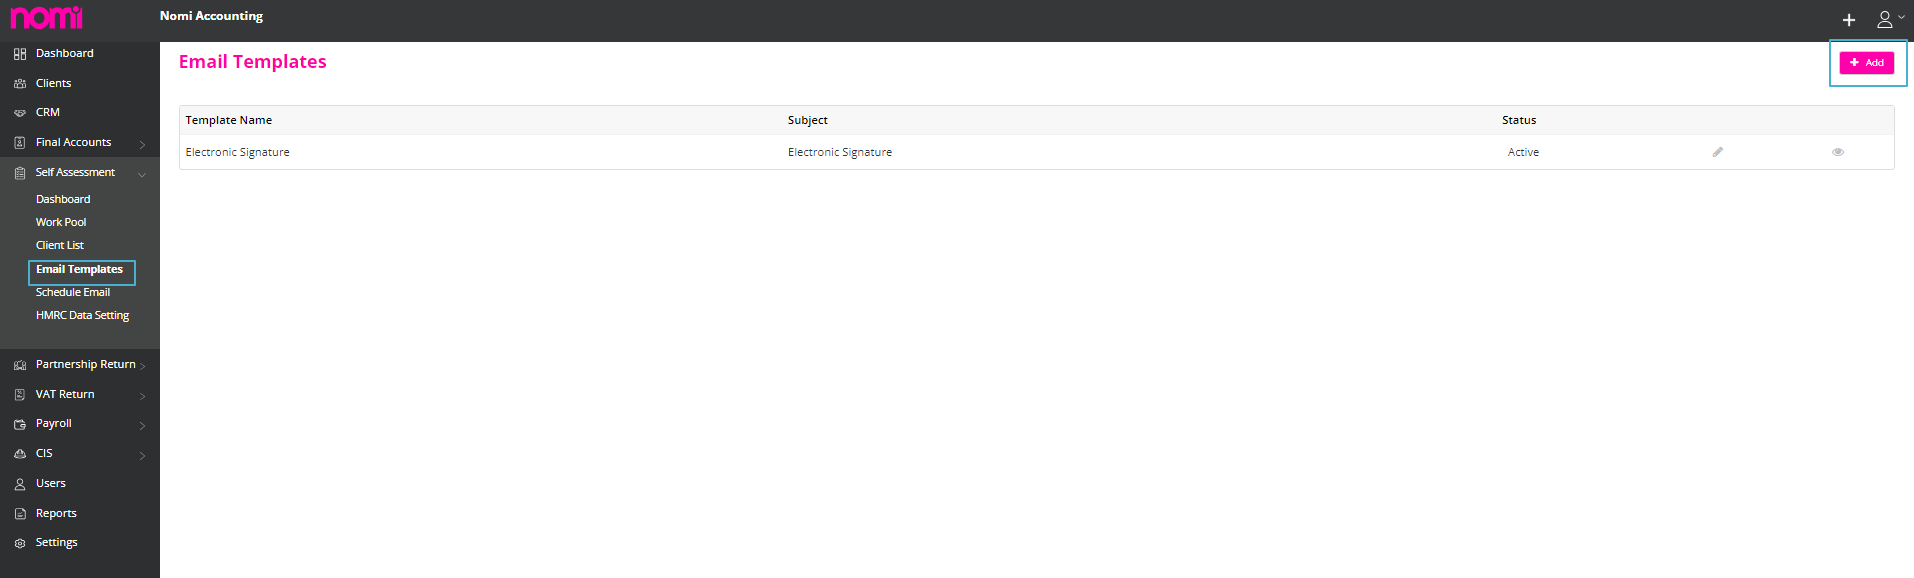
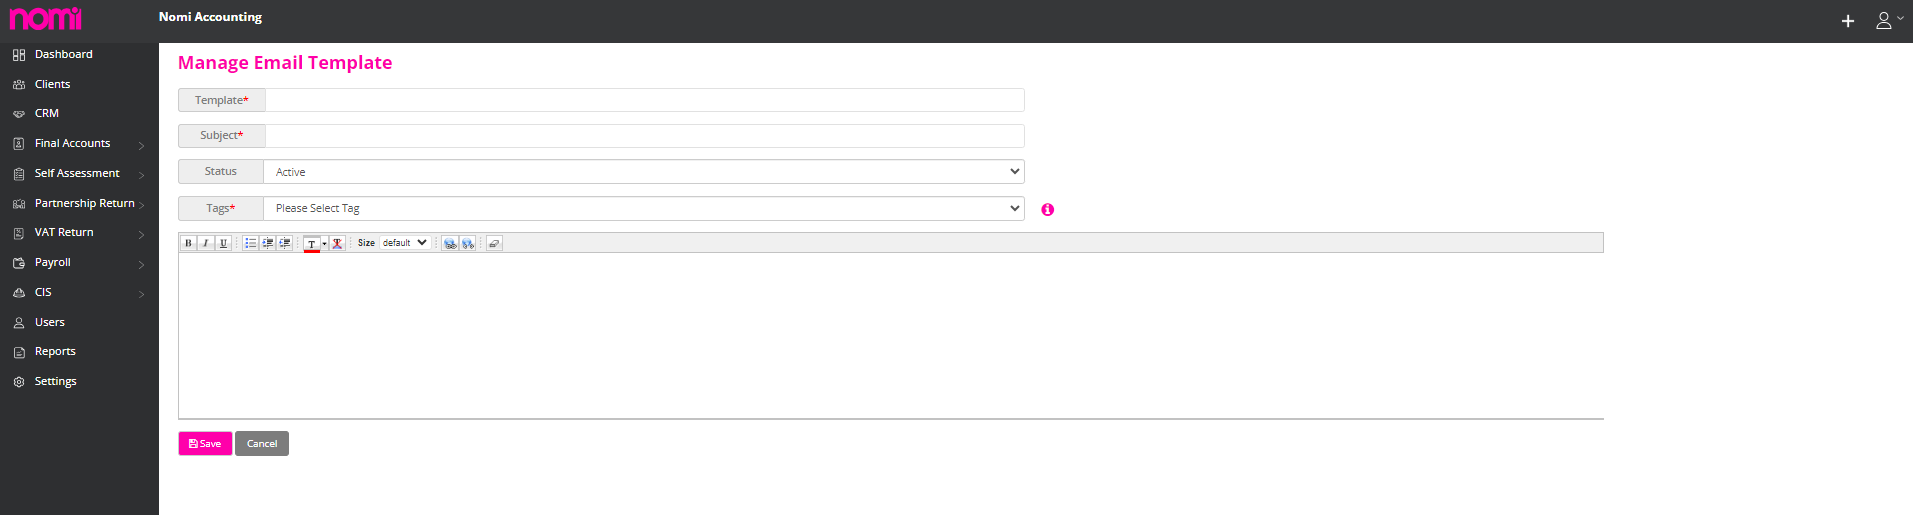
After this, you will have to update the email template using different Tags.
To Refresh HMRC Tokens you will have to navigate to Self-Assessment>>HMRC Data Setting>>Click on Refresh Tokens.
This will take you to the HMRC website where you have to follow the process of setting up the tokens again.
To add the Advisor Information you will have to navigate to Agent Hub>>Settings>>Advisor Info>>Agent Info.
Once you update the information it will fetch details such as Advisor’s name, Phone Number, Address Line 1, Address Line 2 and Postcode.
If you do not wish to include the Tax Advisor details with the submission then you have to navigate to Individual SA100 Dashboard>>Click on Others>>Tax Advisor Details.

On this tab, you have to click on edit in the top right corner and then tick the checkbox ‘Do not Include tax advisor details with submission’. This in turn will not include the Tax Advisor’s details on the personal tax Return of the Individual.
To send the Personal Tax return for E-sign to the customer you will have to click on ‘Communications’ on the left side of the vertical pane of the Self-Assessment record of the individual.
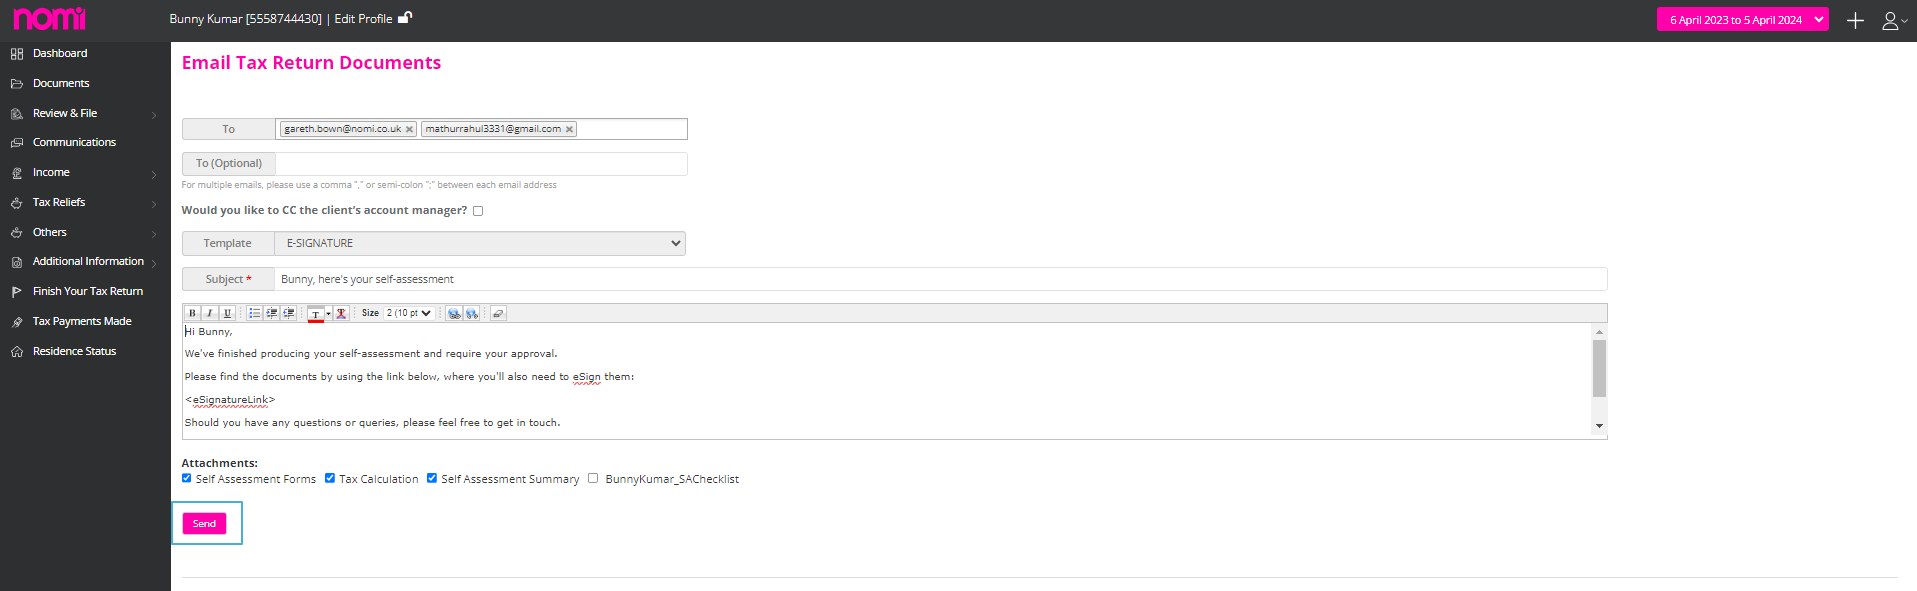
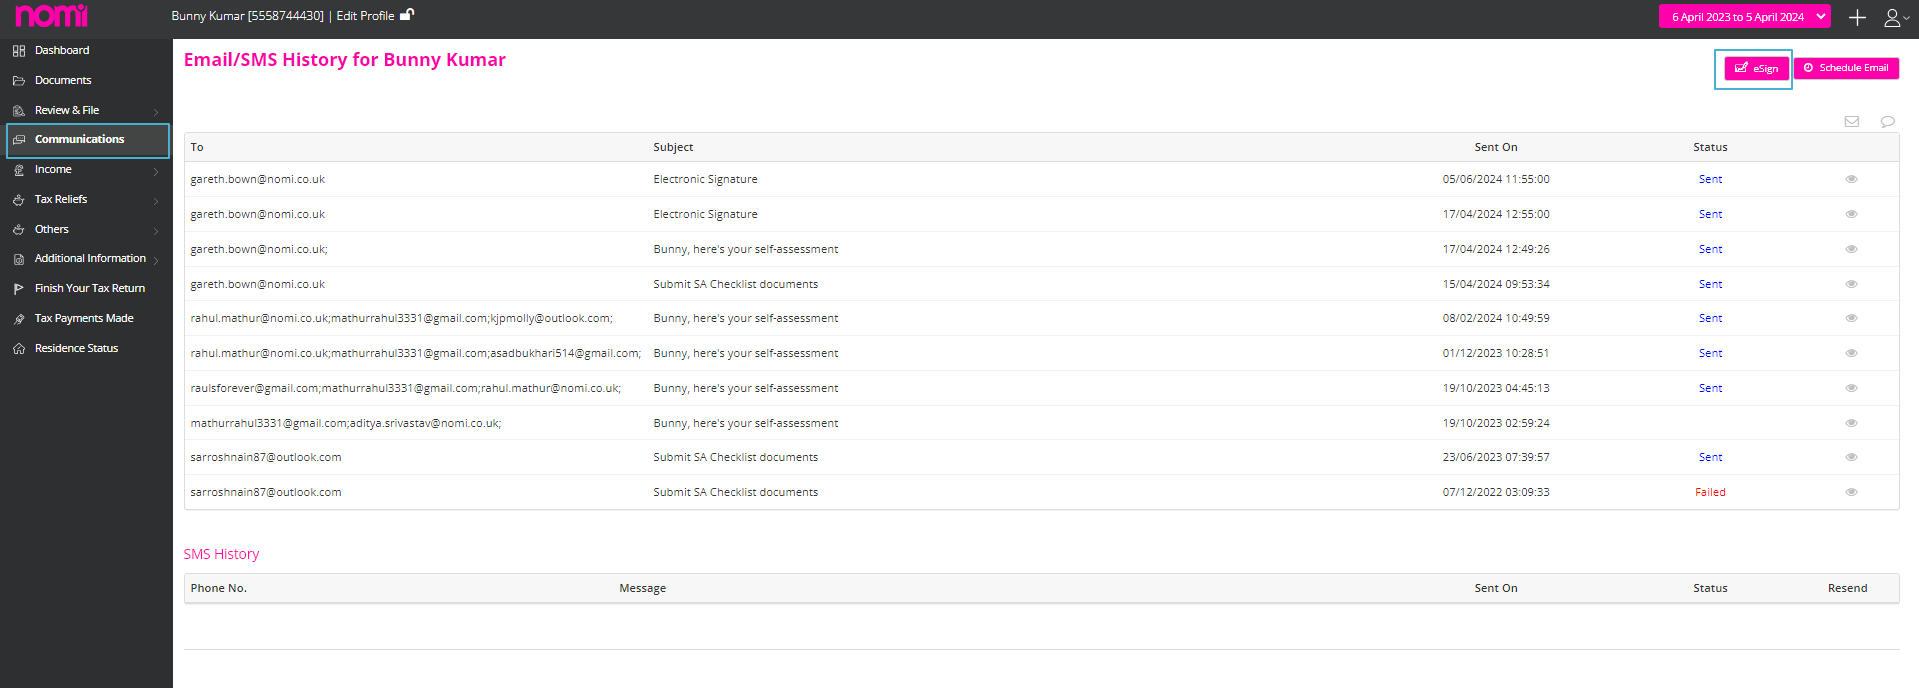
As you click on E-sign it will show a pop-up and there will be an email with a template that contains a link for E-sign. You can send this to the client and after that, they will receive an email and they can click on the link.
It will redirect them to a webpage where they can sign the document.
To submit the personal Tax Return you will have to navigate to Self-Assessment>>Client List>>Click on Individual record and then click on Review and File. This will give you the option of Submitting to HMRC.
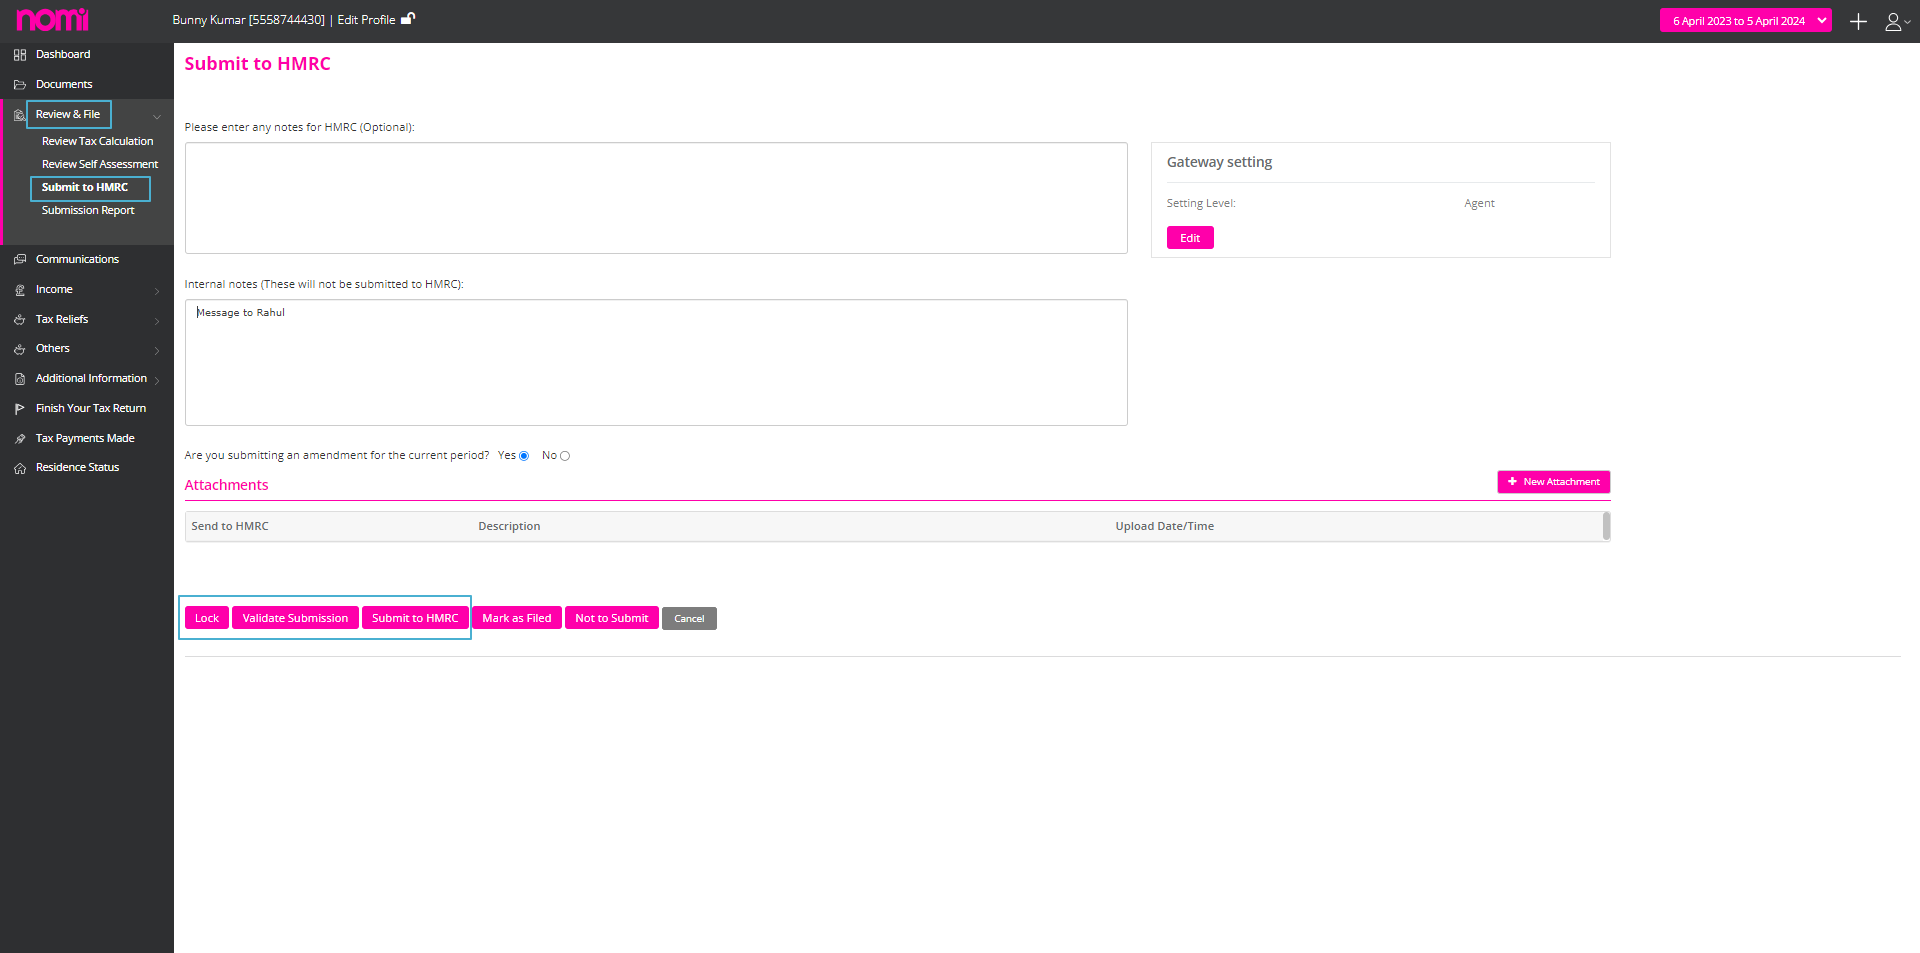
Here you have to click on Lock, and it will lock the Tax Return after this you cannot make any changes to the Tax Return. Now you have to click on Validate Submission, and this will make a test submission to HMRC and will also check for any errors. Once it is approved you can ‘Submit to HMRC’ and make the SA100 submission to HMRC.
To upload any documents with submission you will have to click on +New Attachment on the Submit to HMRC screen.
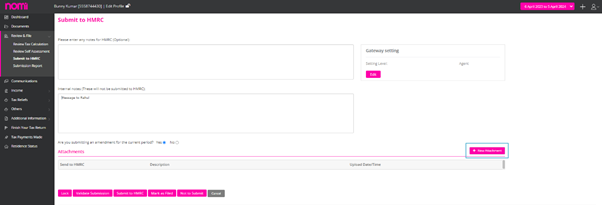
Up until the Tax year 2022-2023, every unincorporated business operates within its Accounting Period. According to HMRC, the Tax period spans from 6th April to 5th April the following year. During this period, starting from every 6th of April, we evaluate income and apply taxes accordingly. This established practice has been consistently followed to date.
However, the Sole Traders and Partners usually don’t follow the same tax year. They have accounting periods let’s say August 2021 to July 2022 which is different to Tax Year. In this case, the Income and Expenses related to the Accounting Period August 2021-July 2022 are reported directly into the Tax Return period of 2022-23. We do not apportion the Income and expenses from August 2021 to April 2022 and from April to July. From the 2024/25 tax year, HMRC’s basis period reform means all unincorporated businesses will use the UK tax year of 6 April to 5 April as their basis period for income tax assessment.
Before we proceed further, we have to be clear with the below key terms:
Overlap Profits: Overlap profits occur when someone who is registered as self-employed chooses to report their income and expenditure in the self-employment section of their tax return for an accounting period that is not the same as the tax year. These overlap profits will normally arise in their first 3 tax returns. To avoid double taxation, HMRC allows businesses to claim overlap relief. Overlap relief applies to profits that have been taxed more than once due to overlapping basis periods. This relief can be deducted from the taxable profits in the transition year.
If a sole trader chooses to draw up their income and expenditure for the accounting period that matches the tax year, then basis periods and overlap profits won’t arise.
Accounting Profits: Accounting profit, also known as net income or net profit, is the difference between a business’s total revenue and its total explicit costs over a specific period. Explicit costs include all direct costs associated with running the business, such as wages, rent, materials, and other operational expenses. These are related to a particular accounting period i.e. August 2022 to July 2023
Transition Profits: “Transition profits” in the context of HMRC (Her Majesty’s Revenue and Customs) refer to profits that are adjusted or re-evaluated during the transition from one accounting method or period to another. This often arises in the context of changes in tax rules, accounting standards, or business practices that necessitate a re-evaluation of previously reported profits.
One significant context where transition profits are relevant is the alignment of accounting periods for tax purposes, especially in light of changes to the basis period rules for unincorporated businesses. As of the latest changes, HMRC has implemented new rules to align the accounting periods of businesses more closely with the tax year, leading to the concept of “transition profits.”
Transition Year: The year in which the transition to the new rules takes place is known as the “transition year.” During this year, businesses might have to report profits for a period longer than 12 months or shorter as well. So, 2023-2024 is termed a Transition year and our transition profit after Overlap Relief will be spread over 5 years, starting with the tax year 2023 to 2024 and ending with the tax year 2027 to 2028.
Accounting Period: The accounting period for self-employed individuals under HMRC (Her Majesty’s Revenue and Customs) refers to the time frame for which a self-employed person prepares their accounts and reports their profits or losses. This period is essential for determining the income that needs to be reported for tax purposes.
Transition Period: The “transition period” as per HMRC, particularly in the context of the basis period reform for unincorporated businesses, refers to the time during which businesses adjust their accounting periods to align with the new tax year basis. This transition is part of HMRC’s efforts to simplify the tax system by ensuring that business profits are reported in line with the tax year (April 6 to April 5).
Basis Period: The basis period as per HMRC (Her Majesty’s Revenue and Customs) refers to the time frame for which self-employed individuals and partnerships calculate their taxable profits. It determines the period of income that should be reported for a specific tax year. To keep it simple, we can understand in this way that the Accounting Period + Transition Period is the basis period.
Transition Period Spread: The transition period spread refers to the option provided by HMRC for businesses to spread the taxable profits arising during the transition year over a specified period, typically up to five years. This helps businesses manage their tax liabilities more effectively during the shift to the new basis period rules.
Explanation with example
Let’s take an example and see how it fits into Nomi.
Test Case
1 Overlap Profits- £15000
Calculation: Accounting Profits+ (Transition Profits-Overlap Profits)
= 55000 + (40000-15000)
= 55000 + (25000)
= 55000 + 25000
= 80000
Here £25000 is the profit available for transition spread.
Now we will navigate to the Self-Assessment Full form in Nomi and enter the data.
To access the form, you will have to navigate to Agent Hub>>Self-Assessment>>Client List>>Click on Client Name>>Income (left vertical)>>Self Employment>>Click on + New Self Employment Full.
This will redirect you to the Self-Employment full form and then you can enter the data such as Business Name, Trade Description and Accounting Period Start and End Date.
Please note that this Accounting Period should be the one for which you have calculated the Accounting profit.
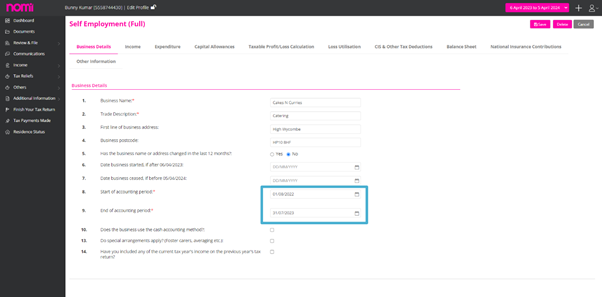
Then you have to enter the Income which includes the turnover or any other profits.
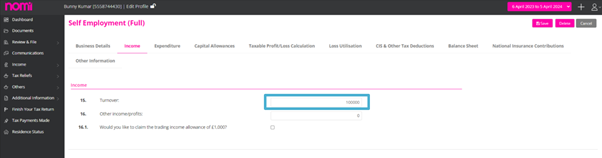
After this kindly record all the Expenses along with any Capital Allowances.
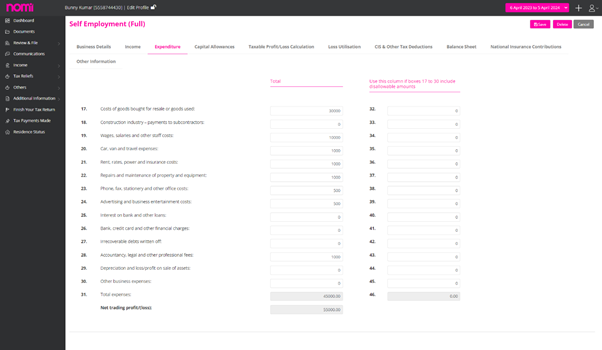
After recording all the Incomes and Expenses you will have to click on Taxable Profit/Loss Calculation. On this screen you will have to enter the Basis period start and end date under Box 66 and Box 67.
Then you can see Box No 73 where the Adjusted Profit value is showing up which is £55000. After this we have, the following boxes and we can enter the data accordingly:
Box 73.1-Box 73.2= Box 73.3.
Please note that these are manual calculations and not automatic.
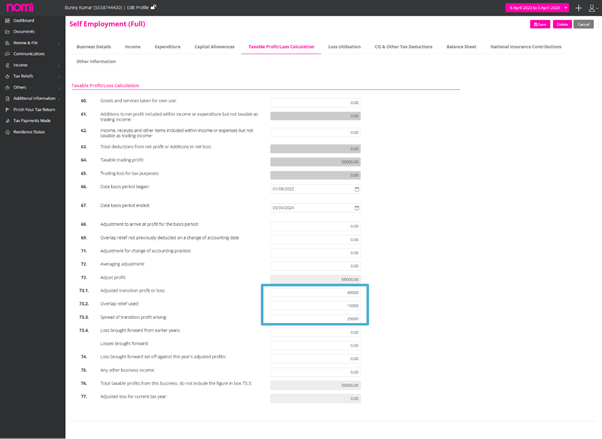
To check the tax implication, we have to review the Tax calculation summary. For this, we will navigate to Review & File>>Tax Calculation Summary.
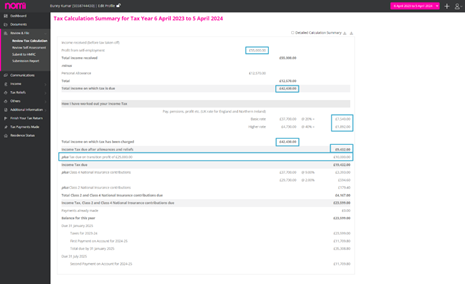
As you can see the tax is calculated on Profit from Self-Employment after deducting the Personal Allowance i.e. The Total income on which tax is due.
Then it also shows you a Tax due on transition profit i.e. £10000.
If we see the detailed calculation, then the net profit for tax purposes is £55000, however, for Class 4 NICs the total profits taken into consideration is £80000 which is the total taxable profit.
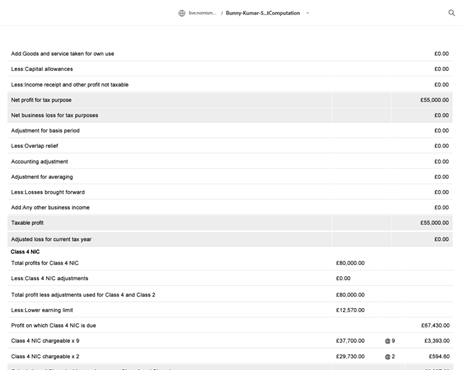
Note: For Partnerships, you will have to enter the values in boxes 16.1 (Transition profit or loss), 16.2 (Overlap relief), and 16.3 (Spread of transition profit treated as arising).
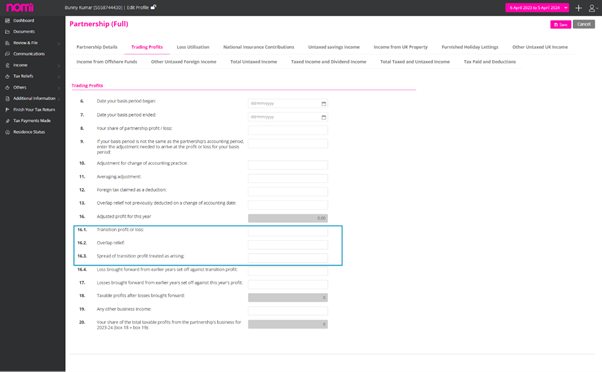
The Basis Period Reform is a positive step towards simplifying tax reporting for businesses. By aligning our accounting period with the tax year, the business can achieve greater clarity and consistency in the financial reporting.
The Self-Assessment mobile app is a bridge between clients and advisors that helps unlock hidden efficiencies within the Self-Assessment production process.
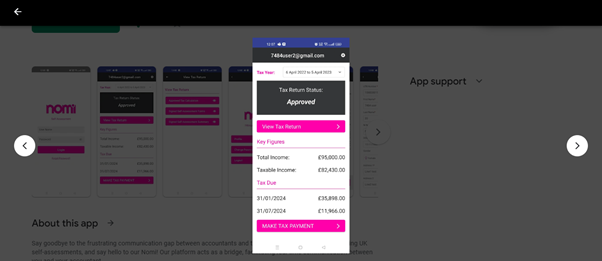
The app has eliminated all of the time-consuming processes such as email or SMS and has all the functionalities such as real-time notifications which will help you gather the necessary data needed on the go from the convenience of your mobile phone.
You can review the Tax Calculation generated from the submitted Tax Questionnaire by going to Review and File on the left-hand menu of the client’s Self-Assessment module.
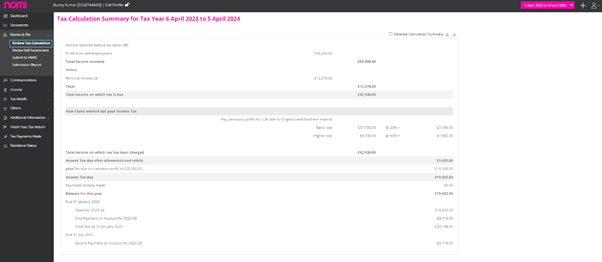
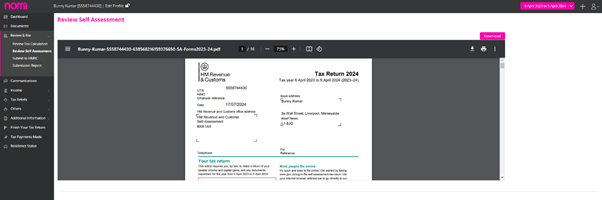
You will also be able to review the final Self-Assessment Tax Return (HMRC form) that is to be submitted by going to the same Review and File section and selecting the appropriate option.
The Tax Questionnaire comprises twenty-six questions covering every scenario and can unlock ‘hidden’ conversations such as tax saving opportunities or additional value-added work. It simply allows clients to answer the questions within the app which will then automatically import the answers back over to the web application and then populate the clients’ Self-Assessment. Some questions will only appear if yes has been marked for certain other questions.
The client will then have the option to upload any additional files at the end of the questionnaire before submitting. Files will be stored within the Documents section of the client’s Self-Assessment which can be reviewed by an advisor at any time. The client can then review the completed Tax Questionnaire by clicking on Review and Submit and then selecting Submit if all information is correct. Once successfully submitted, the Tax Return Status will then change to Questionnaire Submitted and the action button will change to Awaiting Advisor.
Once a client (business user) has been assigned to a Self-Assessment they will first need to check that all of the personal information is correct within the app.
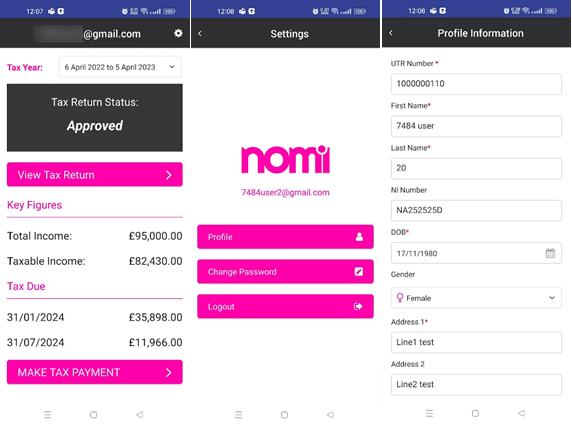
Click on the settings icon in the top right corner which will then take you to the Profile Information page where the client will be able to double-check and edit any details if necessary (this will then automatically update this information on the web application).
Go to the Agent Dashboard, select Users on the left-hand menu, click on the three dots to the right of the business user you wish to give access to their Self-Assessment and select Assign SA from the drop-down options.
Type in the name of the client you wish to assign the Self-Assessment to and then click Assign.
Send digital tax questionnaires to your clients to collect Self-Assessment data to digitally transfer them to your client’s Self-Assessment returns with the click of a button. Your client can submit the data using the mobile app or via a web browser.
You will be able to keep track of any questionnaires sent out to clients via the Self-Assessment table found on the Agent Self-Assessment dashboard, keeping track and showing the current status of all your clients’ Self-Assessments.
Go to Self-Assessment on the left-hand menu on the Agent dashboard and select Dashboard. Then click on the Send Tax Questionnaire Reminder button in the top right-hand corner.
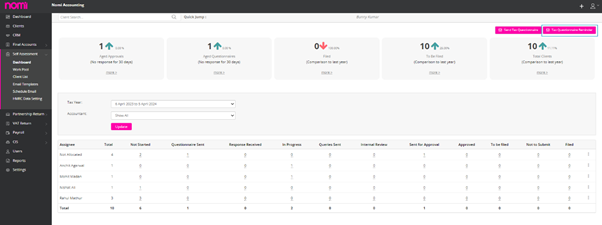
A pop-up page will then appear where you will then be able to select all or multiple different clients at one time that are present on the list.
Once you have selected your clients you will then be able to make any necessary adjustments to the email template that will be sent out with the Tax Questionnaire Reminder. Once you have double-checked that everything is correct you will need to click Next and then Send.
Go to Self-Assessment on the left-hand menu of the Agent Dashboard and select Client List. Then select which client you wish to send a Tax Questionnaire Reminder to by using the search bar and clicking Update.
Once you have located to client in question you will then need to click email (envelope icon) on the right-hand side. A pop will appear where you will have to make sure that the correct email address and Subject (Tax Questionnaire Reminder) have been selected (also make sure any email template you wish to have set for this specific type of email has been chosen). Once all the correct details and format has been chosen, click Send.
Self-assessment is integrated with Bookkeeping/Final Accounts/Payroll/Partnership Tax Return and you can also import data from Tax Questionnaires and Get Data from HMRC. The integration helps reduce the admin time and you can quickly complete all your tax returns.
Import Data from Questionnaire
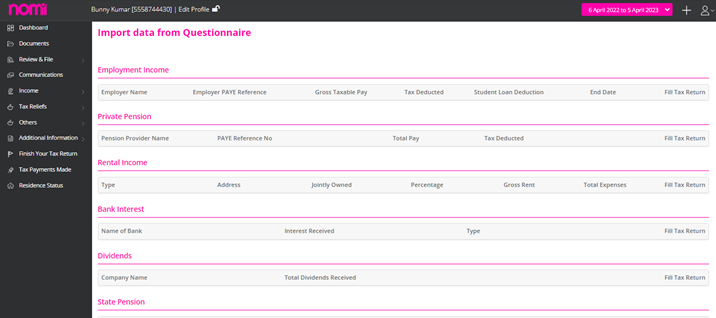
As discussed earlier you can send a Tax Questionnaire to your clients and once, they fill in the data and respond to the Tax questionnaire then you can import the data directly into the Tax Return of the individual. You will have to click on ‘Import data from Questionnaire’ and it takes you to the import data from questionnaire screen where you will find information updated by the individual and this can be imported to their tax return.
Get Data from HMRC
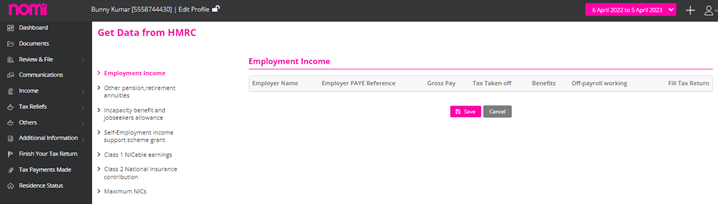
Integrated with HMRC the software helps you import data related to employment, pension, jobseekers’ allowance and NICs through ‘Get data from HMRC’.
Income: dividend linking with bookkeeping
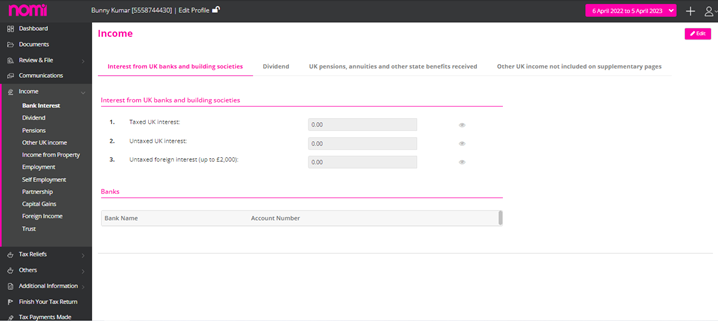
We can now start entering the information from the left panel by clicking on Income and then we can enter the data manually for Bank interest/Pensions and Other UK income.
The Dividend Income can be further linked with the Bookkeeping Module, and you can fetch the dividend information directly into the SA100. For this, you have to first issue a dividend under the Bookkeeping Module for the Director/Individual. Then you need to click on ‘Link Dividend’ and in the pop-up, you will see the name click on the link and all the data will be fetched from the bookkeeping module.
Income from property: Multiple property wizard
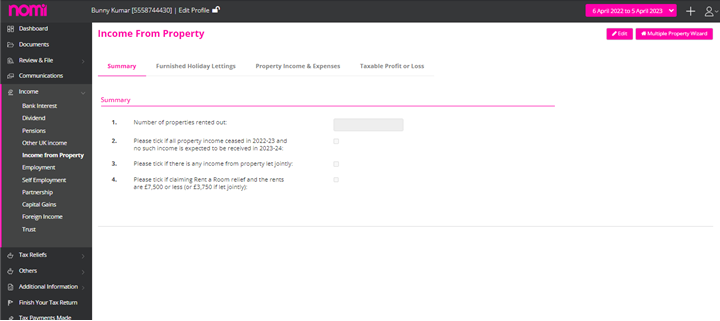
You can fill in the income related to property under this section. There are two ways to update the data, the first being entering the data on the summary screen. In case the individual has rental income from multiple properties then you can use the Multiple Property wizard and record the information for different properties. Later you can also check the Residential Finance Cost Computation in the Documents section.
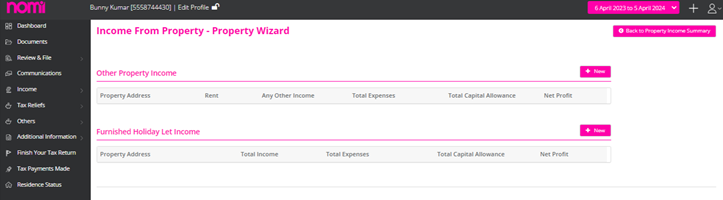
Employment
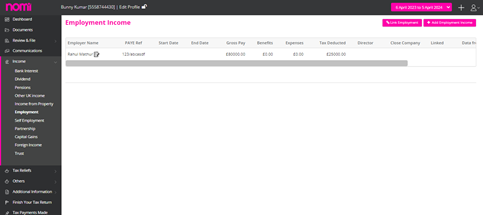
You can populate the data in the Employment section if the individual is in Employment with one or more than one employer. You can click on the link and a pop-up will appear where you can search for the individual if they are employed in any of the companies for whom you are processing the payroll in Nomi. In case they are employed in two different companies then the record will appear twice, and you can link the record with both employers.
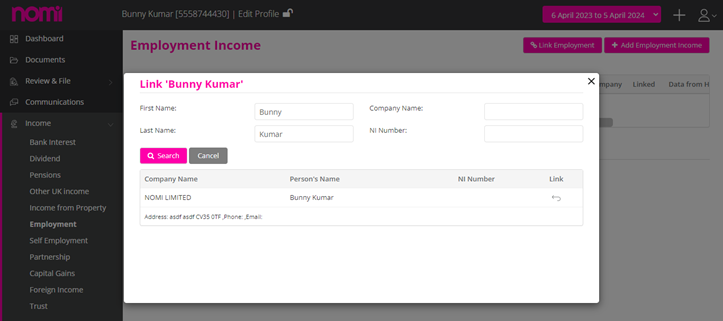
Apart from this, the data is also updated if you click on ‘Get Data from HMRC’ on the dashboard and if HMRC holds any information for the individual related to employment then you may fetch the same under the Employment Supplementary form. It also gets the data through the tax questionnaire if the individual has responded to that and updated their employment details. A manual option is also present, and we can add the data manually as well.
Self-Employment
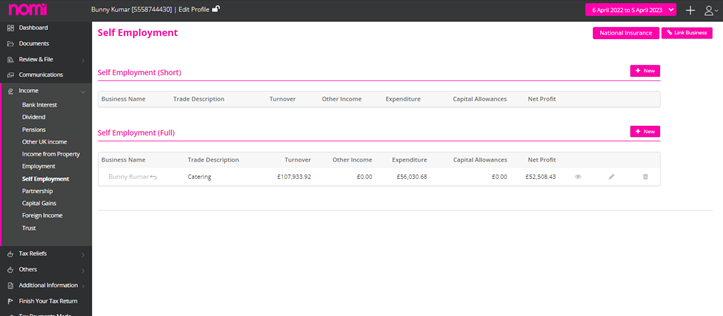
For Sole Trader Businesses we can record all the data in Final Accounts and then when we are preparing the SA100, it can be linked to the Self Employment form. This avoids duplication of data entry at various sections and saves a lot of admin time. After linking the information if you make any changes in the Final Accounts of the Sole Trader then it is updated on a Real-Time basis, and you don’t have to relink the Accounts.
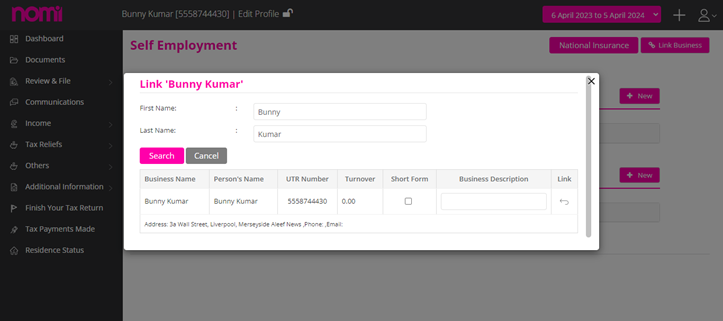
The data linking options are very useful for Accountants and help them in reducing the turnaround time on each tax record. It helps them automate everything and encourages them to file more tax returns and generate more business every year.
Partnership
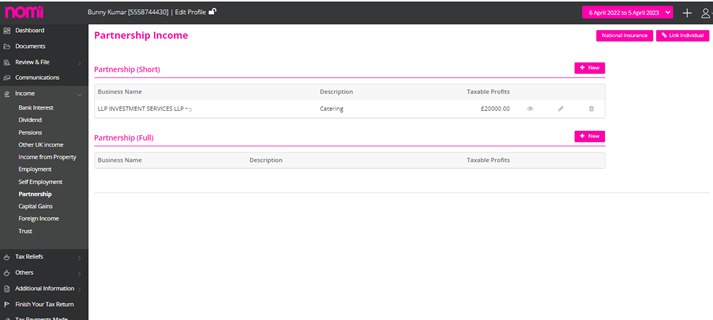
If the individual is a partner in any of the partnership firms for which you are filing an SA800 then all the information can be directly updated into a Partnership supplementary form. All you have to do is click on ‘Link Individual’ and in the pop-up it will show you the individual’s record and the partnership name.
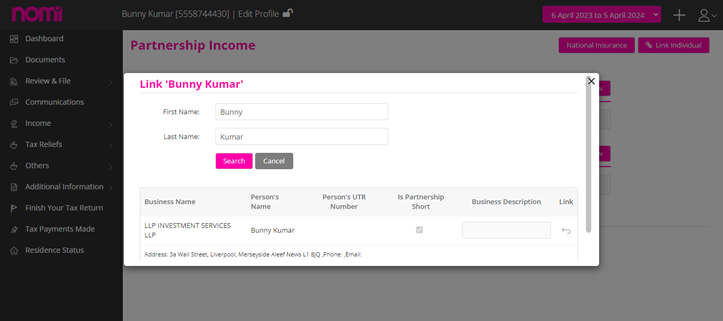
From your Agent screens, click on the + button in the top right-hand corner, select New Client and then choose the Self-Assessment option.
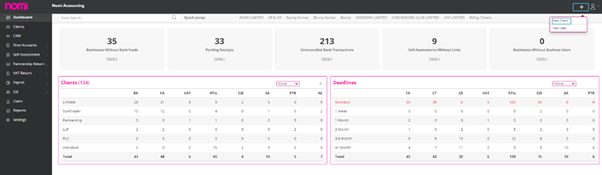
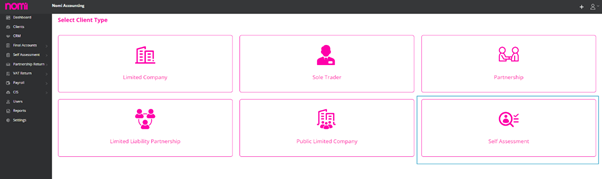
Either choose to manually add a new client or you can batch upload multiple clients by downloading the CSV template, populating it and then uploading via the choose file option.
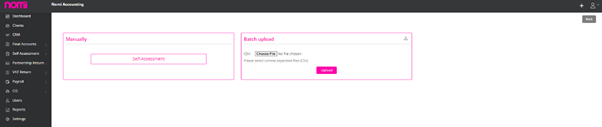
Once you have successfully added a client/s (either manually or batch upload) they will then appear within your clients list under the Service Type ‘Self-Assessment’.
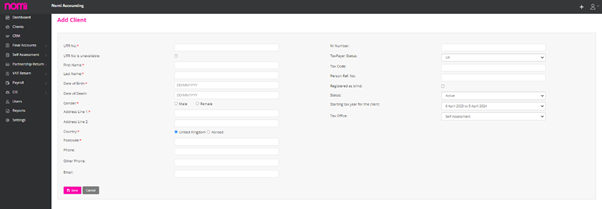
For further queries or more information, please get in touch. Let’s continue growing our Nomi community together!
We'd love to hear from you.